
User manual
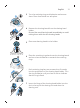
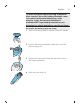
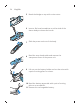
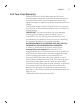
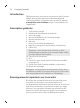
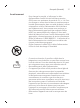
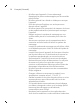
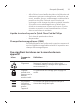
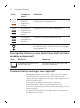
Table Of Contents
- Introduction
- General description
- Important safety information
- What do the icons on my appliance handle mean?
- What does the icon on my Quick Clean Pod mean? (specific models only)
- How do I charge my appliance?
- How do I use my appliance and the attachments?
- How do I clean my appliance and the attachments?
- How do I use the Quick Clean Pod? (specific models only)
- How do I replace the shaving heads?
- Ordering accessories
- Disposal
- Full Two-Year Warranty
- Introduction
- Description générale
- Renseignements importants sur la sécurité
- Que signifient les icônes sur le manche de mon appareil?
- Que signifie l’icône sur mon Quick Clean Pod? (certains modèles uniquement)
- Comment dois-je recharger mon appareil?
- Comment dois-je utiliser mon appareil et ses accessoires?
- Comment dois-je nettoyer mon appareil et ses accessoires?
- Comment dois-je utiliser le Quick Clean Pod? (Certains modèles uniquement)
- Comment dois-je remplacer les têtes de rasage?
- Commande d’accessoires
- Mise au rebut
- Garantie complète de deux ans

21
English
2
1
3
Turn the retaining rings anticlockwise and remove
them. Place them aside in a safe place.
4
Remove the shaving heads from the shaving head
holder.
Discard the used shaving heads immediately to avoid
mixing them with the new shaving heads.
5
Place new shaving heads in the holder.
2
1
6
Place the retaining rings back onto the shaving heads
and turn them clockwise to reattach the retaining
rings.
- Each retaining ring has two recesses that fit exactly
into the projections of the shaving head holder. Turn
the ring clockwise until your hear a click to indicate
that the ring is fixed.
7
Insert the hinge of the shaving head holder into the
slot in the top of the shaving unit and close the
shaving unit.