
User manual
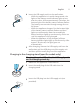
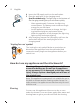
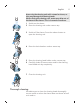
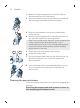
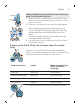
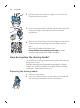
Table Of Contents
- Introduction
- General description
- Important safety information
- What do the icons on my appliance handle mean?
- What does the icon on my Quick Clean Pod mean? (specific models only)
- How do I charge my appliance?
- How do I use my appliance and the attachments?
- How do I clean my appliance and the attachments?
- How do I use the Quick Clean Pod? (specific models only)
- How do I replace the shaving heads?
- Ordering accessories
- Disposal
- Full Two-Year Warranty
- Introduction
- Description générale
- Renseignements importants sur la sécurité
- Que signifient les icônes sur le manche de mon appareil?
- Que signifie l’icône sur mon Quick Clean Pod? (certains modèles uniquement)
- Comment dois-je recharger mon appareil?
- Comment dois-je utiliser mon appareil et ses accessoires?
- Comment dois-je nettoyer mon appareil et ses accessoires?
- Comment dois-je utiliser le Quick Clean Pod? (Certains modèles uniquement)
- Comment dois-je remplacer les têtes de rasage?
- Commande d’accessoires
- Mise au rebut
- Garantie complète de deux ans

15
English
Never dry the shaving unit with a towel or tissue, as
this may damage the shaving heads.
While rinsing the shaving unit, water may drip out of
the base of the shaver. This is a normal occurrence.
1
Switch on the shaver.
2
Rinse the shaving unit under a warm tap.
3
Switch off the shaver. Press the release button to
open the shaving unit.
4
Rinse the hair chamber under a warm tap.
5
Rinse the shaving head holder under a warm tap.
6
Carefully shake off excess water and let the shaving
head holder air-dry completely.
7
Close the shaving unit.
Thorough cleaning
We advise you to clean the shaving heads thoroughly
once a month or when the shaver does not shave as well
as it used to.