
User manual

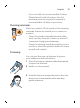
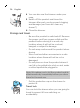
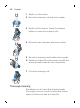
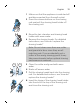
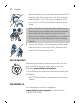
Table Of Contents
- Contents
- IMPORTANT SAFETY INSTRUCTIONS
- General description
- Introduction
- What do the icons on my product handle mean?
- How do I charge my product?
- How do I use my product?
- How do I clean my shaver?
- How do I replace the shaving heads?
- Accessories
- Assistance
- Disposal
- Full Two-Year Warranty
- 45-DAY MONEY-BACK GUARANTEE
- Contenido
- INSTRUCCIONES IMPORTANTES DE SEGURIDAD
- Información general
- Introducción
- ¿Qué significan los íconos que están en el mango del producto?
- ¿Cómo se carga el producto?
- ¿Cómo se usa el producto?
- ¿Cómo se limpia la afeitadora?
- ¿Cómo se reemplazan los cabezales de afeitado?
- Accesorios
- Asistencia
- Desecho
- Garantía Total de Dos Años
- GARANTÍA DE DEVOLUCIÓN DE SU DINERO POR 45 DÍAS

Cleaning the pop-up trimmer
Clean the trimmer after each use to prevent
clogging and damage.
Never dry the trimmer teeth with a towel or
tissue, as this may damage the trimmer teeth.
1 Make sure that the appliance is switched off
and disconnected from the wall socket.
2 Push the trimmer release slide down to
open the pop-up trimmer.
3 Switch on the appliance and rinse the pop-
up trimmer with warm water.
4 After cleaning, switch off the appliance.
5 Carefully shake off excess water and let the
pop-up trimmer air dry.
6 Close the trimmer.
Tip: For optimal performance, lubricate the
teeth of the pop-up trimmer with a drop of
mineral oil every six months (oil not included).
How do I replace the shaving heads?
For maximum shaving performance, replace
the shaving heads once a year. Replace
damaged shaving heads immediately.
Always replace the shaving heads with original
Philips Norelco shaving heads (see
'Accessories').
20
English