S5540 Tripleheader shaver BC
ENGLISH 4 ESPAÑOL 31 Congratulations on your purchase and welcome to Philips Norelco! To fully benefit from the support that Philips Norelco offers, register your product at www.norelco.com/register S5540 ¡Bienvenido a Philips Norelco y felicitaciones por su compra! Para utilizar los servicios de asistencia técnica de Philips Norelco, registre su producto en www.norelco.
ENGLISH IMPORTANT SAFETY INSTRUCTIONS When using an electric appliance, basic precautions should always be followed, including the following: Read all instructions before using this appliance. DANGER To reduce the risk of electric shock: 1. Do not reach for a corded shaver that has fallen into water. Unplug immediately. 2. Power plug is not for immersion or for use in shower. 3. Do not use an extension cord with this appliance. 4.
ENGLISH 5 3. Never operate this shaver if it has a damaged cord or charging plug, if it is not working properly, if it has been dropped or damaged, or dropped into water while plugged in. For assistance call 1-800-243-3050. 4. Keep the shaver, cord and charging plug away from heated surfaces. 5. Never drop or insert any object into any opening. 6. Do not use the adapter in or near a power outlet that contains an electric air freshener to prevent damage to the adapter. 7.
ENGLISH 45 - DAY MONEY-BACK GUARANTEE To enjoy the closest and most comfortable shave from your new Philips Norelco Men’s Shaver, the shaver should be used exclusively for 3 weeks. This allows your hair and skin enough time to adapt to the Philips Norelco Shaving System. If, after that period of time, you are not fully satisfied with your Philips Norelco Men’s Shaver, send the product back along with dated sales receipt and we’ll refund you the full purchase price.
ENGLISH Table of Contents Features............................................................. 8 LED Display....................................................10 Before First Use............................................12 Charging..........................................................12 Recharging......................................................14 Quick Charge................................................14 Put It To The Test & Shaving Tips...............
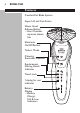
ENGLISH Features ComfortCut Blade System Super Lift and Cut Action Shaver Head Release Button • Hair Chamber captures shaven hair Electronic On/Off Button Turbo+ Mode Cleaning Reminder Indicator Replacement Shaving Heads Indicator Travel Lock ‘Unplug for use’ Indicator Battery Display • Battery Charge, Full & Low Indicators
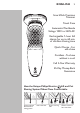
ENGLISH 9 SmartClick Precision Trimmer Travel Case Automatic Worldwide Voltage 100V to 240V AC Rechargeable 1-hour full charge for up to 60 min.
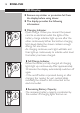
ENGLISH LED Display ◗ Remove any sticker or protective foil from the display before using shaver. ◗ The display provides the following information: ◗ Charging Indicator - Quick charge: When you connect the power cord to an electrical outlet the lights of the battery charge indicator light up one after the other continuously. When the bottom charging light slowly blinks, the shaver contains enough energy for one shave.
ENGLISH 11 ◗ Low Battery Indicator C - When the battery is almost empty (5 or less shaving minutes left), the bottom charging light blinks orange and you will hear a beep. For Use' Indicator C ◗The'Unplug 'unplug for use' symbol will blink to remind you the shaver is connected to the outlet. mode C ◗ThisTurbo+ setting allows quicker and more powerful shaving for easier removal of dense hair.
ENGLISH Lock C ◗TheTravel shaver is equipped with a travel lock function. You can use the travel lock function when you are going to store the shaver for a longer period or if you are going to take the shaver with you when traveling. See ‘Travel Lock’ section for instructions on how to use this function. Before First Use ◗ Charge the shaver before you start using it (see ‘Charging’). ◗ Remove any sticker or protective foil from the display before using shaver.
ENGLISH 13 ◗ This shaver will not operate corded directly from the electrical outlet. ◗ Do not charge the shaver in a pouch or travel case. C 1 Connect cord directly to shaver and connect the power plug into any 100V to 240V AC outlet. Use only the power cord provided. ◗ An adaptor plug may be necessary for power cord usage in some foreign countries. Use an attachment plug adaptor of the proper configuration for the power outlet.
ENGLISH Recharging 1 Recharging requires one full hour. Recharge when the display indicates the battery is almost empty. Quick Charge When batteries are empty, recharging the shaver for 5 minutes gives enough energy for one cordless shave. Put It To The Test & Shaving Tips ◗ 21 Day Trial and Conversion Process. It is a fact that your skin and beard need time to adjust to a new shaving system. ◗ Use your new shaver exclusively for 3 weeks to fully enjoy the closeness of a Philips Norelco shave.
ENGLISH 15 ◗ If you are still not convinced after 21 days, Philips Norelco will refund you the full purchase price as long as the request is received within 45 days of purchase. How To Shave With An Electric Shaver C ◗ This symbol on the shaver indicates that the shaver can be used in the bath or shower. ◗ Make sure the SmartClean System does not get wet or near water. ◗ For hygienic reasons, the shaver should only be used by one person.
ENGLISH 2 Stretch your skin with your free hand so blades can lift and cut whiskers. Gently press shaver to skin so the floating heads can follow the contours of your face. DO NOT press too hard. Too much pressure can pinch the skin into the combs. 3 Turn shaver OFF by pressing the on/off button once. 4 Clean the shaver after each use (see chapter ‘Cleaning’). 5 Place the shaver in the travel case for safe storage.
ENGLISH C C 17 3 Rinse the shaving unit under the tap to ensure that the shaving unit glides smoothly over your skin. 4 Press the on/off button once to switch on the shaver. 5 Move the shaving heads in circular movements over your skin. NOTE: Rinse the shaver under the tap regularly to ensure that it continues to glide smoothly over your skin. Dry your face and thoroughly clean the shaver after each use (see chapter ‘Cleaning’). NOTE: Make sure you rinse all foam or gel off the shaver.
ENGLISH Turbo+ Mode 1 Turn shaver ON by pressing the on/off button once. C 2 Press the Turbo+ button once if you want to shave areas of dense hair more quickly. C 3 Move the shaving heads over your skin in circular movements. 4 Turn off the Turbo+ mode by pressing the Turbo button once. Using the SmartClick Trimmer 1 Pull the shaving unit straight off the shaver. C NOTE: Do not turn the shaving unit while you pull it off the shaver.
ENGLISH C C C 19 3 Turn shaver ON. 4 Hold trimmer to exact hairline desired. Move trimmer downward with gentle pressure. 5 Trim beard, moustache or sideburns using the trimmer. 6 Turn shaver OFF when finished. 7 Thoroughly clean the trimmer (see ‘Cleaning’). 8 Pull the trimmer straight off the shaver. NOTE: Do not turn or twist the trimmer while you pull it off the shaver. 9 Insert the raised notch of the shaving unit into the slot in the top of the shaver.
ENGLISH Travel Lock If you are going to store the shaver for a longer time period or if traveling, it is possible to lock the shaver. The travel lock prevents the shaver from being switched on by accident. Activating the travel lock C 1 Press the ON/OFF button for 3 seconds. ◗ The travel lock symbol lights up continuously and the lock symbol blinks. 3 sec. 2 The travel lock has now been activated. Deactivating the travel lock C 1 Press the ON/OFF button for 3 seconds.
ENGLISH 21 Cleaning ◗ Always clean your shaver after each use. ◗ Regular cleaning guarantees better shaving results. ◗ Never remove or replace shaving unit while motor is on. ◗ Do not apply pressure to shaving head combs. Do not touch shaving heads with hard objects as this may dent or damage precision-made slotted combs. ◗ Do not use shaver if shaving head combs are damaged or broken. Facial injury may occur.
ENGLISH C C C 1 Turn the shaver ON by pressing the on/off button once. 2 For best results rinse the shaving unit by running under hot water for a few minutes. 3 Turn the shaver OFF. 4 Press the Shaver Head Release Button to open the shaving unit. 5 Rinse the hair chamber under the tap. 6 Rinse the shaving head holder under hot tap water for 30 seconds. BE CAREFUL TO TEST WATER FIRST SO AS NOT TO BURN OR SCALD HANDS.
ENGLISH 2 23 1 Turn shaver OFF. C 2 Press the shaver head release button and open the shaving unit. C 3 Pull the shaving head holder off the bottom part of the shaving unit. C 4 Turn the retaining ring counterclockwise (1) and lift it off the shaving head (2). 1 C C Remove one shaving head from the shaving head holder. Remove the cutter from the comb. Do not clean more than one cutter and comb at a time, since they are all matching sets.
ENGLISH C C C 1 2 7 After cleaning, place the cutter back into the comb with the cutter legs pointing downwards. Put the shaving head back into the shaving head holder. Make sure the projections of the shaving head fit exactly into the recesses on the shaving head holder. 8 Hold the shaving head holder in your hand and place the retaining ring on the shaving head holder (1). Turn clockwise (2) to reattach the retaining ring. Do not place the shaving head holder on a surface, as damage may occur.
ENGLISH 25 Cleaning the Trimmer Clean the trimmer after each use. C 1 Attach the trimmer to shaver. 2 Turn shaver ON. C 3 Rinse the trimmer under hot water. BUT BE CAREFUL TO TEST WATER FIRST SO AS NOT TO BURN OR SCALD HANDS. C 4 Turn the shaver OFF. Shake off excess water and allow trimmer to air dry thoroughly. Tip: For optimal trimmer performance, lubricate the trimmer teeth with one drop of mineral oil every 6 months.
ENGLISH 26 Replacement Shaving Heads Indication C ◗ The shaving unit symbol lights up continuously when the shaver is turned off to remind you to replace your shaving heads to obtain optimal shaving results. 2 C 1 Press the shaver head release button to open the shaving unit. C 2 Pull the shaving head holder off the bottom part of the shaving unit. C 3 Turn the retaining ring counterclockwise (1) and lift it off the shaving head (2).
ENGLISH C C 1 2 27 5 Place a new shaving head in the holder. Make sure the projections of the shaving head fit exactly into the recesses on the shaving head holder. Hold the shaving head holder in your hand and place the retaining ring on the shaving head holder (1). Turn clockwise (2) to reattach the retaining ring. Do not place the shaving head holder on a surface, as damage may occur. 6 7 Repeat this process for the other two cutters and combs.
ENGLISH Storage ◗ The shaver can be placed in the travel case for safe storage. w Be sure shaver is turned off. Remove cord from outlet before storing in a safe, dry location where it will not be crushed, banged, or subject to damage. w Do not wrap power cord around shaver when storing. w Store cord in a safe location where it will not be cut or damaged. w Do not place or store shaver where it can fall or be pulled into a tub or sink, water or other liquid while plugged in.
ENGLISH 29 Disposal Philips Norelco shaver contains a C w This rechargeable lithium-ion battery which must be disposed of properly. w Contact your local town or city officials for battery disposal information or call 1-800-822-8837 or www.call2recycle.org for battery drop-off locations. w Your product is designed and manufactured with high quality materials and components, which can be recycled and reused. For recycling information, please contact your local waste management facilities or visit www.
ENGLISH FULL TWO YEAR WARRANTY Philips North America LLC warrants this new product (except cutters and combs) against defects in materials or workmanship for a period of two years from the date of purchase, and agrees to repair or replace any defective product without charge.
ESPAÑOL 31 INSTRUCCIONES IMPORTANTES DE SEGURIDAD Cuando utilice un artefacto eléctrico, tome las precauciones básicas. Lea las instrucciones antes de utilizar este producto. PELIGRO Para reducir el riesgo de descarga eléctrica: 1. No intente tocar una afeitadora enchufada que haya caído al agua. Desenchúfelo inmediatamente. 2. E l enchufe de alimentación no deben sumergirse ni usarse en la ducha. 3. No utilice el artefacto con un cable de extensión. 4.
ESPAÑOL 1. El uso de este dispositivo debe estar bajo estricta supervisión cuando esté operado por niños, por personas con capacidades mentales, sensoriales o físicas limitas o por personas con discapacidades, o cuando se emplee en o cerca de estos. 2. Utilice esta afeitadora para el uso doméstico que se describe en este manual. No utilice accesorios que no estén recomendados por Philips North America LLC. 3.
ESPAÑOL 33 12. Para evitar dañar el cable, no lo enrolle alrededor de la afeitadora. 13. No intente abrir el artefacto para cambiar la batería. 14. Utilice únicamente el conector de alimentación y los accesorios suministrados con el artefacto. CONSERVE ESTAS INSTRUCCIONES IMPORTANTE: el conector de energía contiene un transformador. No lo sustituya por otro para evitar situaciones de riesgo.
ESPAÑOL Tabla de contenido Tabla de contenido Características...............................................35 Pantalla LED...................................................37 Antes del primer uso...................................39 Carga................................................................40 Recarga............................................................41 Carga rápida...................................................41 Prueba y consejos de afeitado...................
ESPAÑOL Características Tecnología DynamicFlex Functionamiento del sistema Super Lift & Cut Boton de liberación del cabezal de afeitado • Cámara de recolección de vello recoge el pelo afeitado Electrónico Botón de encendido/apagado Modo Turbo+ Recortadorio de limpieza Reemplazo Cabezales de afeitado Indicador Sistema de bloqueo 'Desenchufar para utilizar' Indicador Pantalla de la batería • Carga de batería, Indicadores Cargado y Bajo 35
ESPAÑOL Recortador de Precisión SmartClick Funda de viaje (S5570CC) Voltaje universal automático entre 100 y 240 V CA Se recarga en 1 hora.
ESPAÑOL 37 Pantalla LED ◗ Quite cualquier adhesivo o lámina protectora de la pantalla antes de usar la afeitadora. ◗ La pantalla proporciona la siguiente información: ◗ Indicador de carga - Carga rápida: Cuando se conecta el cable de alimentación a una toma de corriente eléctrica, las luces del indicador de carga de la batería de hasta uno después del otro continuamente. Cuando la luz de carga inferior parpadea lentamente, la afeitadora tiene suficiente energía para un afeitado.
ESPAÑOL ◗ Capacidad de carga disponible en la batería C - La cantidad de luces de carga encendidas indican la capacidad de carga disponible en la batería. ◗ Indicador de nivel bajo de batería C - Cuando la batería está casi vacía (5 minutos o menos de tiempo de afeitado), la luz de carga inferior parpadea de color naranja y se oye un pitido.
ESPAÑOL 39 de limpieza C ◗ParaRecordadorio conseguir un rendimiento óptimo de afeitado, recomendamos limpiar la afeitadora después de CADA uso. El grifo parpadeante le recordará que la unidad de afeitado debe limpiarse. Esto ocurre después de cada afeitado. para viajes C ◗LaBloqueo afeitadora está equipada con una función de sistema de bloqueo.
ESPAÑOL Carga ◗ La carga, recarga o el almacenamiento del producto a temperaturas inferiores a los 4,5°C (40°F) o superiores a los 35°C (95°F) reduce la vida útil de las baterías. ◗ La carga o recarga requiere una hora completa. ◗ Una afeitadora completamente cargada otorga un tiempo de afeitado de hasta 60 minutos. ◗ Puede recargar la afeitadora cuando la pantalla indique que la batería está casi vacía. ◗ Esta afeitadora no funciona si está enchufada directamente a la toma de corriente eléctrica.
ESPAÑOL 41 2 La pantalla de la afeitadora indicará que se está cargando. 3 La carga requiere una hora completa. Una afeitadora completamente cargada ofrece un tiempo de afeitado sin cable de hasta 60 minutos. Recarga 1 La recarga requiere una hora completa. Puede realizar la recargar cuando la pantalla indique que la batería está casi vacía. Carga rápida Cuando las baterías estén vacías, al cargar la afeitadora durante 5 minutos tendrá suficiente energía para un afeitado sin cable.
ESPAÑOL Prueba y consejos de afeitado ◗ Proceso de prueba y adaptación de 21 días. Es un hecho que la piel y la barba tardan algún tiempo en acostumbrarse al nuevo sistema de afeitado. ◗ Utilice su nueva afeitadora Philips Norelco durante 3 semanas para disfrutar completamente de un afeitado al ras. ◗ Es posible que al principio no obtenga el afeitado al ras que desea e incluso su piel puede irritarse levemente. Esto es normal, ya que la barba y la piel necesitan tiempo para acostumbrarse.
ESPAÑOL 43 Cómo usar una afeitadora eléctrica C ◗ Este símbolo indica que la afeitadora puede utilizarse en el baño o en la ducha. ◗ Asegúrese de que el sistema SmartClean no se moje ni que esté cerca del agua. ◗ Por razones de higiene, la afeitadora sólo debe ser utilizado por una sola persona. ◗ Utilice esta afeitadora para el uso doméstico que se describe en este manual.
ESPAÑOL 3 Pulse una vez el botón de encendido/ apagado para apagar la afeitadora. 4 Limpie la afeitadora después de cada uso (consulte el capítulo "Limpieza"). 5 La afeitadora puede colocarse en la funda de viaje para un almacenamiento seguro. Afeitado húmedo También puede utilizar la afeitadora sobre el rostro húmedo con espuma o gel de afeitar. C 1 Humedezca la piel. C 2 Aplique espuma o gel de afeitar sobre la piel.
ESPAÑOL C 5 45 Mueva los cabezales de afeitado sobre la piel con movimientos circulares. NOTA: enjuague regularmente la afeitadora con el agua del grifo para garantizar que se siga deslizando suavemente sobre la piel. Séquese la cara y limpie cuidadosamente la afeitadora después de cada uso (consulte el capítulo "Limpieza"). NOTA: asegúrese de eliminar todos los restos de espuma o gel de afeitar de la afeitadora cuando la enjuague.
ESPAÑOL C 3 Desplace los cabezales de afeitado sobre la piel, haciendo movimientos circulares. 4 Desactivar el modo turbo+ pulsando el botón turbo una vez. Uso del recortador SmartClick C C C Extraiga la unidad de afeitado de la afeitadora. NOTA: no gire la unidad de afeitado mientras la extrae de la afeitadora. 1 2 Inserte la muesca levantada del recortador SmartClick en la ranura de la parte superior de la afeitadora. Presione el recortador hacia abajo para fijarlo a la afeitadora.
ESPAÑOL 7 47 Limpie a fondo el recortador después de su uso (consulte el capítulo ‘Limpieza’). 8 Extraiga el recortador de la afeitadora. C NOTA: no gire ni tuerza la unidad de recorte mientras la extrae de la afeitadora. C 9 Inserte la muesca levantada de la unidad de afeitado en la ranura de la parte superior de la afeitadora. Presione la unidad de afeitado hacia abajo para fijarla a la afeitadora. Se oirá un ‘clic’.
ESPAÑOL Activación del sistema de bloqueo C 1 Pulse el botón de encendido/apagado durante 3 segundos. ◗ El símbolo del sistema de bloqueo se ilumina constantemente y parpadea el símbolo de bloqueo. 3 sec. 2 Se ha activado el sistema de bloqueo. Desactivación del sistema de bloqueo C 1 Pulse el botón de encendido/apagado durante 3 segundos. 2 El símbolo de bloqueo parpadea y, a continuación, se ilumina constantemente. La afeitadora ahora está lista para usarse.
ESPAÑOL 49 Limpieza ◗ Limpie siempre la afeitadora después de cada uso. ◗ La limpieza frecuente asegura mejores resultados en el afeitado. ◗ Nunca retire ni reemplace la unidad de afeitado con el motor en funcionamiento. ◗ No aplique presión a los peines del cabezal de afeitado. No toque los cabezales de afeitado con objetos duros, debido a que podría deformar o dañar los peines que cuentan con ranuras de precisión.
ESPAÑOL w La limpieza frecuente asegura mejores resultados en el afeitado. w Al enjuagar los cabezales de afeitado, es posible que salga agua por la base de la afeitadora. Esto es normal. C C C 1 Pulse el botón de encendido/apagado una vez para encender la afeitado. 2 Enjuague la unidad de afeitado bajo el agua caliente durante algunos minutos. 3 Apagado la afeitadora. 4 Pulse el botón de liberación del cabezal afeitadora para abrir la unidad de afeitado.
ESPAÑOL 51 7 Elimine cuidadosamente el exceso de agua y deje que el soporte del cabezal de afeitado se seque completamente al aire. 8 Cierre el soporte del cabezal de afeitado. Método de limpieza a fondo No mezcle las cuchillas y los peines, pues puede afectar el rendimiento del afeitado y pueden pasar varias semanas hasta que recupere el rendimiento óptimo. 1 Apague la afeitadora. C 2 Pulse el botón de liberación del cabezal afeitadora y abra la unidad de afeitado.
ESPAÑOL 52 2 C 4 1 C Gire el anillo de retención a la izquierda (1) y levántelo para sacarlo del cabezal de afeitado (2). Extraiga el cabezal de afeitado del soporte del cabezal de afeitado. Retire la cuchilla del peine. No limpie más de una cuchilla y su peine a la vez, ya que funcionan como un conjunto. Si accidentalmente coloca una cuchilla en el peine equivocado, tardará varias semanas en volver a lograr un desempeño óptimo del afeitado.
ESPAÑOL C 1 2 53 Sujetar el soporte del cabezal de afeitado en la mano y coloque el anillo de retención en el soporte del cabezal de afeitado (1). Gírelo hacia la derecha (2) para volver a colocar el anillo de retención. No coloque el soporte de cabezal de afeitado sobre una superficie, ya que esto puede causar daños. 9 10 Repita el proceso para los otros dos conjuntos de cuchillas y peines.
ESPAÑOL Limpieza del recortador Limpie el recortador después de cada uso. C 1 Coloque el recortador en la afeitadora. 2 Encienda la afeitadora. C 3 Enjuague el recortador con agua caliente. PRIMERO COMPRUEBE LA TEMPERATURA DEL AGUA PARA EVITAR QUEMADURAS EN LAS MANOS. C 4 Apague la afeitadora. Elimine el exceso de agua y deje que el recortador se sequen completamente al aire.
ESPAÑOL 55 Reemplazo de los cabezales de afeitado ◗ Reemplace los cabezales de afeitado una vez al año para obtener resultados óptimos de afeitado. w Reemplace los cabezales de afeitado dañados o desgastados solo con los cabezales para la afeitadora Philips Norelco modelo SH50.
ESPAÑOL 56 C 2 3 1 C C C 1 2 Gire el anillo de retención a la izquierda (1) y levántelo para sacarlo del cabezal de afeitado (2). Quite los cabezales de afeitado del soporte del cabezal de afeitado y deséchelos. NO DESECHE el anillo de retención. 4 Coloque el nuevo cabezal de afeitado en el soporte. Asegúrese de que las proyecciones del cabezal de afeitado encajen exactamente en los huecos sobre el soporte del cabezal de afeitado.
ESPAÑOL 7 57 Repita el proceso para los otros dos conjuntos de cuchillas y peines. Cada anillo de retencion tiene dos huecos C NOTA: y dos proyecciones que encaja exactamente en las proyecciones y huecos soporte del cabezal de afeitado. Asegurese de que se oye un 'clic' que indica el anillo de retencion se fija en su lugar. 7 sec. C 8 Vuelva a colocar la bisagra del soporte del cabezal de afeitado en la ranura de la unidad de afeitado. Cierre el soporte del cabezal de afeitado (clic).
ESPAÑOL Almacenamiento w La afeitadora puede colocarse en la funda de viaje para un almacenamiento seguro. w Asegúrese de que la afeitadora esté apagada. Desenchufe el cable de la toma de corriente antes de guardarla en un lugar seguro y seco, donde no se aplaste, golpee ni pueda sufrir daños. w No enrolle el cable de alimentación alrededor de la afeitadora cuando la guarde w Guarde el cable en un lugar seguro donde no sufra cortes ni daños.
ESPAÑOL 59 Eliminación afeitadora Philips Norelco contiene una C w Esta batería recargable de iones de litio que debe desecharse de manera adecuada. w Para obtener información sobre la forma de desechar las baterías, comuníquese con las autoridades locales, llame al número 1-800-822-8837 o visite el sitio web www.call2recycle.org. w Para obtener asistencia, visite nuestro sitio Web www.philips.com/support o comuníquese al número gratuito: 1-800-243-3050.
ESPAÑOL Accesorios C ◗ Reemplazo de los cabezales de afeitado Modelo SH50 - para obtener el máximo rendimiento de afeitado, reemplace los cabezales de la afeitadora Philips Norelco una vez al año.
ESPAÑOL 61 GARANTÍA TOTAL POR DOS AÑOS Philips North America LLC garantiza este producto nuevo (excepto cuchillas y peines) contra defectos en los materiales o en la mano de obra por un período de dos años desde la fecha de compra y acepta reparar o reemplazar cualquier producto defectuoso sin cargo.
www.philips.com 4222.002.7354.