
User manual

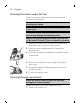
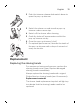
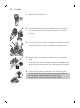
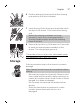


Table Of Contents
- IMPORTANT SAFETY INSTRUCTIONS
- Contents
- General description (Fig. 1)
- Introduction
- The display
- Charging
- Using the product
- Shaving
- Trimming
- Cleaning and maintenance
- Replacement
- Storage
- Accessories
- Assistance
- Disposal
- Full Two-Year Warranty
- 45-DAY MONEY-BACK GUARANTEE
- INSTRUCCIONES IMPORTANTES DE SEGURIDAD
- Contenido
- Descripción general (Fig. 1)
- Introduction
- La pantalla
- Carga
- Uso del producto
- Afeitado
- Recorte
- Limpieza y mantenimiento
- Sustitución
- Almacenamiento
- Accesorios
- Asistencia
- Desecho
- Garantía Total de Dos Años
- GARANTÍA DE DEVOLUCIÓN DE SU DINERO POR 45 DÍAS

1
2
6 Put the retaining frame back into the shaving
unit and turn the lock clockwise.
7 Insert the lug of the shaving unit into the slot in
the top of the shaver. Then close the shaving
unit.
Note:If the shaving unit does not close
smoothly, check if you have inserted the
shaving heads properly and if the retaining
frame is locked.
5 sec.5 sec.
8 Press and hold the on/off button for 5 seconds
to reset the replacement reminder on the
shaver. The orange light goes out.
This product has no other user-serviceable parts.
For assistance call 1-800-243-3050.
Storage
Put the protective cap on the shaver to prevent
damage.
Note: Always let the shaver dry completely before
storing.
- Be sure the product is turned off. Remove cord
from outlet and the product before storing it in
a safe, dry location where it will not be crushed,
banged, or subject to damage.
- Do not wrap cord around the product when
storing.
- Store cord and other accessories in a safe
location where these will not be cut or
damaged.
17
English