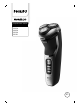
Tripleheader shaver S331X S321X S313X S311X BC
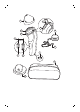
1 8 9 2 10 3 4 11 7 5 6 13 12
empty page before TOC
English 6 Español 26
English Contents IMPORTANT SAFETY INSTRUCTIONS______________________ General description (Fig.
English 7 - Do not place or store the product where it can fall or be pulled into a tub or sink. Do not place or drop the product into water or other liquid. - This product does not work while it is connected to the power outlet. Except when charging, always unplug this product from the power outlet. - Remove power cord from power outlet and product before cleaning.
English - Do not use product outdoors or operate where aerosol (spray) products are being used or where oxygen is being administered. - Always check shaving heads (guards and cutters) before using the product. Do not use the product if cutters or caps are damaged, as injury may occur. - Always attach power cord to product first, then to power outlet. - Plug power cord directly into power outlet. Do not use an extension cord. - Unplug power cord before plugging in or unplugging the product.
English 9 - If batteries are damaged or leaking, avoid contact with the skin or eyes. If this occurs, immediately rinse well with water and seek medical care. - When you handle batteries, make sure that your hands, the product and the batteries are dry. - To avoid accidental short-circuiting of batteries after removal, do not let battery terminals come into contact with metal objects (e.g. coins, hairpins, rings). Do not wrap batteries in aluminum foil.
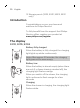
English 13 Storage pouch (S3112, S3211, S3212, S3311 only) Introduction Congratulations on your purchase and welcome to Philips Norelco! To fully benefit from the support that Philips Norelco offers, register your product at www.philips.com/register. The display S3112, S3115, S3134 Battery fully charged When the battery is fully charged, the charging light lights up white continuously. Note: After approx. 30 minutes, the charging light goes out to save energy.
English 11 S3210, S3211, S3212, S3311 Battery fully charged When the battery is fully charged, all charging lights light up white continuously. Note: After approx. 30 minutes, the charging lights go out to save energy. = Battery low When the battery is almost empty (when there are only 5 or fewer shaving minutes left), the bottom charging light starts to flash orange. When you switch off the shaver, the bottom charging light continues to flash orange for a few seconds.
English Charge the shaver before you use it for the first time and when the display indicates that the battery is almost empty. Charging takes approx. 1 hour. A fully charged shaver has a shaving time of up to 60 minutes. This shaver is suitable for use in the bath or shower. For safety reasons, it is therefore not possible to use the shaver while it is connected to the power outlet for charging. Note: Depending on your shaving/styling behavior and beard type, the operating time may vary over time.
English 13 2 Place the shaver in the stand in an upright position making sure charging contacts in the bottom of stand fit into recess in bottom of the shaver. - The display on the shaver will indicate the shaver is charging. 3 After charging, remove the shaver from the stand by lifting straight up. Do not tilt the shaver Note: An adapter plug may be necessary for cord usage in some foreign countries. Use an attachment plug adapter of the proper configuration for the power outlet.
English This symbol indicates that the shaver can be used in the bath or shower. - Use this shaver for its intended household use as described in this manual. - For hygienic reasons, the shaver should only be used by one person. - Trimming is easier when the skin and hair are dry. This product can only be used without a cord. This shaver is suitable for use in the bath or shower. For safety reasons, it is therefore not possible to use the shaver while it is connected to the power outlet for charging.
English 15 - Stick with it! If you alternate shaving methods during the adjustment period, it may make it more difficult to adapt to the Philips Norelco shaving system. - If you are still not convinced after 21 days, Philips Norelco will refund you the full purchase price as long as the request is received within 45 days of purchase. Switching the product on and off 1 Press the on/off button once to turn the shaver on or off.
English Note: Do not press too hard as too much pressure can cause shaving heads to pinch the skin. 4 After shaving, turn off the product. 5 Clean the shaver (see 'Cleaning and maintenance'). 6 Put the protective cap on the product to protect shaver heads during storage and travel. Wet shaving For a more refreshing shave, you can also use this shaver on a wet face with shaving foam or gel. 1 Apply some water to your skin. 2 Apply shaving foam or gel to your skin.
English 17 5 Move the shaving heads over your skin in circular movements to catch all hairs growing in different directions. Make sure each shaving head is fully in contact with the skin. Exert gentle pressure for a close, comfortable shave. Note: Do not press too hard, this can cause skin irritation. Note: Rinse the shaving unit regularly to ensure that it continues to glide smoothly over your skin. 6 Turn the shaver off and clean it after each use. 7 Dry your face.
English 1 Push the trimmer release slide downwards to open the trimmer. 2 Turn on the shaver. 3 Hold the trimmer perpendicular to the skin and move the product downwards, exerting gentle pressure. 4 Turn off and clean the trimmer after each use (see 'Cleaning the pop-up trimmer'). 5 Close the trimmer (‘click’). Cleaning and maintenance Regular cleaning guarantees better shaving results. Never clean, remove or replace the shaving unit while the shaver is switched on.
English 19 Always check if the water is too hot, to prevent burning your hands. While rinsing shaving heads, water may drip out of the base of shaver. This is a normal occurrence. Internal electric parts are in a waterproof compartment so the shaver will be protected against water damage. 1 Turn off the shaver, unplug from outlet and remove power cord from the product. 2 Press the unit release button to open the shaving unit. 3 Rinse the shaving unit and hair chamber with lukewarm water.
English 1 Turn off the shaver. 2 Push the trimmer release slide down to open the pop-up trimmer. 3 Turn on the shaver and rinse the pop-up trimmer under warm water. 4 Turn the shaver off after cleaning. 5 Carefully shake off excess water and let the pop-up trimmer air dry. 6 Close the pop-up trimmer (‘click’). 7 For optimal performance, lubricate the teeth of the pop-up trimmer with a drop of mineral oil every six months (oil not included).
English 2 1 21 3 Turn the lock counterclockwise (1) and remove the retaining frame (2). Place it aside in a safe place. 4 Remove the shaving heads from the shaving unit. Discard the used shaving heads immediately to avoid mixing them with the new shaving heads. 5 Place new shaving heads in the shaving unit. Note: Make sure that the shaving heads with the projections fit exactly onto the hooks of the shaving head holder when placing them.
English 7 Insert the hinge of the shaving unit into the slot in the top of the shaver. Then close the shaving unit. Note:If the shaving unit does not close smoothly, check if you have inserted the shaving heads properly and if the retaining frame is locked. This product has no other user-serviceable parts. For assistance call 1-800-243-3050. Storage Put the protection cap on the shaver to prevent damage.
English 23 Storage in pouch (S3112, S3211, S3212, S3311 only) - Store the product in the pouch supplied. - Make sure the product is dry before you store it in the pouch. Accessories Replacement parts and accessories may be purchased at a store near you or on our website www.philips.com/store. The following accessory is available: - SH30 Philips Norelco replacement blades. Assistance For assistance, visit our website: www.philips.com/support or call toll free 1-800-243-3050.
English - Your product is designed and manufactured with high quality materials and components, which can be recycled and reused. For recycling information, please contact your local waste management facilities or visit www.recycle.philips.
English 25 This warranty gives you specific legal rights, and you may also have other rights which vary from state to state. Some states do not allow the exclusion or limitation of incidental or consequential damages, so the above exclusion and limitations may not apply to you. *Read enclosed instructions carefully. 45-DAY MONEY-BACK GUARANTEE If you are not fully satisfied with your product send the product back and we’ll refund you the full purchase price.
Español Contenido INSTRUCCIONES IMPORTANTES DE SEGURIDAD_________ Descripción general (Fig.
Español 27 - No intente agarrar un producto con cable que haya caído al agua. Desconéctelo inmediatamente del enchufe de la pared. - Mantenga el cable de alimentación seco. - No coloque ni guarde el producto en un lugar desde donde pueda caerse a una bañera o fregadero. No coloque el producto en un lugar desde donde pueda caerse al agua o a cualquier otro líquido ni sumerja el producto en ningún tipo de líquido. - Este producto no funciona mientras está conectado al enchufe de pared.
Español - Nunca utilice este producto si el cable o el enchufe de carga están dañados, si no funciona correctamente, si se cayó, si está dañado o si se sumergió en agua mientras estaba conectado a la alimentación eléctrica. Para solicitar asistencia, comuníquese al 1-800-243-3050. - Mantenga el cable de alimentación lejos de superficies calientes. - No deje caer ni introduzca ningún objeto en ninguna abertura.
Español 29 - Use únicamente accesorios o productos consumibles originales de Philips. Use únicamente el cable de alimentación desmontable HQ8505. - Cargue, utilice y guarde el producto a una temperatura entre 40 °F / 4.5 °C y 95 °F / 35 °C. - Mantenga el producto y las baterías lejos del fuego y no los exponga a la luz solar directa ni a altas temperaturas.
Español CONSERVE ESTAS INSTRUCCIONES Descripción general (Fig.
Español 31 La pantalla S3112, S3115, S3134 Batería completamente cargada Cuando la batería está completa, la luz de carga permanece encendida en color blanco. Nota: Después de 30 minutos aproximadamente, la luz de carga se apaga para ahorrar energía. = Batería baja Cuando la batería está casi agotada (cuando quedan 5 minutos o menos de tiempo de afeitado) la luz de carga parpadea en naranja. Cuando apaga la afeitadora, la luz de carga parpadea en naranja de manera continua por unos pocos segundos.
Español = Batería baja Cuando la batería está casi agotada (cuando quedan 5 minutos o menos de tiempo de afeitado) la luz de carga inferior comienza a parpadear en naranja. Cuando apaga la afeitadora, la luz de carga inferior parpadea en naranja de manera continua por unos pocos segundos. Carga Cuando la afeitadora está cargándose, primero la luz inferior del indicador de carga de la batería parpadea, luego la segunda luz y así sucesivamente hasta que la afeitadora esté completamente cargada.
Español 33 Esta afeitadora es apta para su uso en el baño o la ducha. Por lo tanto, por motivos de seguridad, no es posible usar la afeitadora mientras está conectada al enchufe de pared para cargarse. Nota: Dependiendo del tipo de barba que tenga y del estilo que desee, el tiempo de funcionamiento puede variar con el tiempo. Carga con el cable de alimentación 2 1 1 Asegúrese de que el producto esté apagado.
Español 2 Coloque la rasuradora en la base en una posición vertical asegurándose de que los contactos de carga en la parte inferior de la base se ajusten al hueco en la base de la afeitadora. - La pantalla de la afeitadora indicará que se está cargando. 3 Después de cargar, quite la afeitadora de la base levantándola derecho hacia arriba. No incline la afeitadora Nota: Es posible que se requiera un enchufe adaptador para el uso del cable en algunos países extranjeros.
Español 35 Este símbolo indica que la afeitadora puede utilizarse en el baño o en la ducha. - Utilice esta afeitadora para el uso doméstico que se describe en este manual. - Por motivos de higiene, la afeitadora debe emplearse únicamente por una persona. - El recorte es más fácil cuando la piel y el vello están secos. Este producto solo se puede utilizar sin cable. Esta afeitadora es apta para su uso en el baño o la ducha.
Español - Sea perseverante. Si alterna entre métodos de afeitado durante el período de adaptación, será más difícil acostumbrarse al sistema de afeitado de Philips Norelco. - Si después de 21 días todavía no está satisfecho con los resultados, Philips Norelco le reembolsará el precio total de la compra, siempre que la solicitud de reembolso se reciba dentro de los 45 días posteriores a la compra.
Español 37 3 Estire bien la piel con su mano libre de manera que las navajas corten los vellos. Presione suavemente la afeitadora sobre la piel para que los cabezales sigan el contorno de la cara. Nota: No presione demasiado fuerte ya que una presión excesiva puede causar que los cabezales de afeitado pellizquen la piel. 4 Después de afeitarse, apague el producto. 5 Limpie la afeitadora (ver 'Limpieza y mantenimiento').
Español 3 Enjuague la unidad de afeitado con el agua de la llave para garantizar que se deslice suavemente sobre su piel. 4 Encienda la afeitadora. 5 Mueva los cabezales de afeitado sobre la piel con movimientos circulares para llegar a todos los vellos en las diferentes direcciones de crecimiento. Asegúrese de que cada unidad de afeitado esté siempre en contacto total con la piel. Ejerza una suave presión para una afeitada al ras y cómoda.
Español 39 Recorte Recortar con la cortadora emergente Puede usar la cortadora para recortar las patillas y el bigote. 1 Deslice el botón de apertura de la cortadora hacia abajo para abrirla. 2 Encienda la afeitadora. 3 Sostenga la cortadora perpendicular a la piel y mueva el producto hacia abajo. 4 Apague y limpie la cortadora después de usarla (ver 'Limpieza de la cortadora emergente'). 5 Cierre la cortadora (Limpieza de la cortadora ("clic").
Español No utilice agentes abrasivos ni líquidos agresivos como la gasolina o la acetona para limpiar la afeitadora. Limpieza de la afeitadora Limpie la afeitadora después de cada rasurada para un óptimo rendimiento del afeitado. Revise siempre si el agua no está muy caliente, para evitar quemarse las manos. Al enjuagar los cabezales de afeitado, es posible que salga agua por la base de la afeitadora. Esto es algo normal.
Español 41 Nunca seque la unidad de afeitado con una toalla o pañuelo desechable, ya que esto puede dañar los cabezales de afeitado. 5 Elimine cuidadosamente el exceso de agua y deje que la afeitadora se seque al aire. 6 Cierre la unidad de afeitado. Limpieza de la cortadora emergente Nunca seque el elemento de corte con una toalla o papel desechable, ya que esto puede dañar el dentado de recorte. Limpie la cortadora emergente después de cada uso. 1 Apague la afeitadora.
Español 7 Para obtener un rendimiento óptimo, lubrique los dientes de la cortadora emergente con una gota de aceite mineral cada seis meses (el aceite no está incluido). Sustitución Reemplazo de los cabezales de afeitado Para un rendimiento de afeitado óptimo, le aconsejamos que reemplace los cabezales de afeitado cada año.Reemplace los cabezales de afeitado dañados inmediatamente. Siempre reemplace los cabezales de afeitado con cabezales originales de Philips Norelco (ver 'Accesorios').
Español 43 5 Coloque los nuevos cabezales de afeitado en la unidad de afeitado. Nota: Asegúrese de que los salientes de los cabezales de afeitado encajen exactamente en los ganchos del sostenedor al colocarlos. Los cabezales de afeitado provistos con la afeitadora tienen ranuras o salientes. Ambos sistemas de afeitado son iguales. 1 2 6 Vuelva a colocar el sostenedor de retención en la unidad de afeitado (1) y gire a la derecha (2).
Español Almacenamiento Coloque la tapa de protección en la afeitadora para prevenir daños. Nota: Siempre deje secar la afeitadora completamente antes de guardarla o antes de cargarla en la base de carga. - Asegúrese de que el producto esté apagado. Retire el cable del enchufe y del producto antes de guardarlo. Guarde el producto en un lugar seguro y seco donde no pueda aplastarse, golpearse o dañarse. - No enrolle el cable alrededor del producto para guardarlo.
Español 45 Accesorios Puede adquirir los accesorios y partes de reemplazo en la tienda más cercana a su domicilio o a través de nuestro sitio web www.philips.com/store. El siguiente accesorio está disponible: - Navajas de repuesto SH30 Philips Norelco. Asistencia Para asistencia, visite nuestro sitio web: www.philips.com/support o llame al número gratuito 1-800-243-3050. La información en línea está disponible las 24 horas, los siete días de la semana.
Español - Su producto está diseñado y fabricado con materiales y componentes de alta calidad, que pueden ser reciclados y reusados. Para obtener información sobre reciclado, comuníquese con las oficinas locales de manejo de desechos o visite www.recycle. philips.
Español 47 las devoluciones del producto se realice por correo certificado con seguro pagado. Cualquier daño que ocurra durante el envío no será cubierto por esta garantía. NOTA: Philips Personal Health, una división de Philips North America LLC no extienden ninguna otra garantía, escrita ni oral. Esta garantía le proporciona derechos legales específicos; asimismo, es posible que goce de otros derechos que pueden variar de estado a estado.
Español El paquete del producto debe contar con matasellos que no supere los 45 días a partir de la fecha de compra. Philips se reserva el derecho a verificar el precio de compra del producto y limita los reembolsos al precio de venta minorista sugerido. Para obtener el servicio de la garantía de devolución del dinero, diríjase a www.PhilipsMoneyBack.com y siga el proceso sencillo de 3 pasos. La entrega del cheque de reembolso ocurrirá de 6 a 8 semanas después de la recepción del producto devuelto.
Empty page before back cover
Manufactured for: Philips Personal Health a division of Philips North America LLC P.O. Box 10313, Stamford, CT 06904 This symbol on the product’s nameplate means it is listed by Underwriters’ Laboratories, Inc. Norelco and Tripleheader are registered trademarks of Philips North America LLC. PHILIPS and Philips shield are registered trademarks of Koninklijke Philips N.V. ©2021 Philips North America LLC. All rights reserved. 3000.036.9525.