S1000
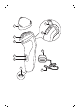
7 1 8 2 3 9 4 5 6 10
empty page before TOC
English 6 Français (Canada) 22
English Contents Introduction_______________________________________________________ General description (Fig.
English 7 Important safety information Read this important information carefully before you use the appliance and save it for future reference. Danger - Keep the supply unit dry. Warning - To charge the battery, only use the detachable supply unit (HQ8505) provided with the appliance. - The supply unit contains a transformer. Do not cut off the supply unit to replace it with another plug, as this causes a hazardous situation.
English Caution - This appliance contains batteries that are nonreplaceable. - Never immerse the charging stand in water and do not rinse it under the tap. - Never immerse the shaver in water. Do not use the shaver in the bath or in the shower. - Never use water hotter than 60°C to rinse the shaver. - Only use this appliance for its intended purpose as shown in the user manual. - For hygienic reasons, the appliance should only be used by one person.
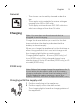
English 9 General - This shaver can be safely cleaned under the tap. - The supply unit is suitable for mains voltages ranging from 100 to 240 volts. - The supply unit transforms 100-240 volts to a safe low voltage of less than 24 volts. Charging Note: You can also use the shaver while it is plugged-in and charging. Charge the shaver before you use it for the first time and when the display indicates that the battery is almost empty.
English 3 After charging, remove the supply unit from the wall socket and pull the small plug out of the appliance. Charging indications Battery fully charged When the battery is fully charged, the charging light lights up white continuously. Note: After approx. 30 minutes, the charging light goes out to save energy. Battery low - When the battery is almost empty (when there are only 5 or fewer shaving minutes left), the charging light flashes orange.
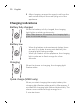
English 11 Using the appliance Note: This appliance can be used without cord or when it is connected to the wall socket. Shaving tips and tricks - Make circular movements during use. Circular movements provide better shaving results than straight movements. - Your skin may need 2 or 3 weeks to get accustomed to the Philips shaving system. Switching the appliance on and off 1 To switch on the appliance, press the on/off button once. 2 To switch off the appliance, press the on/off button once.
English 2 Move the shaving heads over your skin in circular movements to catch all hairs growing in different directions. 3 Stretch your skin with your free hand so the blades can lift and cut hair. Gently press the shaver onto you skin so the floating heads can follow the contours of your face. Note: Do not press too hard as too much pressure can cause shaving heads to pinch the skin. 4 Switch off and clean the appliance after each use.
English 13 5 Close the pop-up trimmer (‘click’). Cleaning and maintenance Cleaning the shaver Clean the shaver after every shave for optimal shaving performance. Caution: While rinsing shaving heads, water may drip out of the base of shaver. This is a normal occurrence. Internal electric parts are in a waterproof compartment so the shaver will be protected against water damage. 1 Switch off the appliance and make sure it is disconnected from the wall socket.
English Never dry the shaving unit with a towel or tissue, as this may damage the shaving heads. 5 Carefully shake off excess water and let the shaver air dry. 6 Close the shaving unit. Cleaning the pop-up trimmer Clean the pop-up trimmer after each use. Never dry the trimmer teeth with a towel or tissue, as this may damage the trimmer teeth. 1 Switch off the appliance and make sure it is disconnected from the wall socket. 2 Push the trimmer release slide button down to open the pop-up trimmer.
English 15 2 Press the release button to open the shaving unit. Pull the shaving unit off the appliance. 3 Turn the lock anticlockwise (1) and remove the retaining frame (2). 2 1 4 Remove and clean one shaving head at a time. Each shaving head consists of a cutter and a guard. Note: Do not clean more than one cutter and guard at a time, since they are all matching sets. If you accidentally mix up the cutters and guards, it may take several weeks before optimal shaving performance is restored.
English 7 Put the shaving heads back into the shaving unit. 8 Put the retaining frame back into the shaving unit (1) and turn the lock clockwise (2). 1 2 9 Insert the lug of the shaving unit into the slot in the top of the appliance. Then close the shaving unit ('click'). Note: If the shaving unit does not close smoothly, check if you have inserted the shaving heads properly and if the retaining frame is locked.
English 17 2 Press the shaving unit release button to open the shaving unit. Pull the shaving unit off the appliance. 3 Turn the lock anticlockwise (1) and remove the retaining frame (2). Place it aside in a safe place. 2 1 4 Remove the shaving heads from the shaving unit. Discard the used shaving heads immediately to avoid mixing them with the new shaving heads. 5 Place new shaving heads in the shaving unit.
English 6 Put the retaining frame back into the shaving unit (1) and turn the lock clockwise (2). 1 2 7 Insert the hinge of the shaving unit into the slot in the top of the shaver. Then close the shaving unit. Note: If the shaving unit does not close smoothly, check if you have inserted the shaving heads properly and if the retaining frame is locked. Storage Put the protective cap on the shaver to prevent damage. Note: Always let the shaver dry completely before storing.
English 19 - This product contains a built-in rechargeable battery which shall not be disposed of with normal household waste. Please take your product to an official collection point or a Philips service center to have a professional remove the rechargeable battery. - Follow your country’s rules for the separate collection of electrical and electronic products and rechargeable batteries. Correct disposal helps prevent negative consequences for the environment and human health.
English 2 Remove the screw in the back of the shaver. 3 Remove the back panel by using a flathead screwdriver. 2× 4 Remove two screws and then remove the hair chamber from the shaver. 5 Lift out the front panel.
English 21 6 Bend the eight snap hooks aside with a flathead screwdriver and remove the cover of the power unit. 8× 7 Lift out the power unit. 1 2× 2 8 Break the battery tags with a pair of cutting pliers. 9 Remove the two rechargeable batteries. Warranty and support If you need information or support, please visit www.philips.com/support or read the international warranty leaflet.
Français (Canada) Table des matières Introduction_______________________________________________________ Description générale (fig.
Français (Canada) 23 Renseignements importants sur la sécurité Lisez attentivement ces renseignements importants avant d'utiliser l'appareil et conservezles pour un usage ultérieur. Danger - Gardez le bloc d’alimentation au sec. Avertissement - Pour charger la batterie, utilisez uniquement le bloc d’alimentation détachable (HQ8505) fourni avec l’appareil. - Le bloc d’alimentation contient un transformateur.
Français (Canada) - Vérifiez toujours l’appareil avant utilisation. Afin d’éviter tout accident, n’utilisez pas l’appareil s’il est endommagé. Remplacez toujours une pièce endommagée par une pièce du même type. - N'ouvrez pas l'appareil pour remplacer la pile rechargeable. Attention - Cet appareil comprend des piles qui ne sont pas remplaçables. - Ne plongez jamais la base de recharge dans l'eau et ne la rincez pas sous le robinet. - Ne plongez jamais le rasoir dans l'eau.
Français (Canada) 25 relatifs à l'exposition aux champs électromagnétiques. Général - Ce rasoir peut être nettoyé à l'eau courante en tout sécurité. - L'appareil est conçu pour une tension secteur comprise entre 100 V et 240 V. - Le bloc d’alimentation transforme la tension de 100-240 volts en tension plus faible et plus sécuritaire de 24 volts. Charge en cours Remarque :Vous pouvez vous servir de l’appareil pendant qu’il est branché et en cours de charge.
Français (Canada) Chargement à l’aide du bloc d’alimentation 2 1 1 Insérez la petite fiche dans l’appareil. 2 Branchez l'adaptateur sur une prise murale. - Le voyant de charge indique l’état de charge de l’appareil. 3 Une fois la charge terminée, débranchez le bloc d’alimentation de la prise murale, puis retirez la petite fiche de l’appareil. Indicateur de charge Pile complètement chargée Le voyant de charge reste allumé en blanc lorsque la pile est entièrement chargée.
Français (Canada) 27 Charge rapide (modèle S1332 seulement) Lorsque vous commencez à charger la pile vide, le voyant de charge clignote rapidement en blanc. Après environ 5 minutes, le témoin de charge se met à clignoter lentement en blanc. Le rasoir contient maintenant suffisamment d’énergie pour une séance de rasage de 5 minutes. Utilisation de l’appareil Remarque : Cet appareil fonctionne sans fil ou lorsqu'il est branché sur une prise murale.
Français (Canada) 2 Faites glisser les têtes de rasage sur votre visage en effectuant des mouvements circulaires afin de couper les poils poussant dans différentes directions. 3 Tendez votre peau avec votre main libre afin que les lames puissent relever et couper les poils. Pressez doucement le rasoir sur la peau afin que les têtes flottantes puissent suivre les contours de votre visage. Remarque :N’exercez pas une pression trop forte, car les têtes de rasage pourraient vous pincer la peau.
Français (Canada) 29 1 Ouvrez la tondeuse en poussant la glissière de libération vers le bas. 2 Allumez l'appareil. 3 Maintenez la tondeuse perpendiculairement à la peau et déplacez l’appareil vers le bas tout en exerçant une légère pression. 4 Éteignez et nettoyez la tondeuse après chaque utilisation. 5 Fermez la tondeuse rétractable (vous entendrez un déclic). Nettoyage et entretien Nettoyage du rasoir Nettoyez votre rasoir après chaque rasage pour un rasage optimal.
Français (Canada) 2 Appuyez sur le bouton de libération pour ouvrir l'unité de rasage. 3 Rincez l’unité de rasage et le compartiment à poils à l’eau tiède. 4 Rincez l’extérieur de l’unité de rasage à l’eau tiède. Ne séchez jamais l'unité de rasage à l'aide d'une serviette au risque d'endommager les têtes de rasage. 5 Enlevez soigneusement l’excédent d’eau et laissez sécher le rasoir. 6 Fermez l’unité de rasage.
Français (Canada) 31 3 Allumez l’appareil et rincez la tondeuse rétractable à l’eau tiède. 4 Après le nettoyage, éteignez l'appareil. 5 Secouez doucement l’appareil pour éliminer l’eau restante et laissez la tondeuse rétractable sécher à l’air libre. 6 Fermez la tondeuse rétractable (vous entendrez un déclic). Suggestion : Pour obtenir un rendement optimal, lubrifiez les dents de la tondeuse rétractable avec une goutte d’huile minérale tous les six mois (huile non incluse).
Français (Canada) rasage, plusieurs semaines peuvent être nécessaires avant de retrouver un rasage optimal. 5. Retirez la lame du dresse-poils et nettoyez les deux pièces à l'eau courante. 6. Replacez la lame dans la grille. 7. Remettez les têtes de rasage dans l’unité de rasage. 1 2 8. Remettez le système de fixation dans l’unité de rasage (1) et tournez le verrou dans le sens horaire (2).
Français (Canada) 33 9. Insérez la charnière de l’unité de rasage dans la fente située sur la partie supérieure du rasoir. Fermez ensuite l’unité de rasage. Remarque :Si l'unité de rasage se ferme mal, assurez-vous que vous avez bien inséré les têtes du rasoir et que le système de fixation est verrouillé. Remplacement Remplacement des têtes de rasage Pour une performance optimale, nous vous recommandons de remplacer les têtes de rasage tous les deux ans.
Français (Canada) 4 Retirez les têtes de rasage de l’unité de rasage. Mettez immédiatement au rebut les têtes de rasage utilisées pour éviter de les mélanger avec les nouvelles têtes de rasage. 5 Insérez les nouvelles têtes de rasoir dans l’unité de rasage. Remarque :Assurez-vous que les têtes de rasage avec les parties saillantes s’adaptent exactement sur les fermoirs du support des têtes de rasage lorsque vous les mettez en place.
Français (Canada) 35 Rangement Mettez le couvercle de protection sur le rasoir pour éviter les dégâts. Remarque : Avant de ranger le rasoir, laissez-le toujours sécher complètement. Commande d’accessoires Visitez le site www.philips.com/parts-andaccessories ou rendez-vous chez votre détaillant Philips pour acheter des accessoires ou pièces détachées.
Français (Canada) Pour retirer la pile rechargeable du rasoir Ne retirez les piles rechargeables que lorsque vous mettez l’appareil au rebut. Avant de retirer les piles, vérifiez que l’appareil est débranché de la prise de courant et que les piles sont complètement déchargées. Prenez toutes les précautions nécessaires lorsque vous manipulez des outils pour ouvrir l’appareil et lorsque vous jetez la pile. Soyez prudent, car les languettes de la pile sont coupantes.
Français (Canada) 37 2× 4 Retirez deux vis, puis retirez le compartiment à poils. 5 Soulevez la plaque avant. 6 Pliez les huit fermoirs de côté à l’aide d’un tournevis à tête plate et retirez le couvercle du bloc d’alimentation. 8× 7 Soulevez le bloc d’alimentation.
Français (Canada) 1 2× 2 8 Brisez les fils de la pile à l’aide de pinces coupantes. 9 Retirez les deux piles rechargeables. Garantie et support Si vous avez besoin de plus d’information ou de support visitez www.philips.com/support ou liser la brochure de Garantie international. Restrictions de garantie Sujettes à l’usure, les têtes de rasoir (lames et grilles) ne sont pas couvertes par la garantie internationale.
Empty page before back cover
© 2019 Koninklijke Philips N.V. All rights reserved Tous droits réservés 3000.041.7423.