
User manual
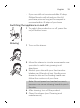
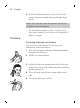
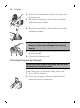
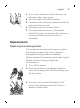
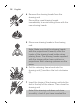
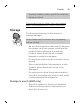
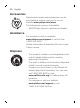
Table Of Contents
- Contents
- IMPORTANT SAFETY INSTRUCTIONS
- General description (Fig. 1)
- Introduction
- Charging
- Charge indicator
- Using the product
- Cleaning and maintenance
- Replacement
- Storage
- Accessories
- Assistance
- Disposal
- Full Two-Year Warranty
- 45-DAY MONEY-BACK GUARANTEE
- Contenido
- INSTRUCCIONES IMPORTANTES DE SEGURIDAD
- Descripción general (Fig. 1)
- Introducción
- Carga
- Indicador de carga
- Uso del producto
- Limpieza y mantenimiento
- Sustitución
- Almacenamiento
- Accesorios
- Asistencia
- Desecho
- Garantía Total de Dos Años
- GARANTÍA DE DEVOLUCIÓN DE SU DINERO POR 45 DÍAS

17
English
3 Turn on the shaver and rinse the pop-up
trimmer under warm water.
4 Turn the shaver off after cleaning.
5 Carefully shake off excess water and let the
pop-up trimmer air dry.
6 Close the pop-up trimmer (‘click’).
7 For optimal performance, lubricate the
teeth of the pop-up trimmer with a drop of
mineral oil every six months (oil not
included).
Replacement
Replacing the shaving heads
For maximum shaving performance, replace
the shaving heads once a year. Replace
damaged shaving heads immediately.
Always replace the shaving heads with original
Philips Norelco shaving heads (see
'Accessories').
1 Turn off the shaver.
2 Press the shaving unit release button to
open the shaving unit. Pull the shaving unit
off the shaver.
2
1
3 Turn the lock counterclockwise (1) and
remove the retaining frame (2). Place it
aside in a safe place.