
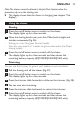
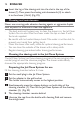
User manual
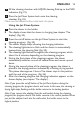
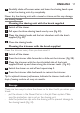
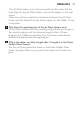

5 FillthecleaningchamberwithHQ200cleaninguiduptotheMAX
indication (Fig. 31).
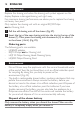
6 Place the Jet Clean System back onto the cleaning
chamber (Fig. 32).
Make sure the release buttons click back into place.
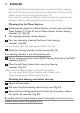
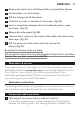
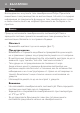
1 Place the shaver in the holder.
The display shows that the shaver is charging (see chapter ‘The
display’) (Fig. 33).
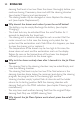
2 Press the on/off button on the Jet Clean System to start the
cleaning program. (Fig. 34)
The shaver display stops showing the charging indication.
Thecleaninglightstartstoashandtheshaverisautomatically
loweredintothecleaninguid(Fig.35).
Thecleaninglightashesthroughoutthecleaningprogram,which
takes 4 to 6 minutes, depending on the cleaning program.
Duringtherstphaseofthecleaningprogram,theshaver
automatically switches on and off several times and moves up and
down.
During the second phase of the cleaning program, the shaver is
placedinthedryingposition,indicatedbyaashingdryingsymbol.
This phase takes approx. 2 hours. The shaver stays in this position
until the end of the program. (Fig. 36)
Afterthecleaningprogram,thechargingindicationappearsonthe
shaver display (see chapter ‘The display’).
Note: If you press the on/off button of the Jet Clean System during the
cleaning program, the program aborts and resets. In this case, the cleaning or
drying light stops ashing and the holder returns to its starting position.
Note: If you remove the adapter from the wall socket during the cleaning
program, the program aborts. The holder remains in its current position. When
you put the adapter back into the wall socket, the holder moves to the
highest position.
,
,
,
,
,
,
,
ENGLISH 15