RC9800i Touch Screen Remote Control User Manual © Copyright 2004 Royal Philips Electronics, Interleuvenlaan 72 - 74, 3000 Leuven (Belgium). Remark: User Manual 1 All rights are reserved. Reproduction in whole or in part is prohibited without prior consent of the copyright owner. Royal Philips Electronics is not liable for omissions or for technical or editorial errors in this manual or for damages directly or indirectly resulting from the use of the RC9800i Touch Screen Remote Control.
Important Information ■ ■ ■ ■ Please read this guide carefully before using the RC9800i. Keep it for future reference. Install and connect the RC9800i Touch Screen Remote Control only in the order described in this manual. This ensures optimal installation results. You must set up your RC9800i before you can actually use it to control other devices.
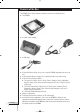
Contents of the Box The RC9800i Touch Screen Remote Control box contains the following items: ■ The RC9800i; ■ A cradle and an adapter; ■ A USB cable; ■ A User Manual that helps you to start using the RC9800i and getting the most out of it; A Quick Start Guide that supports you in getting the device up and running; A CD with the following contents: ■ This manual in English, Finnish, Dutch, French, Swedish, Danish, Norwegian, German, Greek, Italian, Spanish and Portuguese (in US only in English, Spanis
Contents Pick Up Your RC9800i and Take a Good Look On and Off First-Time Power On Everyday Use The Touch Screen The Hard Keys The Network Activity Indicator Charging the RC9800i The Cradle as Digital Music Media Adapter The USB Connector User Manual 4 6 6 6 6 7 7 8 8 8 9 Learning the Basics Controlling Legacy Audio/Video Devices What You Should Know About Home Networking Home Networking and Connected Devices Wireless Connectivity What You Should Know About Activity-Based Control Watch Activities Listen A
Contents Playing Games Listening to a CD Listening to a DVD Listening to Broadcast Radio Listening to Cable Radio Listening to Satellite Radio Listening to Audio Files From Your PC via the Audio System Listening to MP3 Files From Your PC via the RC9800i Synchronization Wizard Individual Device Control “Device Off”, “Activity Off” and “Room Off” User Manual 5 36 36 37 37 37 37 38 38 39 40 41 Adjusting the Settings Accessing the Settings RC9800i Setup Power Settings Screen Settings Network Settings Audio
Pick Up Your RC9800i and Take a Good Look Congratulations on the purchase of your new RC9800i Touch Screen Remote Control! This device is a “must have” if you want to enjoy a real state-of-the-art home entertainment experience. You will see that using the RC9800i is very easy. Before going into details, let’s first have a look at the RC9800i itself. In this chapter you will get acquainted with the various elements of the RC9800i.
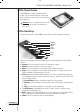
Pick Up Your RC9800i and Take a Good Look ■ The Touch Screen The RC9800i has a landscape-oriented touch screen. You can operate the touch screen either with your fingers or with a small stylus-like object with a blunt tip. Attention! Never use a ballpoint pen tip or other sharp object. These objects can damage the touch screen. ■ The Hard Keys At the right-hand side of your RC9800i’s touch screen you will find several hard keys.
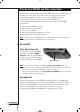
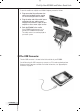
Pick Up Your RC9800i and Take a Good Look ■ The Network Activity Indicator At the top of your RC9800i there is an area that emits a blue light whenever the device is communicating in a wireless network. ■ Charging the RC9800i The battery level of the RC9800i is displayed on the touch screen. At any time you can charge the device as follows: 1 Plug the power adapter into the cradle. 2 Dock the RC9800i in the cradle.
Pick Up Your RC9800i and Take a Good Look To turn the cradle into a digital music Media Adapter, proceed as follows: 1 Plug one end of the audio extension cable (not included) into the analog 3.5 mm Line Out port of the cradle. 2 Plug the other end of the cable into an audio input of your audio system’s amplifier and select this input on your amplifier as the current signal source. 3 3 Dock the RC9800i in the cradle. If the RC9800i is playing music via its speaker, the RC9800i will be muted.
Learning the Basics In this chapter, you will get to know more about: ■ Controlling legacy audio/video devices; ■ Home networking; ■ Activity-Based Control. ■ Controlling Legacy Audio/Video Devices Legacy audio-video devices are non-networked devices that are typically operated by means of a remote control. Your TV, for example, is such a device. When you press a button on the TV’s remote control (e.g. Mute), the remote control sends an Infrared (IR) signal to the TV.
Learning the Basics ■ What You Should Know About Home Networking Home Networking and Connected Devices The RC9800i goes one step further than ordinary universal remotes. The RC9800i is revolutionary in that it can also operate most of the connected devices in your home network. Connected devices are devices that comply with the UPnP (Universal Plug and Play) A/V Protocol. UPnP allows various devices like PCs and intelligent networked appliances (e.g. Media Adapters) to communicate with each other.
Learning the Basics Wireless Connectivity Connected devices can be wired, yet nowadays they are becoming more and more part of a wireless network. There are various technologies used for wireless networking. Most of them are WiFi 802.11 variants, e.g. ‘802.11a’, ‘802.11b’ and ‘802.11g’. The RC9800i can be operated in both 802.11b and 802.11g networks.
Learning the Basics devices that are used for an activity on and off, and how to select the appropriate inputs (sources). You, as a user, will not have to bother with any of this: The RC9800i will take care of it all. Activity-Based Control falls into two categories: watch activities and listen activities. Watch Activities You can enjoy a whole range of ‘Watch’ Activities. Just a few examples: ■ Tonight, you’re going to watch a DVD movie on your flat screen TV.
Getting the Settings Right When you start the RC9800i for the first time, a sequence of screens will guide you through the initial setup process. During this setup process, you will be guided through the most important settings concerning: ■ The RC9800i; ■ Your home situation, more specifically the rooms where you are going to use the RC9800i; ■ The audio-video devices that you want to control with the RC9800i.
Getting the Settings Right Selecting Your Location Next, you will be prompted to indicate what region you live in. Attention! The location you select in this screen affects applications like the Electronic Programming Guide, the remote control codes database and the questions asked during setup. 1 Select either North America or Europe. The RC9800i will automatically restart to configure the location settings and will then display the following welcome screen. 2 Choose Next to start the setup process.
Getting the Settings Right Change Network Settings 1 In the screen, ‘RC9800i Network Settings’, enter the SSID number of your wireless network. 1 Choose Find to find all available wireless networks. 2 Select the SSID of the network you want the RC9800i to connect to. 2 Select the appropriate Security settings that apply to your wireless network: Tip Check the settings of your WAP.
Getting the Settings Right Date & Time Settings You can have the RC9800i retrieve date and time information from dedicated time servers on the Internet, or you can set the date and time yourself. Use a dedicated time server on the Internet 1 Select Get time from Internet. 2 Choose NTP settings. The NTP settings appear: 3 Select RC9800i Default Time Server from the list. -orSelect a Custom Server and fill in the server’s address. 4 Select 12 hour (AM/PM) if you want to use this time format.
Getting the Settings Right Set date and time yourself 1 Make sure that Get time from Internet is not selected. 2 Select 12 hour (AM/PM) if you want to use this time format. Otherwise the RC9800i will use the 0-24 hours time format. 3 Select a time zone. 4 Set the date and time. 5 Choose Next. The RC9800i will now proceed with the setup of rooms and A/V devices.
Getting the Settings Right 3 Select the room type of your choice, for example Living Room. You can choose from the list below: Living room Garage Bedroom Gym, Exercise room Bar Library, Study Dining room, Kitchen Office Family room Theater, Movie room Game room, Kids room Other The name of the room is filled out automatically. If desired, you can rename the room. Tip If you have a room that is not in the list, select a room that most closely matches your room and rename it. 4 Choose OK.
Getting the Settings Right 3 Choose Add.
Getting the Settings Right Determining Remote Control Codes Good To Know: About Remote Control Codes Your RC9800i sends infrared (IR) signals to your devices to trigger an action, e.g. to make the VCR start recording. For every action/function, the RC9800i sends a specific IR signal, called a ‘remote control code’. The codes for various functions of a device are clustered in a ‘codeset’.
Getting the Settings Right When the RC9800i has determined the appropriate remote control codes, the ‘Try & Learn Codeset’ screen will appear. You can try the functions mentioned in the list, to check whether the selected codes work properly. Note Buttons with text in red have no remote control code assigned to them. If you want to use these functions with your RC9800i, you can learn them individually using your original remote control.
Getting the Settings Right Note Buttons with text in red have no remote control code assigned to them. If you want to use these functions with your RC9800i, you can learn the codes individually using your original remote control. Some functions may not be available on your original remote; you can then safely disregard them. 4 Select a function and choose Try. ■ If the device doesn’t respond to the function, choose Learn and perform the procedure as described in steps 1-2 on page 21.
Getting the Settings Right Power on, channel switching and input selection After having determined the correct remote control codes for a device, the RC9800i will now determine the most appropriate methods for powering on, switching channels and selecting inputs on the device. Note In the following paragraph, the example of a TV is discussed. Depending on the kind of device you’re configuring, some questions may be omitted. Power on questions Follow the on-screen instructions.
Getting the Settings Right 6 Choose Input to make the TV switch to an input. Indicate whether your TV shows the signal from its tuner (i.e. broadcasted programs) or an input. Repeat this step until all inputs, including the TV’s internal tuner, have been added. Tip You can add inputs with exactly the same name as they are worded on your TV. You can also choose names of your own choice. 7 Choose Next and indicate which input is currently being displayed. 8 Choose Next.
Getting the Settings Right 3 Choose Next and follow the on-screen instructions to configure all the activities you have selected. This means indicating which devices are involved in an activity, what A/V inputs are being used and, if applicable, what channels the device(s) must tune to. If you have configured devices in more than one room, steps 1-3 will be repeated for every room. A confirmation screen will appear when all activities have been added successfully.
Getting the Most Out of It ■ System Management Area By choosing on the Homepage, you go to the System Management Area. The System Management Area contains the following items: ■ Activities displays the Home Page with the available activities: Watch, Listen and Browse. Depending on the room and the devices located in that room, the available activities may differ. ■ Select a Different Room allows you to select a different room. For further information, see ‘Good To Know: Changing the Room’ on page 36.
Getting the Most Out of It Controlled room Possible activities you can perform in this room Homepage: Level 1 Choose Watch. Remote Control screen, first page: Level 2 Remote Control screen, second page: Level 2 Press the Home hard key. Remote Control screen, Level 3 User Manual 28 Press the Page hard key to cycle through the different remote control screens. Choose Search.
Getting the Most Out of It ■ Activities In ‘What You Should Know About Activity-Based Control’ on page 12, you can read the basics about Activity-Based Control. This will now be described in more detail. Watching Cable TV Tonight, a great movie is being broadcast. You’re going to have a cinema experience by watching it on your living room’s flat screen TV. With the RC9800i you select the cable box as the source that holds the content and the flat screen TV as the device you’ll be watching the movie on.
Getting the Most Out of It Good To Know: Combined Control Screens Combined Control screens are the core elements of the Activity-Based Control concept. They allow you to control the involved devices and their content during the activity. You can cycle through the various control screens with the Page hard key. For example, in the scenario above, the combined control screens for a cable box hooked up to a TV appear. The first screen shows the most frequently used control buttons for both devices.
Getting the Most Out of It ■ ■ ■ ■ The ‘battery status’ indicator: . This indicator goes through 4 stages (full, 2/3, 1/3, minimum). When your RC9800i is docked and charging, the battery status indicator is animated. The ‘Time’ indicator: The time is indicated in HH.MM or HH.MM PM/AM format. To change the time or time format, see page 43. The ‘IR active’ indicator: . This indicator lights up when remote control codes are being sent.
Getting the Most Out of It Watching Video Tape To watch a videotape, perform steps 1 and 2 as described in Watching DVD. Instead of selecting the DVD as the applicable source, select the VCR . In the combined control screen for TV-VCR, choose the desired function. Watching a Program Using EPG Let’s go back to the situation where you want to watch a movie on your flat screen TV in the living room.
Getting the Most Out of It ■ ■ ■ ■ ■ TV station call signs are listed vertically according to their channel number. In grids, the horizontal axis represents time in 2-hour slots. In lists, time slots are displayed in 30-minute slots. Color coding is used for the various program genres. Program information: You can get additional program information by choosing the highlighted program, or choosing OK. See ‘Consulting Program Information’ below.
Getting the Most Out of It Searching Programs To search for programs of a specific genre, proceed as follows: 1 In the EPG grid/list screen, choose Search . The following screen will appear. 2 You can search on the basis of day, time and genre. Refine the search criteria by selecting the appropriate day, time and genres. Tip You can choose multiple genres. 3 Choose Go. The message ‘Searching’ will appear and after a few seconds a screen with the search results will appear.
Getting the Most Out of It 4 Browse through the PC folders and open the folder that contains the photos of your child’s birthday party. 5 Choose a picture to be displayed on your television. Select one of the following options to browse through the pictures: ■ Choose each picture individually that you want to display from the list, and press Play (or press the OK key). The picture that you selected will appear on the TV. ■ Choose the first picture you want to show from the list and press Preview.
Getting the Most Out of It Playing Games To play Games, perform steps 1 and 2 as described in ‘Watching DVD’. Instead of selecting the DVD as the applicable source, select Games . Note The activity ‘Playing Games’ mainly serves the purpose of switching your display device to the appropriate input, so that you can view the content of your game console.
Getting the Most Out of It 3 Select Bedroom. The Homepage reappears. Note that the room indication now reads ‘Bedroom’. Now, you’re all set to start listening to the CD on your bedroom’s audio system. To listen to the CD in the bedroom, proceed as follows: 1 On the Homepage, choose Listen. Note If you have multiple audio devices in the room, the RC9800i will prompt you to select the audio device you want to listen to. 2 Select CD from the list of sources.
Getting the Most Out of It Listening to Audio Files From Your PC via the Audio System Note Listening to audio files on your non-networked audio system requires a UPnPcompliant Media Adapter to convert the digital signals from your PC to analogue signals for your audio system. For more information on Media Adapters, see ‘What You Should Know About Home Networking’ on page 11. You must also install the Philips Media Manager software. For further information, please check ‘Installing the Software’ on page 51.
Getting the Most Out of It Note Enjoying music via the RC9800i can best be done via the cradle, connected by means of an audio extension cable to your audio system. See ‘The Cradle as Digital Music Media Adapter’ on page 8. To listen to MP3 files from your PC via the Docked RC9800i, repeat steps 1 - 6 as described above and dock the RC9800i into the cradle. The RC9800i mutes and the audio-system plays the music.
Getting the Most Out of It ■ Individual Device Control With Individual Device Control you can control a single device outside of the context of activities. Individual Device Control screens offer you more and less frequently used functions than the combined control screens that you get when controlling activities. Follow the steps below to use Individual Device Control: 1 On the Homepage, tap . The System Management Area will appear. 2 Choose Individual Device Control.
Getting the Most Out of It 3 To check the remote control functions of a device, choose the device. A series of screens with remote control functions for that device will become available. For example the following screen is one of the screens for a VCR: 4 To move through the series of screens, use the Page hard key. For each device, there is also one screen with 8 user-defined buttons. These are buttons to which you can assign remote control functions yourself.
Adjusting the Settings After the initial setup, whenever necessary, you can change the settings regarding: ■ Your RC9800i; ■ Your equipment e.g. editing, deleting or adding devices and rooms; ■ The available Internet services. ■ Accessing the Settings 1 The Settings section can be accessed from the System Management Area. To go to the System Management Area, choose on the Homepage. 2 Choose Settings. The ‘Settings’ screen will appear.
Adjusting the Settings Screen Settings Adjusting the Brightness In the Screen Settings you can adjust the brightness of your touch screen by choosing or . Calibrating If you notice that after some time the touch screen no longer responds accurately to the screen areas you are touching, you can recalibrate the touch screen. To do so, tap very precisely the center of the crosshairs that appear in the four corners of the screen.
Adjusting the Settings Add/Edit Rooms 1 On the ‘Rooms & A/V Devices’ screen, choose Add/Edit Rooms. The ‘Set Up Rooms’ screen will appear. 2 To add a room, choose Add. A screen will appear in which you can select a room type and optionally rename it. -orTo edit room information, select a room from the list and choose Edit. A screen will appear in which you can change the room type and, if desired, rename it. -orTo delete a room, select a room from the list and choose Delete.
Adjusting the Settings Moving a Device 1 Select a device and choose Edit. The ‘Modify a Device’ screen will appear. 2 Choose Name/Room. The ‘Modify Device Assignment’ screen will appear. 3 In the Room list, select the room to which you want to reassign the device to. Note If you want, you can optionally also rename the device. 4 Choose OK. The RC9800i will display the ‘Set Up A/V Devices’ screen. The device is now reassigned to the room you selected.
Adjusting the Settings Changing other device settings 1 On the screen ‘Set Up A/V Devices’, select a device and choose Edit. The ‘Modify a Device’ screen will appear. 2 Choose Device Info. The ‘Modify Device Details’ screen will appear. The Device Info Wizard will guide you through a number of settings for the device that you have selected. Choose OK to start the wizard.
Adjusting the Settings 4 Choose the link to create a subscription and follow the instructions. 5 In the screen that summarizes your subscription details, choose Next. The ‘Create a subscription – Activation Key’ screen will appear. This screen contains your activation key. Make a note of this key and choose Proceed to Personalization. Tip You will need the activation key later on to activate the EPG on your RC9800i.
Adjusting the Settings 1 On the Homepage, choose The System Management Area will appear. . 2 Choose Settings. The ‘Settings’ screen will appear. 3 Choose Services Setup. The ‘Services Setup’ screen will appear. 4 Choose Program Guide. The ‘Electronic Program Guide Service Setup’ screen will appear. 5 Choose Activation. The ‘Electronic Program Guide Activation’ screen will appear. 6 Enter your Activation Key and choose Activate.
Adjusting the Settings Note If you receive a message saying that the EPG activation has failed, choose Done. The ‘Setup Program Guide Service’ screen will appear again. In this case, consult ‘Tips and Troubleshooting’ on page 54. If you have only one TV signal source, your RC9800i will now be ready to download program data from the Philips Internet EPG Service. See ‘Downloading EPG Data’ below.
Adjusting the Settings Assigning Lineups to Devices If you have multiple TV signal sources and accordingly defined multiple lineups when personalizing your EPG subscription, you should now assign your chosen lineup IDs to the corresponding devices in your home. Note Before attempting to assign lineups to devices, make sure that you have properly set up the RC9800i to control the activities that involve the TV signal sources to which you are going to assign lineup IDs (e.g.
Installing the Software Note You need Windows 2000 or Windows XP on your PC to use this software. ■ Installing Philips Media Manager This software makes the music, photo and movie files on your computer available for transfer to a Philips Connected Planet device. 1 Place the RC9800i CD in your PC’s CD or DVD drive. The CD will start automatically. Note If the CD does not start automatically, double-click My computer. Then choose the CD-ROM drive icon, and, finally, choose the Setup.exe to start the CD.
Upgrading the Firmware You can upgrade the RC9800i firmware via USB. Attention! Dock the RC9800i into its cradle while upgrading its firmware. 1 On your PC, open your Internet browser and go to http://www.homecontrol.philips.com. Follow the link to the software upgrades section. 2 Download the RC9800i Firmware Update Tool onto your PC. 3 Connect the RC9800i to your PC by means of the USB cable. 4 Dock the RC9800i in its cradle. 5 On the Homepage of the RC9800i, tap The System Management Area will appear.
List of Symbols Pause Stop Play; normal speed Play reverse; normal speed Fast forward Fast reverse Slow forward Slow reverse Eject Recording Navigate (down, right, left, up) Next track Previous track Fast forward to index Rewind to index Forward Frame by frame Reverse Frame by frame Picture-in-picture shift Picture-in-picture swap Teletext mode Page enlargement TV and Teletext mixed Last viewed program; previous program Stand-by Single or multi-digit selection Movie expand, change screen size/aspect ratio A
Taking a First Look Tips and Troubleshooting You can quickly solve most problems that you encounter with the RC9800i by following the advice in this chapter. ■ RC9800i device My RC9800i switches off automatically If your RC9800i is not being used, it will switch to standby mode. To wake the RC9800i, see ‘Everyday Use’ on page 6. You can set the amount of time the RC9800i waits before going into sleep mode. For further information, see Power Settings on page 42.
Tips and Troubleshooting I don’t have a WiFi network at home. Can I use the RC9800i as a remote? Of course you can. The RC9800i can also be used as a remote control for your non-networked audio-video devices. For further information, please check ‘Controlling Legacy Audio/Video Devices’ beginning on page 10. Can I recharge the RC9800i any time I want? Yes, you can. The RC9800i is equipped with a Li-polymer battery, which cannot be overcharged, and can be charged even when the battery is not fully empty.
Tips and Troubleshooting When upgrading software, the messages appear in the wrong language 1 On your PC, open your Internet browser and go to http://www.homecontrol.philips.com. Follow the link to the software upgrades section.
Technical Specifications General Specifications Operating temperature: Storage temperature: Dimensions: Weight: Display Infrared (IR) capabilities Transmitted code: Infrared wavelength: IR learning distance: Learning frequency: 5°C to 45°C ( 41°F to 113°F) -25°C to +60°C (13°F to 140°F) 102 (W) x 150 (L) x 26 (H) mm 4.01 (W) x 5.90 (L) x 1.02 (H) inch 225 g (7.
Environmental Information All redundant packaging has been omitted. We have done our utmost to make the packaging easily separable into two materials: Cardboard and PET. Your set consists of materials that can be recycled if disassembled by a specialized company. Please observe the local regulations regarding the disposal of packaging, exhausted batteries and old equipment. Battery Disposal Your device uses a rechargeable Li Polymer battery. Do not dispose the battery with household waste.
Communications Regulation Information Europe – EU Declaration of Conformity Royal Philips Electronics hereby declares that this universal remote control is in compliance with the essential requirements and other relevant provisions of the Radio & Telecom Terminal Equipment Directive (R&TTE Directive) 1999/5/EC: ■ Radio: EN 300 328 ■ EMC: ETSI EN 301 489-1, ETSI EN 301 489-17 ■ Safety: EN60950 Finnish Philips Consumer Electronics, Remote Control Systems vakuuttaa täten että RC9800i tyyppinen laite on direkt
Glossary Bridge device Bridge devices are devices that convert signals. For example, a Media Adapter is a bridge device. It converts PC residing digital video, pictures or audio files to analogue signals. The Media Adapter receives input from the PC and transforms it into a number of analogue video and audio outputs that feed into classical non-networked TVs or audio systems. DHCP When a device communicates with another device, it must have a unique address to identify itself.
Glossary WAP Wireless Access Point or WAP is the center of a wireless home network. All communication between devices in a wireless network is carried out via the WAP. WEP Wired Equivalent Privacy (WEP) is a security protocol that provides a wireless local area network (WLAN) with a high level of security and privacy by encoding all communication in the network WiFi WiFi or Wireless Fidelity is a term that is used for certain types of wireless local area networks (WLANS) that make use of the 802.
Index Netmask, 61 Network Activity Indicator, 8 Network settings, 15, 43 Network Time Sync, 17 On/Off Switch, 6 Online, 57 Peer-to-peer, 12, 15 Power power adapter, 8 power on, 6 settings, 42 Power on, 24 Proxy server, 16 settings, 16 PVR, 60 Red buttons, 23 Remote control codes autoscan, 22 change, 45 determine, 21 learn, 21 select & try, 23 Room add, 44 change, 36, 44 Screen settings, 43 Security Settings, 16 Settings access, 42 Activity, 25 audio, 43 backlight, 42 date, 17, 43 network, 15, 43 proxy, 16 R