Register your product and get support at www.philips.com/welcome Enregistrez votre produit et bénéficiez d’une assistance à l’adresse suivante www.philips.
1
PT920CC, PT925, PT920, PT870 English 6 Français (Canada) 29
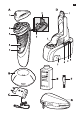
English Introduction Congratulations on your purchase and welcome to Philips! To fully benefit from the support that Philips offers, register your product at www.philips.com/welcome. Please read this user manual, as it contains information about the wonderful features of this shaver as well as some tips to make shaving easier and more enjoyable. General description (Fig.
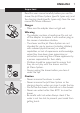
English 7 Important Read this user manual carefully before you use the shaver, the Jet Clean System (specific types only) and the charging stand (specific types only). Save the user manual for future reference. Danger -- Make sure the adapter does not get wet. Warning -- The adapter contains a transformer. Do not cut off the adapter to replace it with another plug, as this causes a hazardous situation.
English -- The shaver, the Jet Clean System, the charging stand and the other accessories are not dishwasher-proof. -- Water may leak from the socket at the bottom of the shaver when you rinse it. This is normal and not dangerous because all electronics are enclosed in a sealed power unit inside the shaver. -- Do not use the shaver, Jet Clean System, adapter, charging stand or any other part if it is damaged, as this may cause injury.
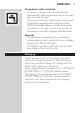
English 9 Compliance with standards -- The shaver complies with the internationally approved IEC safety regulations and can be safely cleaned under the tap. -- The shaver and the Jet Clean System comply with all standards regarding electromagnetic fields (EMF). If handled properly and according to the instructions in this user manual, they are safe to use based on scientific evidence available today.
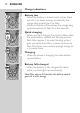
English Charge indications Battery low -- When the battery is almost empty (when there are only 5 or fewer shaving minutes left), the orange plug symbol starts to flash. -- When you switch off the shaver, the orange plug symbol continues to flash for a few seconds. Quick charging -- When you start charging the empty battery, both the white battery symbol and the plug symbol flash. After approx. 3 minutes, the plug symbol goes out, while the battery symbol continues to flash.
English 11 Charging with the adapter Do not charge the shaver in a closed pouch (specific types only). 1 Put the small plug in the shaver. 2 Put the adapter in the wall socket. ,, The battery symbol and the plug symbol show the charging status of the shaver (see section ‘Charge indications’ in this chapter). Charging in the charging stand (specific types only) 1 Put the small plug in the charging stand. 2 Put the adapter in the wall socket. 3 Place the shaver in the charging stand.
English ,, The battery symbol on the Jet Clean System flashes to indicate that the shaver is being charged. Note:When the Jet Clean System is performing the cleaning program, the battery symbol is out. ,, When the battery is fully charged, the battery symbol on the Jet Clean System lights up continuously. Note: After approx. 30 minutes, the battery symbol goes out to save energy.
English 13 Using the shaver Note:You can also use the appliance directly from the mains. Simply connect the shaver to the mains. Shaving 1 Press the on/off button once to switch on the shaver. 2 Move the shaving heads over your skin. Make circular movements. -- Do not make straight movements. -- Your skin may need 2 or 3 weeks to get accustomed to the Philips shaving system. 3 Press the on/off button once to switch off the shaver. 4 Clean the shaver (see chapter ‘Cleaning and maintenance’).
English Cleaning and maintenance Never use compressed air, scouring pads, abrasive cleaning agents or aggressive liquids such as petrol or acetone to clean the shaver, the charging stand (specific types only) and the Jet Clean System (specific types only). -- The best and most hygienic way to clean the shaver is in the Jet Clean System (specific types only). You can also rinse the shaver under the tap or clean it with the cleaning brush supplied.
English 15 Cleaning the shaving unit under the tap 1 Switch off the shaver and disconnect it from the mains. 2 Press the release button to open the shaving unit. 3 Rinse the shaving unit and hair chamber under a hot tap for 30 seconds. Be careful with hot water. Always check if the water is not too hot, to prevent your hands from getting burnt. -- Rinse the hair chamber and the inside of the shaving unit. -- Rinse the outside of the shaving unit. 4 Close the shaving unit and shake off excess water.
English Cleaning the shaving unit with the cleaning brush 1 Switch off the shaver and disconnect it from the mains. 2 Press the release button to open the shaving unit. 3 Pull the shaving unit off the shaver. 4 Turn the lock anticlockwise (1) and remove the retaining frame (2). 5 Remove and clean one shaving head at a time. Each shaving head consists of a cutter and a guard. Note: Do not clean more than one cutter and guard at a time, since they are all matching sets.
English 17 -- Clean the inside and outside of the shaving guard with the brush. 6 Put the shaving heads back into the shaving unit. Make sure that the projections of the shaving heads fit exactly into the recesses. 7 Put the retaining frame back into the shaving unit and turn the lock clockwise. 8 Insert the lug of the shaving unit into the slot in the top of the shaver (1). Then close the shaving unit (2).
English 1 Simultaneously press the release buttons on both sides of the cleaning chamber (1). Then lift the Jet Clean System off the cleaning chamber (2). ,, The cleaning chamber remains behind. 2 Unscrew the cap from the bottle with HQ200 cleaning fluid and remove the airtight seal. 3 Fill the cleaning chamber with HQ200 cleaning fluid up to the MAX indication. Note: Make sure the cleaning chamber is always filled above the MIN indication.
English 19 2 Press the on/off button on the Jet Clean System to start the cleaning program. The cleaning program has two phases, the cleaning phase and the drying phase. ,, The battery symbol on the Jet Clean System goes out. ,, During the first phase of the cleaning program, the cleaning symbol starts to flash and the shaver is automatically lowered into the cleaning fluid. ,, The shaver automatically switches on and off several times and moves up and down.
English Note:When the fluid level drops below the minimum level, the cleaning symbol and the ‘fluid low’ symbol start to flash with intervals and the holder returns to its starting position Cleaning the Jet Clean System Empty the cleaning chamber and clean it thoroughly by rinsing it with hot tap water every 15 days if you use the Jet Clean System daily. Otherwise empty and clean the cleaning chamber at least once a month. 1 Clean the outside of the Jet Clean System with a moist cloth.
English 21 5 Fill the cleaning chamber with HQ200 cleaning fluid up to the MAX indication. Note: Make sure the cleaning chamber is always filled above the MIN indication. 6 Place the Jet Clean System back onto the cleaning chamber (‘click’). Make sure that the release buttons snap back into place. Cleaning the trimmer with the cleaning brush Clean the trimmer every time you have used it. 1 Switch off the shaver and disconnect it from the mains. 2 Push the trimmer slide downwards to open the trimmer.
English Storage There are several ways to store the shaver or to take it with you when you travel: -- Always put the protection cap on the shaver to prevent damage. -- Store the shaver in the pouch supplied (specific types only). -- Store the shaver in the charging stand (specific types only). -- Put the shaver in the Jet Clean System (specific types only). Make sure the protection cap is not on the shaving unit.
English 23 2 4 Turn the lock anticlockwise (1) and remove the retaining frame (2). 5 Remove the shaving heads and place new ones in the shaving unit. Make sure that the projections of the shaving heads fit exactly into the recesses. 6 Put the retaining frame back into the shaving unit and turn the lock clockwise. 7 Insert the lug of the new shaving unit into the slot in the top of the shaver (1). Then close the shaving unit (2).
English Environment -- Do not throw away the shaver and the Jet Clean System (specific types only) with the normal household waste at the end of their life, but hand them in at an official collection point for recycling. By doing this, you help to preserve the environment. -- The built-in rechargeable shaver battery contains substances that may pollute the environment. Always remove the battery before you discard or hand in the shaver at an official collection point.
English 25 5 Bend the 6 hooks aside and take out the power unit. Be careful, the hooks are sharp. 6 Remove the battery. Be careful, the battery strips are sharp. Do not put the shaver back into the plugged-in Jet Clean System (specific types only) or charging stand (specific types only) after you have removed the rechargeable battery. Do not connect the shaver to the mains again after you have removed the rechargeable battery.
English Problem Possible cause Solution The shaver does not shave as well as it used to. The Jet Clean System (specific types only) has not cleaned the shaver properly because the cleaning fluid in the cleaning chamber is soiled or the cleaning fluid level is too low. Clean the shaver thoroughly before you continue shaving. If necessary, clean and refill the cleaning chamber (see chapter ‘Cleaning and maintenance’). The shaving heads are damaged or worn.
English 27 Problem Possible cause Solution The temperature of the shaver is too high. In this case, the shaver does not work. As soon as the temperature of the shaver has dropped sufficiently, you can switch on the shaver again. The shaver is not The cleaning fluid in entirely clean after the cleaning chamber is soiled. I clean it in the Jet Clean System (specific types only). Empty and rinse the cleaning chamber. The cleaning fluid level is too low.
English Problem The Jet Clean System (specific types only) does not work when I press the on/off button. Possible cause Solution You have not closed the locking lever of the Jet Clean System properly, or you have not placed the shaver in the Jet Clean Shaver properly. In these cases the Jet Clean System starts to operate, but the cleaning program is not performed properly. Place the shaver without protection cap in the Jet Clean System properly. Close the locking lever properly.
Français (Canada) 29 Introduction Félicitations pour votre achat et bienvenue dans l’univers Philips! Pour profiter pleinement du soutien de Philips, enregistrez votre produit à l’adresse : www.philips.com/welcome. Veuillez lire ce manuel contenant des renseignements sur les caractéristiques fantastiques de ce rasoir ainsi que des conseils pour simplifier le rasage et le rendre plus agréable. Description générale (fig.
Français (Canada) Remarque : Le numéro de modèle est indiqué à l’arrière de votre rasoir. Important Avant toute utilisation du rasoir, du système Jet Clean (exclusif à certains modèles) et du socle de recharge (exclusif à certains modèles), prenez le temps de lire ce manuel attentivement et conservezle pour pouvoir vous y reporter ultérieurement. Danger -- Gardez l’adaptateur au sec. Mise en garde -- L’adaptateur contient un transformateur.
Français (Canada) 31 Avertissement -- Ne plongez jamais le rasoir dans l’eau. -- Ne plongez jamais le système Jet Clean ni le socle de recharge dans l’eau et ne les rincez pas sous le robinet. -- N’utilisez jamais le rasoir dans le bain ni sous la douche. -- N’utilisez jamais d’eau dont la température est supérieure à 80 °C pour rincer le rasoir. -- Attention avec l’eau chaude. Il est important de toujours vérifier que l’eau n’est pas trop chaude pour ne pas vous brûler les mains.
Français (Canada) -- Posez toujours le rasoir et le système Jet Clean sur une surface imperméable. -- Utilisez exclusivement l’adaptateur, le socle de recharge et les accessoires fournis. -- Placez toujours le capuchon de protection sur le rasoir afin d’en protéger les têtes lorsque vous êtes en voyage. -- Utilisez seulement le système Jet Clean avec le liquide de nettoyage HQ200 d’origine. -- Rangez toujours le système Jet Clean sur une surface stable, plane et horizontale pour éviter les fuites.
Français (Canada) 33 Conformité aux normes -- Le rasoir respecte les normes de sécurité internationales de la CEI et peut être nettoyé à l’eau courante en toute sécurité. -- Le rasoir et le système Jet Clean sont conformes à toutes les normes relatives aux champs électromagnétiques (CEM). Ils répondent aux règles de sécurité établies sur la base des connaissances scientifiques actuelles s’ils sont manipulés correctement et conformément aux instructions de ce mode d’emploi.
Français (Canada) Informations relatives à la charge Pile faible -- Lorsque la pile est presque entièrement déchargée (c’est-à-dire lorsqu’il ne reste que 5 minutes de rasage ou moins), le symbole de prise orange se met à clignoter. -- Lorsque vous éteignez le rasoir, le symbole de prise orange continue à clignoter pendant quelques secondes. Chargement rapide -- Au début de la charge d’une pile vide, le symbole de pile blanc et le symbole de prise clignotent tous les deux.
Français (Canada) 35 Chargement à l’aide de l’adaptateur Ne laissez pas le rasoir enfermé dans son étui (exclusif à certains modèles) pendant que vous le rechargez. 1 Insérez la petite fiche dans le rasoir. 2 Branchez l’adaptateur dans une prise murale. ,, Les symboles de pile et de prise indiquent l’état de la charge du rasoir (voir la section «Informations relatives à la charge» de ce chapitre). Recharge sur le socle (exclusif à certains modèles) 1 Insérez la petite fiche dans le socle de recharge.
Français (Canada) Remarque :Vous ne pouvez pas placer le rasoir dans le système Jet Clean tant que le capuchon de protection couvre l’unité de rasage. 4 Abaissez complètement le système de verrouillage pour maintenir le rasoir en position. ,, Le symbole de pile du système Jet Clean clignote pour indiquer que la charge est en cours. Remarque : Le symbole de pile est éteint lorsque le système Jet Clean procède au nettoyage.
Français (Canada) 37 Utilisation du rasoir Remarque :Vous pouvez aussi simplement brancher le rasoir sur une prise secteur. Rasage 1 Mettez l’appareil en marche en appuyant une fois sur le bouton marche/arrêt. 2 Faites glisser les têtes de rasoir sur votre visage en effectuant des mouvements circulaires. -- N’effectuez pas de mouvement rectiligne. -- Votre peau pourrait avoir besoin de 2 ou 3 semaines pour s’habituer au système de rasage Philips.
Français (Canada) Nettoyage et entretien N’utilisez jamais d’air comprimé, de tampons à récurer, de produits abrasifs ou de détergents agressifs tels que de l’essence ou de l’acétone pour nettoyer le rasoir, le socle de recharge (exclusif à certains modèles) ou le système Jet Clean (exclusif à certains modèles). -- La meilleure façon, et la plus hygiénique, de nettoyer votre rasoir consiste à le déposer dans le système Jet Clean (certains modèles seulement).
Français (Canada) 39 Nettoyage de l’unité de rasage sous le robinet 1 Éteignez le rasoir et débranchez-le de la prise secteur. 2 Appuyez sur le bouton de libération pour ouvrir l’unité de rasage. 3 Rincez l’unité de rasage et le compartiment de récupération des poils pendant 30 secondes sous l’eau chaude du robinet. Attention avec l’eau chaude. Il est important de toujours vérifier que l’eau n’est pas trop chaude pour ne pas vous brûler les mains.
Français (Canada) Nettoyage de l’unité de rasage avec la brosse 1 Éteignez le rasoir et débranchez-le de la prise secteur. 2 Appuyez sur le bouton de libération pour ouvrir l’unité de rasage. 3 Détachez l’unité de rasage du rasoir. 4 Tournez le verrou dans le sens anti-horaire (1) et retirez le système de fixation (2). 5 Ne retirez et ne nettoyez qu’une seule tête de rasoir à la fois. Chaque tête est composée d’une lame et d’un dresse-poils.
Français (Canada) 41 -- Retirez la lame du dresse-poils et nettoyez-la à l’aide de la brosse. -- Nettoyez l’intérieur et l’extérieur du dresse-poils à l’aide de la brosse. 6 Remettez les têtes du rasoir dans l’unité de rasage. Veillez à ce que les saillies de la tête du rasoir s’imbriquent parfaitement dans les creux. 7 Remettez le système de fixation dans l’unité de rasage et tournez le verrou dans le sens horaire.
Français (Canada) Nettoyage de l’unité de rasage dans le système Jet Clean (certains modèles uniquement) Le système Jet Clean permet de nettoyer le rasoir. Préparation du système Jet Clean Remarque : Remplissez la cuve avant la première utilisation et lorsque le symbole de faible niveau du liquide clignote pour indiquer qu’il est trop bas.
Français (Canada) 43 5 Branchez la petite fiche au système Jet Clean et branchez l’adaptateur à une prise murale. ,, Le support se place automatiquement en position haute. Le système Jet Clean est prêt à être utilisé. Utilisation du système Jet Clean 1 Placez le rasoir à l’envers, sans son capuchon, sur le support. Enfoncez complètement le système de verrouillage pour maintenir le rasoir en position. ,, Le symbole de pile du système Jet Clean s’allume pour indiquer que le rasoir se recharge.
Français (Canada) Le rasoir demeure dans cette position jusqu’à la fin du programme. ,, Une fois le programme de nettoyage terminé, le symbole de pile du système Jet Clean s’allume pour indiquer que le rasoir se recharge. Remarque : Si vous appuyez sur le bouton marche/ arrêt du système Jet Clean au cours du nettoyage, le programme est annulé et réinitialisé. Dans ce cas, le symbole de nettoyage ou de séchage arrête de clignoter et le support reprend sa position initiale.
Français (Canada) 45 2 Appuyez simultanément sur les boutons de dégagement des deux côtés du système Jet Clean (1). Ensuite, soulevez et dégagez le système Jet Clean de la cuve (2). ,, La cuve est ainsi séparée du dispositif de nettoyage. 3 Vider la cuve du liquide nettoyant restant. Vous pouvez vider le liquide de nettoyage dans le lavabo sans risque pour l’environnement. 4 Rincez la cuve à l’eau chaude du robinet. Attention avec l’eau chaude.
Français (Canada) Nettoyage de la tondeuse à l’aide de la brosse Nettoyez la tondeuse après chaque utilisation. 1 Éteignez le rasoir et débranchez-le de la prise secteur. 2 Ouvrez la tondeuse en poussant la glissière vers le bas. 3 Nettoyez la tondeuse avec l’extrémité à poils courts de la brosse de nettoyage. Brossez les lames de la tondeuse dans un mouvement de haut en bas. 4 Fermez la tondeuse (vous devez entendre un déclic).
Français (Canada) 47 Remarque : Si vous ne voulez pas que le rasoir se recharge lorsqu’il est rangé dans le système Jet Clean, laissez le système de verrouillage en position haute. Remplacement Pour profiter de performances de rasage optimales, nous vous recommandons de remplacer l’unité de rasage chaque année. Et remplacez les têtes du rasoir sans attendre si vous constatez qu’elles sont endommagées.
Français (Canada) 7 Insérez la patte de la nouvelle unité de rasage dans la fente située sur la partie supérieure du rasoir (1), puis refermez l’unité de rasage (2). Remarque : Si l’unité de rasage se ferme mal, assurezvous que vous avez bien inséré les têtes du rasoir et que le système de fixation est verrouillé. Accessoires Pour préserver les performances optimales de votre rasoir, prenez soin de le nettoyer régulièrement et d’en replacer les têtes dans les délais recommandés.
Français (Canada) 49 Environnement -- Si vous n’avez plus besoin du rasoir ni du système Jet Clean (exclusif à certains modèles) et que vous désirez les mettre au rebut, ne les jetez pas avec les ordures ménagères. Déposez-les dans un point de collecte de recyclage. Vous contribuerez ainsi à la protection de l’environnement. -- La pile rechargeable intégrée au rasoir contient des substances potentiellement nocives pour l’environnement.
Français (Canada) 5 Pliez les 6 crochets sur les côtés pour retirer le bloc d’alimentation. Attention, les crochets sont pointus. 6 Retirez la pile. Soyez prudent, car les languettes de la pile sont coupantes. Ne remettez pas le rasoir dans le système Jet Clean (exclusif à certains modèles) ou dans le socle de recharge (exclusif à certains modèles), lorsque ces appareils sont encore branchés, après avoir retiré la pile rechargeable du rasoir.
Français (Canada) 51 Problème Cause possible Solution Les résultats de rasage ne sont pas aussi satisfaisants que d’habitude. Le système Jet Clean (exclusif à certains modèles) n’a pas nettoyé adéquatement le rasoir parce que le liquide de nettoyage dans la cuve est souillé ou en quantité insuffisante. Nettoyez le rasoir à fond avant de continuer le rasage. Au besoin, nettoyez et remplissez la cuve (reportez-vous au chapitre «Nettoyage et entretien»). Les têtes du rasoir sont endommagées ou usées.
Français (Canada) Problème Cause possible Solution La température du rasoir est Lorsque la température trop élevée. Dans ce cas, le du rasoir a chuté rasoir ne fonctionne pas. suffisamment, vous pouvez l’utiliser de nouveau. Le liquide de nettoyage dans Videz et rincez la cuve. Le rasoir la cuve est souillé. n’est pas tout à fait propre après l’avoir nettoyé dans le système Jet Clean (exclusif à certains modèles). Le niveau du liquide de nettoyage est trop bas.
Français (Canada) 53 Problème Cause possible Solution Vous n’avez pas activé correctement le système de verrouillage du système Jet Clean ou vous n’y avez pas bien positionné le rasoir. Dans ce cas, le programme démarre, mais le nettoyage ne s’effectue pas de façon appropriée. Placez le rasoir adéquatement sans son capuchon de protection dans le système Jet Clean et activez le système de verrouillage correctement.
4222.002.5242.