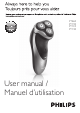
PT860 PT730 PT725 PT720 User manual / Manuel d’utilisation
1
PT860, PT730, PT725, PT720 English 6 Français (Canada) 21
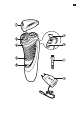
English Introduction Congratulations on your purchase and welcome to Philips! To fully benefit from the support that Philips offers, register your product at www.philips.com/welcome. Please read this user manual, as it contains information about the wonderful features of this shaver as well as some tips to make shaving easier and more enjoyable. General description (Fig.
English 7 -- The appliance is not intended for use by persons (including children) with reduced physical, sensory or mental capabilities, or lack of experience and knowledge, unless they have been given supervision or instruction concerning use of the appliance by a person responsible for their safety. -- Children should be supervised to ensure that they do not play with the appliance. -- Always unplug the shaver before you clean it under the tap. -- This symbol means: Forbidden to use in the shower.
English -- Always place and use the shaver on a surface that is fluid-resistant. -- Only use the adapter, charger and accessories supplied. -- Always put the protection cap on the shaver to protect the shaving heads when you are travelling. Electromagnetic fields (EMF) -- This Philips appliance complies with all applicable standards and regulations regarding exposure to electromagnetic fields (EMF). General -- This shaver can be safely cleaned under the tap.
English 9 Charge indications Battery low -- When the battery is almost empty (when there are only 5 or fewer shaving minutes left), the charging light starts to flash orange. -- When you switch off the shaver, the charging light continues to flash orange for a few seconds. Quick charging -- When you start charging the empty battery, the charging light alternately flashes orange and green. After approx. 3 minutes, the charging light starts flashing green only.
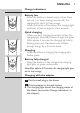
English Using the shaver Note:You can also use the shaver directly from the mains. Simply connect the shaver to the mains. Shaving 1 Press the on/off button once to switch on the shaver. 2 Move the shaving heads over your skin. Make circular movements. -- Do not make straight movements. -- Your skin may need 2 or 3 weeks to get accustomed to the Philips shaving system. 3 Press the on/off button once to switch off the shaver. 4 Clean the shaver (see chapter ‘Cleaning and maintenance’).
English 11 5 Close the trimmer (‘click’). Cleaning and maintenance Warning: Remove the detachable cord from the handheld part before cleaning this part in water. Never use compressed air, scouring pads, abrasive cleaning agents or aggressive liquids such as petrol or acetone to clean the appliance. -- Clean the shaver after every shave for optimal shaving performance. -- Regular cleaning guarantees better shaving performance.
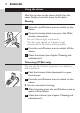
English 2 Press the release button to open the shaving unit. 3 Rinse the shaving unit and hair chamber under a hot tap for 30 seconds. Be careful with hot water. Always check if the water is not too hot, to prevent your hands from getting burnt. -- Rinse the hair chamber and the inside of the shaving unit. -- Rinse the outside of the shaving unit. 4 Close the shaving unit and shake off excess water. Be careful not to hit the shaving unit against anything while shaking off excess water.
English 13 2 Press the release button to open the shaving unit. 3 Pull the shaving unit off the shaver. 4 Turn the lock anticlockwise (1) and remove the retaining frame (2). 5 Remove and clean one shaving head at a time. Each shaving head consists of a cutter and a guard. Note: Do not clean more than one cutter and guard at a time, since they are all matching sets. If you accidentally mix up the cutters and guards, it may take several weeks before optimal shaving performance is restored.
English 6 Put the shaving heads back into the shaving unit. Make sure that the projections of the shaving heads fit exactly into the recesses. 7 Put the retaining frame back into the shaving unit and turn the lock clockwise. 8 Insert the lug of the shaving unit into the slot in the top of the shaver (1). Then close the shaving unit (2). Note: If the shaving unit does not close smoothly, check if you have inserted the shaving heads properly and if the retaining frame is locked.
English 15 Tip: For optimal trimming performance, lubricate the trimmer teeth with a drop of sewing machine oil every six months. Storage -- Put the protection cap on the shaver every time you have used it, to prevent damage. Replacement For maximum shaving performance, we advise you to replace the shaving heads every year. Replacement reminder The shaving head symbol will light up to indicate that the shaving heads need to be replaced. Replace damaged shaving heads right away.
English 3 Press the release button to open the shaving unit. 4 Pull the shaving unit off the shaver. 5 Turn the lock anticlockwise (A) and remove the retaining frame (B). 6 Remove the shaving heads and place new ones in the shaving unit. Note: Make sure that the projections of the shaving heads fit exactly into the recesses. 7 Put the retaining frame back into the shaving unit (A) and turn the lock clockwise (B). 8 Insert the lug of the new shaving unit into the slot in the top of the shaver.
English 17 9 Press and hold the on/off button for 5 seconds to reset the replacement reminder on the shaver. The orange light goes out. Ordering accessories To buy accessories or spare parts, go to your Philips dealer. You can also contact the Philips Consumer Care Centre in your country (see the worldwide guarantee leaflet for contact details). To retain the top performance of your shaver, make sure you clean it regularly and replace its shaving heads at the recommended time.
English -- The built-in rechargeable shaver battery contains substances that may pollute the environment. Always remove the battery before you discard or hand in the shaver at an official collection point. Dispose of the battery at an official collection point for batteries. If you have trouble removing the battery, you can also take the appliance to a Philips service centre. The staff of this centre will remove the battery for you and will dispose of it in an environmentally safe way.
English 19 Warranty and support If you need information or support, please visit www.philips.com/support or call 1-866-800-9311. Warranty restrictions The shaving heads (cutters and guards) are not covered by the terms of the international guarantee because they are subject to wear. Troubleshooting This chapter summarises the most common problems you could encounter with the appliance. If you are unable to solve the problem with the information below, visit www.philips.
English Problem Possible cause Solution The temperature of the shaver is too high. In this case, the shaver does not work. As soon as the temperature of the shaver has dropped sufficiently, you can switch on the shaver again.
Français (Canada) 21 Introduction Félicitations pour votre achat et bienvenue dans l’univers Philips! Pour profiter pleinement du soutien de Philips, enregistrez votre produit sur le site : www.philips.com/welcome. Veuillez lire ce manuel contenant des renseignements sur les caractéristiques fantastiques de ce rasoir ainsi que des conseils pour simplifier le rasage et le rendre plus agréable. Description générale (fig.
Français (Canada) ----- physiques, sensorielles ou mentales sont réduites, ou qui n’ont pas l’expérience et les connaissances nécessaires, à moins qu’elles ne soient sous la surveillance d’une personne responsable de leur sécurité ou qu’elles aient reçu de cette personne des directives concernant l’utilisation de l’appareil. Les enfants doivent être surveillés pour s’assurer qu’ils ne s’amusent pas avec l’appareil. Toujours débrancher le rasoir avant de le nettoyer sous le robinet.
Français (Canada) 23 -- Utilisez, chargez (certains modèles seulement) et rangez l’appareil à une température comprise entre 10 °C et 35 °C. -- Placez et utilisez toujours le rasoir sur une surface imperméable. -- Utilisez exclusivement l’adaptateur, le chargeur et les accessoires fournis. -- Placez toujours le capuchon de protection sur le rasoir afin d’en protéger les têtes lorsque vous êtes en voyage.
Français (Canada) Un rasoir complètement chargé offre jusqu’à 40 (PT730, PT725, PT720) ou 50 (PT860) minutes d’autonomie. L’autonomie de rasage peut être inférieure à 40 (PT730, PT725, PT720) ou 50 (PT860) minutes selon vos habitudes de rasage et de nettoyage du rasoir ou selon votre type de barbe.
Français (Canada) 25 Chargement à l’aide de l’adaptateur 1 Insérez la petite fiche dans le rasoir. 2 Branchez l’adaptateur dans une prise murale. ,, Le témoin de charge indique l’état de chargement du rasoir (voir la section «Informations relatives à la charge» de ce chapitre). Utilisation du rasoir Remarque :Vous pouvez aussi simplement brancher l’appareil sur une prise secteur. Rasage 1 Mettez l’appareil en marche en appuyant une fois sur le bouton marche/arrêt.
Français (Canada) 1 Ouvrez la tondeuse en poussant la glissière vers le bas. 2 Mettez l’appareil en marche en appuyant une fois sur le bouton marche/arrêt. ,, Vous pouvez commencer à tondre. 3 Après la tonte, éteignez le rasoir en appuyant une fois sur le bouton marche/arrêt. 4 Nettoyez la tondeuse (voir section «Nettoyage et entretien»). 5 Fermez la tondeuse (vous entendrez un déclic). Nettoyage et entretien Avertissement : Retirez le cordon amovible du manche avant de nettoyer le rasoir à l’eau.
Français (Canada) 27 Nettoyage de l’unité de rasage sous le robinet 1 Éteignez le rasoir et débranchez-le de la prise secteur. 2 Appuyez sur le bouton de libération pour ouvrir l’unité de rasage. 3 Rincez l’unité de rasage et le compartiment de récupération des poils pendant 30 secondes sous l’eau chaude du robinet. Attention avec l’eau chaude. Il est important de toujours vérifier que l’eau n’est pas trop chaude pour ne pas vous brûler les mains.
Français (Canada) Nettoyage de l’unité de rasage avec la brosse 1 Éteignez le rasoir et débranchez-le de la prise secteur. 2 Appuyez sur le bouton de libération pour ouvrir l’unité de rasage. 3 Détachez l’unité de rasage du rasoir. 4 Tournez le verrou dans le sens anti-horaire (1) et retirez le système de fixation (2). 5 Ne retirez et ne nettoyez qu’une seule tête de rasoir à la fois. Chaque tête est composée d’une lame et d’un dresse-poils.
Français (Canada) 29 -- Nettoyez l’intérieur et l’extérieur du dresse-poils à l’aide de la brosse. 6 Remettez les têtes du rasoir dans l’unité de rasage. Veillez à ce que les saillies de la tête du rasoir s’imbriquent parfaitement dans les creux. 7 Remettez le système de fixation dans l’unité de rasage et tournez le verrou dans le sens horaire. 8 Insérez la patte de l’unité de rasage dans la fente située sur la partie supérieure du rasoir (1). Fermez ensuite l’unité de rasage (2).
Français (Canada) 2 Ouvrez la tondeuse en poussant la glissière vers le bas. 3 Nettoyez la tondeuse avec l’extrémité à poils courts de la brosse de nettoyage. Brossez les lames de la tondeuse dans un mouvement de haut en bas. 4 Fermez la tondeuse (vous entendrez un déclic). Suggestion : Pour des performances optimales, lubrifiez les lames de la tondeuse avec une goutte d’huile pour machine à coudre tous les six mois.
Français (Canada) 31 Rappel de remplacement Le symbole de la tête de rasoir s’allume pour indiquer qu’elle doit être remplacée. Remplacez immédiatement les têtes endommagées. Ne les remplacez que par des têtes de rasoir Philips HQ8 d’origine. 1 La lumière orange du symbole de la tête de rasoir s’allume. 2 Éteignez le rasoir. Débranchez le rasoir de la prise secteur et retirez-le du système Jet Clean. 3 Appuyez sur le bouton de libération pour ouvrir l’unité de rasage. 4 Détachez l’unité de rasage du rasoir.
Français (Canada) 8 Insérez la patte de la nouvelle unité de rasage dans la fente située sur la partie supérieure du rasoir, puis refermez l’unité de rasage. Remarque : Si l’unité de rasage se ferme mal, assurezvous que vous avez bien inséré les têtes du rasoir et que le système de fixation est verrouillé. 9 Maintenez enfoncé le bouton marche/arrêt pendant 5 secondes pour réinitialiser le rappel de remplacement sur le rasoir. La lumière orange s’éteint.
Français (Canada) 33 Environnement -- Ne jetez pas l’appareil avec les ordures ménagères à la fin de sa vie utile; déposez-le plutôt dans un point de collecte de recyclage. Vous contribuerez ainsi à la protection de l’environnement. -- La pile rechargeable intégrée contient des substances qui peuvent nuire à l’environnement. Veillez à toujours retirer la pile avant de mettre le rasoir au rebut ou de le déposer à un endroit assigné à cet effet. Déposez la pile usagée à un endroit assigné à cet effet.
Français (Canada) 6 Retirez la batterie rechargeable du rasoir. Soyez prudent, car les languettes de la batterie sont coupantes. Ne branchez pas le rasoir sur le secteur après avoir retiré la pile rechargeable. Assistance et garantie Pour obtenir des renseignements supplémentaires, veuillez consulter le site www.philips.com/ support ou téléphonez au numéro: 1-866-800-9311.
Français (Canada) 35 Problème Cause possible Solution Les résultats de rasage ne sont pas aussi satisfaisants que d’habitude. Les têtes du rasoir sont endommagées ou usées. Remplacez les têtes du rasoir (voir le chapitre «Remplacement»). Les têtes du rasoir sont bloquées par de longs poils. Nettoyez les têtes du rasoir l’une après l’autre (voir le chapitre «Nettoyage et entretien»). Vous n’avez pas correctement inséré les têtes du rasoir.
4222.002.5568.