User Manual Register your product and get support at www.philips.
Table of contents Introduction �������������������������������������������������3 5 Connect to playback devices ����������� 13 Dear customer ���������������������������������������������������������������3 Connect to devices through HDMI ����������������������� 13 About this user manual ����������������������������������������������3 Connect to devices through AV ����������������������������� 13 What’s in the box ����������������������������������������������������������3 Connect to a computer throug
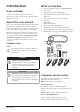
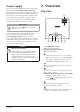
Introduction What’s in the box Dear customer b Thank you for purchasing this projector. d a c We hope you enjoy this product and the many functions it offers! e About this user manual f The quick start guide supplied with this product allows you to start using this product quickly and easily. Detailed descriptions can be found in the following sections of this user manual. Read the entire user manual carefully.
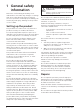
1 General safety information Take note of all warning and safety notes indicated. Do not make any changes or settings that are not described in this user manual. Incorrect operation, and improper handling can lead to physical injury, damage to the product or loss of data. Setting up the product This product is for indoor use only. Place the product securely on a stable, flat surface.
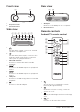
Power supply Use only a power adapter which is certified for this product (see Technical data, page 23). Check whether the mains voltage of the power supply matches the mains voltage available at the setup location. This product complies with the voltage type specified on the product. 2 Overview Top view a The power outlet shall be installed near the product and shall be easily accessible. CAUTION! Always use the projector off.
Front view Rear view a a b a b b a Projection lens Front IR sensor b Side view Remote controls a b c d e f g AV MICRO SD VGA port Connect to the VGA port on a computer. Rear IR sensor HDMI 1 HDMI 2 USB Android TV remote control l DC a k j a i 3.5 mm audio output; connect to external speakers or headphones. h b c d e f 3.5 mm audio/video input; connect to the analogue audio jacks and/or composite video jack on a playback device.
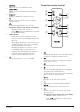
e Quick access to the Netflix service. Projector remote control f k Quick access to the Amazon Prime Video service. a j g Enable or disable the remote control. b h Return to the previous screen or exit the current screen. i Access the Android TV home screen. Navigation buttons (Up, Down, Left, Right) • Navigate items on the screen. • Press / to move backward or forward in the current video. LED indicator • Each time you press a button on the remote control, the LED lights up briefly then off.
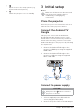
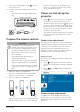
j Quick access to the setup options (e.g. picture and sound options). k 3 Initial setup Notice Make sure all devices are disconnected from their power supplies before establishing or changing any connections. Switch the projector on or to standby. Place the projector Place the projector on a flat surface such as a table in front of the projection surface. Connect the Android TV Dongle This projector comes with an Android TV Dongle (NeoViu D1), allowing you to easily watch videos over the internet.
3 Connect the AC adapter to the on the projector. 4 Connect the power cable to an electrical socket. • The LED on the projector lights up in red. AV MICRO SD HDMI 1 HDMI 2 sensor on the projector, and make sure there is no obstacle between the remote control and the IR sensor. socket USB Power on and set up the projector 1 Press to turn on the projector. The LED on the projector turns from red to green. • twice.
settings. AV AUX MICRO SD MICRO SD HDMI 1 HDMI 1 HDMI 2 HDMI 2 USB USB DCDC After the setup, Android TV will sign in to your Google account and connect to a Wi-Fi network. What you need • • A Wi-Fi internet connection A Google account Step 1: Pair the remote control with the Android TV Dongle Follow the on-screen instructions to pair the Android TV remote control with the Android TV Dongle. Image focus adjustment To adjust image focus, turn the focus adjustment knob at the top of the projector.
7 To finish setup, follow the instructions on your Android TV screen. Tip: After the setup, your Android TV automatically signs in to your Google Account and connects to the same Wi-Fi network as your phone. 4 Use Android TV You will see the Android TV home screen similar to the one below after completing the setup. Set up with the Android TV remote control 1 When your Android TV says, “Quickly set up your TV with your Android phone?”, use the Android TV remote control to choose Skip.
• the installed apps and access the app store. 5 Select your Bluetooth device. Press on the remote control to access voice search function. 6 When your Android TV says, “Pair with this device?”, choose Pair. The device will be paired within a few seconds. Configure Android TV On the home screen (press ), you can navigate to select in the upper right corner of the screen and access various Android TV related settings, e.g.
5 Connect to playback devices Notice Make sure all devices are disconnected from their power supplies before establishing or changing any connections. Connect to devices through AV You can connect a playback device (e.g. a DVD player, gaming console, camcorder or digital camera) to the projector through AV connection. With this connection, images are shown on the projection screen, and audio is played on the projector. 1 Connect to devices through HDMI You can connect a playback device (e.g.
Connect to a computer through VGA Connect to external speakers or headphones You can connect a computer (e.g. a desktop or laptop) to the projector through VGA connection. With this connection, images are shown on the projection screen. You can connect external speakers or headphones to the projector. With this connection, audio from the projector is played through the external speakers or headphones.
6 Play videos from storage devices file or a folder. To open a selected folder, press the OK button. To return to the parent folder, select Up Folder on the screen. To exit the current folder and storage device, press on the remote control or select RETURN on the screen. If you select a video file and wait more than 3 seconds, the projector will begin playing a preview of the video from the beginning. Using the projector, you can access and play video files stored on a local storage device.
Stop: Stops playing the video and returns to the list of video files in the current folder. • Repeat: Toggles between the repeat options. If Repeat None is selected, the projector will stop playing videos after the last video file in the current folder has been played. If Repeat 1 is selected, the projector will play the current video continuously. If Repeat ALL is selected, the projector will cycle through all the video files in the current folder continuously.
• • • • • View all the installed and system apps, and the storage used by each app. Set various permissions for the installed apps, e.g. location, contacts, camera, microphone, phone and SMS. Set security and restrictions for app installation. Check an app's version, storage used, cache size, etc. Clear an app's cache, disable or uninstall an app, view an app's permissions, etc. Display settings Go to TV settings - Display to access the following settings.
Change projector settings Picture settings 1 Press 2 Select a picture option, and then press / or the OK button to change the value. • Picture Mode: Select predefined color settings for picture or video display. Select User to customize the following settings: • Contrast: Set color contrast. • Brightness: Set color brightness. • Color: Set color saturation. • • • • on the projector remote control. Sharpness: Set image sharpness. Language settings 1 2 Color Temperature: Set the color temperature.
/ or the OK button to rotate or flip the projection screen. 8 Maintenance Cleaning DANGER! Follow the following instructions when cleaning the projector: Use a soft, lint-free cloth. Never use liquid or easily flammable cleansers (sprays, abrasives, polishes, alcohol, etc.). Do not allow any moisture to reach the interior of the projector. Do not spray the projector with any cleaning fluids. Set sleep timer Select a period of time after which the projector turns off automatically.
CAUTION! Do not turn off the projector or remove the USB flash drive during a software update. Update software through USB 1 Check the latest software version on www. philips.com/support. Find your product (model number: NPX646), and locate ‘Software and drivers’. 2 Download the software installation file to a USB flash drive. Unzip the downloaded file and save the resulting file in the root directory of the USB flash drive.
9 Troubleshooting Power cycling If a problem occurs and you cannot resolve it using the instructions in this user manual, try the following steps to resolve the problem. 1 Turn the projector off by pressing 2 Wait at least ten seconds. 3 Turn the projector on by pressing 4 If the problem persists, contact our technical service center or your dealer. twice. once. Problem Solution The projector cannot be turned on. • Disconnect and reconnect the power cable, and try to turn the projector on again.
Problem Solution The projector cannot read the USB storage • The projector does not support the exFAT file device. system. • Format the USB storage device in FAT32 or NTFS format, then use it. The projector does not react to remote control commands. • Check the batteries of the remote control. Screen Mirroring does not work anymore after a firmware update of an Android or iOS device. • We recommend checking regularly for new firmware of your projector (see Update software, page 19).
10 Appendixes Technical data External Dongle Android TV™ / Full catalog of Apps Operating system.....................................Android TV CPU................................................AMT972 QuadCore Technology/optical Integrated Media Player Display technology................................................LCD Thousands of codecs supported via VLC builtin players Light source..............................................................LED Resolution......................................
CE statement • The product shall only be connected to a USB interface of version USB 2.0 or higher. • Adapter shall be installed near the equipment and shall be easily accessible. • The operating temperature of the EUT can’t exceed 35°C and shouldn’t be lower than 5°C. • The plug is considered as disconnect device of adapter. • The UNII Band 5150-5250 MHz is for indoor use only. • The device complies with RF specifications when the device is used at 20 cm from your body.
exposure and compliance. This device should be installed and operated with a minimum distance of 7.8 inches (20 centimetres) between the device and your body. Other notice Preservation of the environment as part of a sustainable development plan is an essential concern of Screeneo Innovation SA.
Screeneo Innovation SA Route de Lully 5c - 1131 Tolochenaz - Switzerland Philips and the Philips Shield Emblem are registered trademarks of Koninklijke Philips N.V. used under license. Screeneo Innovation SA is the warrantor in relation to the product with which this booklet was packaged. NeoPix Ultra One+ 2022 © Screeneo Innovation SA. All rights reserved.