User Manual NeoPix Ultra 2TV Home projector Register your product and get support at www.philips.
Table of contents Introduction �������������������������������������������������3 9 Change settings ���������������������������������� 15 Dear customer ���������������������������������������������������������������3 Android TV system settings ������������������������������������15 About this user manual ����������������������������������������������3 Projector system settings ����������������������������������������16 What’s in the box ����������������������������������������������������������3 10 S
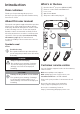
Introduction What’s in the box Dear customer b Thank you for purchasing this projector. d We hope you enjoy this product and the many functions it offers! TV projector (NPX643/INT) Remote control with 2 AAA batteries Lens cover Quick Start Guide AC power cable with plug x 3 a NeoPix Ultra 2 c e a About this user manual The quick start guide supplied with this product allows you to start using this product quickly and easily.
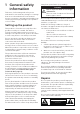
1 General safety information Take note of all warning and safety notes indicated. Do not make any changes or settings that are not described in this user manual. Incorrect operation, and improper handling can lead to physical injury, damage to the product or loss of data. Setting up the product This product is for indoor use only. Place the product securely on a stable, flat surface.
Power supply Before connecting the power plug to the mains socket, check whether the mains voltage of the power supply matches the mains voltage available at the setup location. This product complies with the voltage type specified on the product. 2 Overview Top view The power outlet shall be installed near the product and shall be easily accessible. CAUTION! Always use the projector off.
Front view Remote control a b l a k j b OK i c h c a Front IR sensor d b Focus adjustment knob e Adjust image sharpness. c Projection lens f g Rear view a b c de SPDIF HDMI USB f a SPDIF Connect to the digital SPDIF audio input on an HiFi audio system. b Connect to the HDMI output on a playback device. c USB port • Connect to power USB devices like Amazon Fire TV stick®, Roku® streaming stick (it also works for mass storage if you install an app like VLC).
i Access the Android TV home screen. j Navigation buttons Navigate menu options. k LED indicator • Each time you press a button on the remote control, the LED lights up briefly then off. • Blue light indicates the remote control is in Android TV mode and navigation of Android TV interface is possible. • Red light indicates the remote control is accessing the projector system settings and navigation of Android TV interface is not possible. l Switch the projector on or to standby.
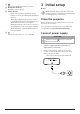
Prepare the remote control CAUTION! The improper use of batteries can lead to overheating, explosion, risk of fire and injury. Leaking batteries can possibly damage the remote control. Never expose the remote control to direct sunlight. Avoid deforming, dismantling or charging the batteries. Avoid exposure to open fire and water. Replace empty batteries immediately. Remove the batteries from the remote control if not in use for long periods of time. 1 Open the battery compartment.
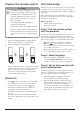
4 Operation Image setup Screen size adjustment The projection screen size (or size of images) is determined by the distance between the lens of the projector and the projection surface. This projector has the projection distance from 80 cm to 200 cm, and thus creates projection image size from 20" to 100". Digital zooming You can use the digital zoom to reduce the screen size. 1 Press to access the settings options and go to Digital Zoom.
Manual correction You can manually correct keystone or distorted images to be rectangular. 1 Press to access the settings options and go to Geometry Corrections - Manual. 2 The projector automatically adjusts for the correct projection orientation. If not in the correct projection orientation, press to access the settings options and go to Projection Direction - Front.
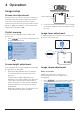
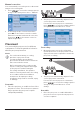
5 Use home screen The home screen provides direct access to Android TV service and setup on the projector. 2 The projector automatically adjusts for the correct projection orientation. If not in the correct projection orientation, press to access the settings options and go to Projection Direction - Rear. Rear ceiling 1 Mount the projector on ceiling with upside up behind the projection screen.
Use wired keyboard/mouse • • • Simply connect the USB-A plug of your wired mouse or keyboard to the USB port on the projector. Use the keys on the keyboard for screen navigation, selection and text input, just like the keyboard operation with a computer. Use the buttons on the mouse for navigation and selection. 6 Chromecast streaming This projector has Chromecast built-in. This allows you to stream content (e.g.
7 Connect to playback devices Notice When the projector is connected to an HDMI device and switched to HDMI input, volume adjustment is not possible through the remote control. Press to access the settings options and go to Volume for volume adjustment. Notice Make sure all devices are disconnected from the power outlet before establishing or changing any connections. Connect to devices through HDMI Connect a playback device (e.g.
8 Other features 2 Listen through external speakers or headphones Use HDMI ARC function Connect external speakers or headphones to the projector. With this connection, audio from the projector is played through the external speakers or headphones. This projector supports HDMI with Audio Return Channel (ARC). With ARC feature, you can hear the audio from the projector on the connected HDMI ARC device. DANGER! device to the USB port on the projector.
9 Change settings • This section helps you change the following two system settings: • • Android TV system Projector system Android TV system settings 1 2 On the home screen (press ), use the Navigation buttons on the remote control to select the icon in the upper right corner of the home screen then press OK to access various setting options. Use the Navigation buttons and OK to select and change settings.
Go to TV settings - Audio Output to access the following settings. Projector system settings • 1 Press on the remote control to access the projector system settings options. 2 Use the Navigation buttons and OK to select and change settings. • • Dolby sounds: select a DRC (Dynamic Range Compression) mode for reducing dynamic range of sound output. For example, reduce the volume of the loud sounds when watching movie at night.
• • • • values on brightness, contrast, saturation and sharpness. Color Temperature: Set to Warm to enhance hotter colors such as red; set to Cool to make picture bluish; set to User to customize color values in RGB mode. Geometry Corrections: Select an option to correct keystone or distorted images to be rectangular or square. • Auto: Enable or disable auto correction of the image shape. • Manual: Manually correct keystone or distorted images in the horizontal and vertical orientation.
10 Service Update SW through USB CAUTION! Cleaning Do not turn off the projector or remove the USB flash drive during the update. DANGER! Instructions for cleaning! Use a soft, lint-free cloth. Never use liquid or easily flammable cleansers (sprays, abrasives, polishes, alcohol, etc.). Do not allow any moisture to reach the interior of the projector. Do not spray the projector with any cleaning fluids. Wipe over the surfaces gently. Be careful that you do not scratch the surfaces.
Troubleshooting 1 Turn the projector off by pressing Power cycling 2 Wait at least ten seconds. 3 Turn the projector on by pressing 4 If the problem persists, please contact our technical service centre or your dealer. If a problem occurs that cannot be corrected with the instructions in this user manual, follow the steps given here. . once. Problems Solutions The projector cannot be turned on. • Disconnect and reconnect the power cable, and try to turn the projector on again.
Problems Solutions When I view videos, the sound or the • The available WiFi bandwidth is insufficient for picture is sometimes distorted or the sound sending the video flawlessly from the smartphone is not synchronized to the picture. to the projector. This can happen if one or more WiFi networks operate in the same frequency range nearby. Certain IoT devices (e.g. ZigBee enabled devices) also operate in this frequency range.
11 Appendix Technical data Technology/optical Product details Dimensions (W × D × H) ...........277 x 310 x 111 mm Weight .................................................................... 2.7 kg Operating temperature.......................... 5 °C - 35 °C Storage temperature....................................... < 60 °C Display technology ...............................................LCD Light source .............................................................LED Package content Color space ......
CE statement 15.105 Information to user. • The product shall only be connected to a USB interface of version USB 2.0 or higher. • Adapter shall be installed near the equipment and shall be easily accessible. • The operating temperature of the EUT can’t exceed 35°C and shouldn’t be lower than 5°C. • The plug is considered as disconnect device of adapter. • The UNII Band 5150-5250 MHz is for indoor use only. • The device complies with RF specifications when the device is used at 20 cm from your body.
RF Radiation Exposure statement: The device meets the exemption from the routine evaluation limits in section 2.5 of RSS102 and users can obtain Canadian information on RF exposure and compliance. This device should be installed and operated with a minimum distance of 7.8 inches (20 centimetres) between the device and your body. Other notice Preservation of the environment as part of a sustainable development plan is an essential concern of Screeneo Innovation SA.
Screeneo Innovation SA Route de Lully 5c - 1131 Tolochenaz - Switzerland Philips and the Philips Shield Emblem are registered trademarks of Koninklijke Philips N.V. used under license. Screeneo Innovation SA is the warrantor in relation to the product with which this booklet was packaged. NeoPix Ultra 2TV 2021 © Screeneo Innovation SA. All rights reserved.