
User manual


Operation 9
4 Operation
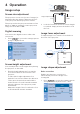
Image setup
Screen size adjustment
The projection screen size (or size of images) is
determined by the distance between the lens
of the projector and the projection surface.
This projector has the projection distance from
80 cm to 200 cm, and thus creates projection
image size from 20" to 100".
Digital zooming
You can use the digital zoom to reduce the
screen size.
1 Press to access the settings options
and go to Digital Zoom.
2 Press / to adjust screen size.
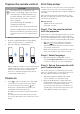
Screen height adjustment
You can adjust the screen height when placing
the projector on the table.
1 Find the height adjustment foot and the
foot release slider on the bottom of the
projector.
To unlock the height adjustment foot,
push the foot release slider in the direction
of the arrow shown below and hold the
slider. Then the foot will extend outwards
when the bottom of the projector points
downwards.
Adjust the length of the foot when the foot
is unlocked and extends outwards.
Height adjustment
foot
Foot release
slider
2 Lock the foot when the desire screen height
is reached. Simply release the slider to lock
the foot.
Image focus adjustment
To adjust image focus, turn the focus knob on
the front of the projector.
NeoPix
Ultra 2
TV
Image shape adjustment
Auto correction
Enable auto keystone correction to
automatically correct the image to be
rectangular.
1 Press to access the settings options
and go to Geometry Corrections - Auto.