User Manual NeoPix Ultra 2 Home projector Register your product and get support at www.philips.
Table of contents Introduction �������������������������������������������������3 7 Dear customer ���������������������������������������������������������������3 Screen mirroring for iOS devices and Mac �������� 17 About this user manual ����������������������������������������������3 Cast video for iOS devices �������������������������������������� 17 What’s in the box ����������������������������������������������������������3 Customer service centre ��������������������������������������������3 S
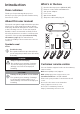
Introduction What’s in the box Dear customer b Remote control with 2 AAA batteries Thank you for purchasing this projector. d Lens cover We hope you enjoy this product and the many functions it offers! a NeoPix Ultra 2 projector (NPX642/INT) c A/C power adapter e Quick Start Guide f AC power cable with plug x 4 About this user manual a The quick start guide supplied with this product allows you to start using this product quickly and easily.
1 General safety information Take note of all warning and safety notes indicated. Do not make any changes or settings that are not described in this user manual. Incorrect operation, and improper handling can lead to physical injury, damage to the product or loss of data. Setting up the product This product is for indoor use only. Place the product securely on a stable, flat surface.
Power supply Use only a power adapter which is certified for this product (see Technical data, page 23). Check whether the mains voltage of the power supply matches the mains voltage available at the setup location. This product complies with the voltage type specified on the product. 2 Overview Top view a The power outlet shall be installed near the product and shall be easily accessible. CAUTION! Always use the projector off.
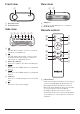
Front view Rear view a a b b a VGA port a Projection lens Connect to the VGA port on a computer. b Front IR sensor b Rear IR sensor Side view Remote control a b c d e f g AV MICRO SD HDMI 1 HDMI 2 USB DC m a l b k c OK a 3.5 mm audio output; connect to external speakers or headphones. j b c d e f 3.5 mm audio/video input; connect to the analogue audio jacks and/or composite video jack on a playback device. Micro SD card slot Connect to a Micro SD card for media play.
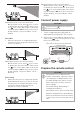
b • • Access and select an input source. Quick access to settings options (e.g. picture and sound options). c Confirm a selection or entry. d • • When browsing apps, access more options. When playing media, access more options. 3 Initial operation Placement You can install the projector in four different configuration. Follow the guidelines below for different projector placement.
Adjust projection to the correct position. On the home screen, press once or more to display the shortcut options. Then select the icon on the upper right of the home screen and press OK, then go to Projection Image Setting - Projection Mode - RearCeiling. Connect power supply Adjust projection to the correct position. On the home screen, press once or more to display the shortcut options.
1 Open the battery compartment. 2 Insert the supplied batteries (type AAA) with correct polarity (+/- ) indicated. 3 Close the battery compartment. Setting - Digital Zoom. 2 Press / to adjust screen size with 60100% scaling range. Screen height adjustment To adjust the screen height when placing the projector on the table, turn the angle adjustment knob located on the bottom of the projector.
• • First go to Projection Image Setting - Gyro Horizon. Perform calibration to achieve optimal horizontal projection. Then go to Projection Image Setting Auto Keystone - On. Initialize automatic correction of the projection. Make sure to select Projection Image Setting - Keystone Advanced - Front to activate Auto Keystone option. Manual correction You can manually correct keystone or distorted images to be rectangular. 1 2 Press on the remote control to display the settings options.
Step 2: activate on-screen pointer Activate the on-screen pointer (mouse cursor) to replace the function of the Navigation buttons on the remote control. The on-screen pointer is useful when you input text through pop-up virtual keyboard, browse the Internet, or use some certain apps. Before you can use the on-screen pointer, pair the remote control with the projector. 1 Go to the Bluetooth settings. On the home screen, press once or more to display the shortcut options.
4 Use home screen The home screen provides easy access to a wide range of Internet applications, setup and other useful features on the projector. • • Use the Navigation buttons and OK on the remote control to select and open an application. To uninstall applications on the home screen, select an application, then press on the remote control to access the Uninstall option. Notice New applications (apps) will be automatically installed on the projector with firmware update (see Update software, page 20).
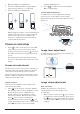
Use Bluetooth Keyboard/mouse/ gamepad 1 Pair your Bluetooth keyboard, mouse or gamepad with the projector as follows: • 2 On the home screen, press once or more to display the shortcut options. Use the Navigation button on the remote control to select Bluetooth to access Bluetooth settings. Enable Bluetooth by selecting Bluetooth ON/ OFF if not enabled. In the Bluetooth settings interface of the projector, select your Bluetooth keyboard, mouse, or gamepad name from the Bluetooth device list.
projector to the analogue audio output jacks (red and white) and/or composite video output jack on a playback device. AV MICRO SD HDMI 1 HDMI 2 USB 2 DC Resolution 3 2 On your computer, adjust the screen resolution of the computer to the correct setting and switch the VGA signal to an external monitor. The following resolutions are supported: Press to display the input source list, and then select AV. Connecting to a computer through VGA Connect a computer (e.g.
AV MICRO SD HDMI 1 HDMI 2 USB DC 6 Browse storage devices Through the projector, you can access and play the pictures, audio and video files stored on the local storage and the networked device. 1 Connect a USB storage device to the USB port on the projector. • 2 When connecting to the headphones, use the volume control on the remote control to adjust the volume to a comfortable level. Or connect a Micro SD card to the MICRO SD slot on the projector.
• Pause/resume play • Select a previous/next playback file • Fast forward/backward • Skip to a specific part of the video by entering the time of the scene. Using / on the remote control to input time. • Repeat a video section. • Select sound effect and picture effect. Play music from storage devices 1 From the file browser displayed, navigate to access the folders on the storage device. 2 To access music files, make sure the music icon on the left side of the file browser is selected.
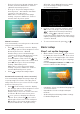
7 Wireless projection On the home screen, press once or more to display the shortcut options. Use the Navigation button on the remote control to access AirPlayTM to check whether AirPlay is enabled. Once enabled, you do not need to enable it again later. View online video on your iPhone, and tap the TV icon on the video picture to access Apple TV mode. The video is now cast and played on the full projection screen.
2 3 • tablet). On your Android device (or Windows PC), access the screen mirroring funtion. Then select the projector name under the screen mirroring device list to connect your Android device to the projector. After successful connection, the screen contents of your Android device (or Windows PC) are casted to the projection surface.
projection. Place the projector on a level surface before calibration. • Projection Mode: Adjust the projection to the correct position based on different installation of the projector. • Keystone Advanced: Enable or disable 4-corner image correction. Select Side to enable 4-corner image correction. • Auto Keystone: Enable or disable auto correction of the projection. Perform calibration (Gyro Horizon) before you enable auto keystone correction of the projection.
• • sharpness. White Balance: Select a white balance option to best reproduce colours under different lighting conditions. Or configure your own color balance between red, green and blue. Picture Preset: Select a predefined color brightness setting for picture and video display. 9 Service Cleaning DANGER! Instructions for cleaning! Use a soft, lint-free cloth. Never use liquid or easily flammable cleansers (sprays, abrasives, polishes, alcohol, etc.).
screen and press OK, then go to System Update - Online Update. On the home screen, press once or more to display the shortcut options. Then select the icon on the upper right of the home screen and press OK, then go to System Update - Local Update. 5 Follow the on-screen instructions to complete the update. • 3 If an upgrade media is detected, you are prompted to start or cancel the update. Follow the on-screen instructions to complete the update.
Problems Solutions Only the home menu appears and not the image from the connected computer. • Check that the VGA output of the computer is turned on. • Check if the resolution of the computer is set to 1920*1080 (for VGA connection) or 1080P (for HDMI connection). The projector turns itself off. • When the projector is running for a long period of time, the surface becomes hot. • Check that the power cable is connected correctly.
10 Appendix Technical data Technology/optical Apps Pre loaded apps........................... Smart Philips OS Netflix, YouTube, Firefox, Express VPN, VLC...(continuously expanding and thus may differ when shipping) Display technology ...............................................LCD Product details Light source .............................................................LED Dimensions (W × D × H) ..........220 x 170 x 90 mm Resolution .....................................
CE statement 15.105 Information to user. • The product shall only be connected to a USB interface of version USB 2.0 or higher. • Adapter shall be installed near the equipment and shall be easily accessible. • The operating temperature of the EUT can’t exceed 35°C and shouldn’t be lower than 5°C. • The plug is considered as disconnect device of adapter. • The UNII Band 5150-5250 MHz is for indoor use only. • The device complies with RF specifications when the device is used at 20 cm from your body.
Other notice Preservation of the environment as part of a sustainable development plan is an essential concern of Screeneo Innovation SA. The desire of Screeneo Innovation SA is to operate systems respecting the environment and consequently it has decided to integrate environmental performances in the life cycle of these products, from manufacturing to commissioning use and elimination.
PHILIPS and the PHILIPS’ Shield Emblem are registered trademarks of Koninklijke Philips N.V. used under license. This product was brought to the market by Screeneo Innovation SA., further referred to in this document as Screeneo Innovation SA., and is the manufacturer of the product. 2020 © Screeneo Innovation SA. All rights reserved. Headquarters: Screeneo Innovation SA. Route de Lully 5C 1131 - Tolochenaz – Switzerland www.philips.