
User manual


8 Philips · NeoPix Ultra 2
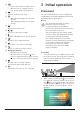
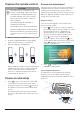
Front ceiling
1 Mount the projector on the ceiling with
upside up in front of the projection screen.
A projector mount is required to mount the
projector on ceiling.
2 Adjust projection to the correct position.
On the home screen, press once or more
to display the shortcut options. Then select
the icon on the upper right of the home
screen and press OK, then go to Projection
Image Setting - Projection Mode - Front-
Ceiling.
Rear table
1 Place the projector on a table behind the
projection screen. A special rear projection
screen is required.
2 Adjust projection to the correct position.
On the home screen, press once or more
to display the shortcut options. Then select
the icon on the upper right of the home
screen and press OK, then go to Projection
Image Setting - Projection Mode - Rear-
Desktop.
Rear ceiling
1 Mount the projector on ceiling with upside
up behind the projection screen. To mount
the projector on ceiling behind the screen,
a projector mount and a special rear
projection screen is required.
2 Adjust projection to the correct position.
On the home screen, press once or more
to display the shortcut options. Then select
the icon on the upper right of the home
screen and press OK, then go to Projection
Image Setting - Projection Mode - Rear-
Ceiling.
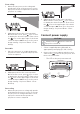
Connect power supply
CAUTION!
Always use the button to turn the
projector on and off.
1 Select a supplied power cable with an
appropriate power plug (EU, UK, US, CH).
2 Connect the power adapter with the power
cable to the socket on the projector, and
then to the wall outlet.
• The LED on the projector turns red.
a
b
c
MICRO SDAV HDMI 1HDMI 2USB DC