NeoPix Ultra 2 Home projector EN User Manual FR Manuel utilisateur DE Bedienungsanleitung ES Manual de usuario IT Manuale d’uso NL Gebruiksaanwijzing RU Руководство пользователя TR Kullanım Kılavuzu Register your product and get support at www.philips.
User Manual NeoPix Ultra 2 Home projector Register your product and get support at www.philips.
Table of contents Introduction �������������������������������������������������3 7 Dear customer ���������������������������������������������������������������3 Screen mirroring for iOS devices and Mac �������� 17 About this user manual ����������������������������������������������3 Cast video for iOS devices ��������������������������������������18 What’s in the box ����������������������������������������������������������3 Customer service centre ��������������������������������������������3 Sc
Introduction What’s in the box Dear customer b Remote control with 2 AAA batteries Thank you for purchasing this projector. d Lens cover We hope you enjoy this product and the many functions it offers! a NeoPix Ultra 2 projector (NPX642/INT) c A/C power adapter e Quick Start Guide f AC power cable with plug x 4 About this user manual a The quick start guide supplied with this product allows you to start using this product quickly and easily.
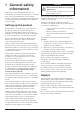
1 General safety information Take note of all warning and safety notes indicated. Do not make any changes or settings that are not described in this user manual. Incorrect operation, and improper handling can lead to physical injury, damage to the product or loss of data. Setting up the product This product is for indoor use only. Place the product securely on a stable, flat surface.
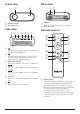
Power supply Use only a power adapter which is certified for this product (see Technical data, page 26). Check whether the mains voltage of the power supply matches the mains voltage available at the setup location. This product complies with the voltage type specified on the product. 2 Overview Top view a The power outlet shall be installed near the product and shall be easily accessible. CAUTION! Always use the projector off.
Front view Rear view a a b b a VGA port a Projection lens Connect to the VGA port on a computer. b Front IR sensor b Rear IR sensor Side view Remote control a b c d e f g AV MICRO SD HDMI 1 HDMI 2 USB DC m a l b k c OK a 3.5 mm audio output; connect to external speakers or headphones. j b c d e f 3.5 mm audio/video input; connect to the analogue audio jacks and/or composite video jack on a playback device. Micro SD card slot Connect to a Micro SD card for media play.
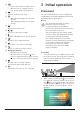
b • • Access and select an input source. Quick access to settings options (e.g. picture and sound options). c Confirm a selection or entry. d • • When browsing apps, access more options. When playing media, access more options. 3 Initial operation Placement You can install the projector in four different configuration. Follow the guidelines below for different projector placement.
Front ceiling 1 Mount the projector on the ceiling with upside up in front of the projection screen. A projector mount is required to mount the projector on ceiling. 2 2 Adjust projection to the correct position. On the home screen, press once or more to display the shortcut options. Then select the icon on the upper right of the home screen and press OK, then go to Projection Image Setting - Projection Mode - FrontCeiling. Rear table 1 Place the projector on a table behind the projection screen.
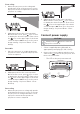
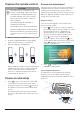
Prepare the remote control CAUTION! The improper use of batteries can lead to overheating, explosion, risk of fire and injury. Leaking batteries can possibly damage the remote control. Screen size adjustment The projection screen size (or size of images) i-s determined by the distance between the lens of the projector and the projection surface. This projector has the projection distance from 80 cm to 200 cm, and thus creates projection image size from 20" to 65".
Image focus adjustment To adjust image focus, turn the focus knob on the top of the projector. Manual correction You can manually correct keystone or distorted images to be rectangular. 1 NeoPix Ultra 2 Press on the remote control to display the settings options. Then navigate to select Geometry Corrections - Manual. Another way to access manual image correction as follows. On the home screen, press once or more to display the shortcut options.
2 In the 4-corner correction interface, press OK to select an image corner, then press / to adjust the horizontal positioning values, and / to adjust the vertical positioning values. Repeat the same step to adjust positioning values of the other image corners if desired. 3 To exit correction mode, press or . Basic setup 2 Hold down and on the remote control for five seconds. The remote control is automatically paired with the projector.
Step 3: set up the WiFi network Set up the WiFi network to access online applications and screen mirroring. What you need • • A wireless network router. For best wireless performance and coverage, use an 802.11n router (“WiFi 4”) and the 5 GHz band. 1 Go to the WiFi settings. On the home screen, press once or more to display the shortcut options. Use the Navigation button on the remote control to select WiFi to access WiFi setting. Enable WiFi by selecting WiFi ON/OFF if not enabled.
Access online services Some pre-loaded Internet applications are available on the home screen. • Before access to the applications, make sure the projector is connected to Internet. On the home screen, press once or more to display the shortcut options then use the Navigation buttons to select WiFi. • Use the Navigation buttons and OK on the remote control to select and open an application.
5 Connect to playback devices Notice Make sure all devices are disconnected from the power outlet before establishing or changing any connections. Connecting to devices through AV Connect a playback device (e.g. a DVD player, gaming console, camcorder or digital camera) to the projector through AV connection. With this connection, images are shown on the projection screen, and audio is played on the projector. 1 Connecting to devices through HDMI Connect a playback device (e.g.
• The speakers of the projector are deactivated automatically when the external speakers or headphones are connected to the projector. VGA AV 2 HDMI 1 HDMI 2 USB DC On your computer, adjust the screen resolution of the computer to the correct setting and switch the VGA signal to an external monitor.
6 Browse storage devices Through the projector, you can access and play the pictures, audio and video files stored on the local storage and the networked device. 1 Play video from storage devices 1 From the file browser displayed, navigate to access the folders on the storage device. 2 To access video files, make sure the video icon on the left side of the file browser is selected. Select a video file, and press OK to start video playback.
View photo from storage devices 1 From the file browser displayed, navigate to access the folders on the storage device. 2 To access picture files, make sure the picture icon on the left side of the file browser is selected. Select a picture file, and press OK to display the picture. 3 • When the picture is displayed, the playback control bar appears at the bottom of the screen. You can press on the remote control to hide or display the control bar.
Cast video for iOS devices You can cast videos from your iOS device on the full projection screen. What you need • 1 2 Enable WiFi both on the projector and iPhone/Mac, and the two are in the same WiFi network. Make sure AirPlay is enabled on the projector. On the home screen, press once or more to display the shortcut options. Use the Navigation button on the remote control to access AirPlayTM to check whether AirPlay is enabled. Once enabled, you do not need to enable it again later.
Notice For better streaming performance, use a 5 GHz WiFi network. Copy-protected (DRM) content cannot be streamed. Google Pixel Phones are not compatible with this Screen Mirroring system. 8 Change settings This section helps you change the following two system settings: • • Operating system Projector system Operating system settings 1 On the home screen, press once or more to display the shortcut options.
Bluetooth settings Go to Bluetooth Setting to pair the projector with the projector's remote control, or a Bluetooth keyboard/mouse/gamepad. • Digital Zoom: Scale the projection image within the range from 60% to 100%. Notice If Side is selected under Keystone Advanced, Auto Keystone option is invisible and Manual Keystone option is enabled for 4-corner image correction. Language and keyboard settings Go to Language and input method Setting to access the following settings.
System information checking Go to System Info to check the following system information: product name, system version, free and total internal memory, free and total ROM, and MAC address. • • Check an app version, app size and cache size. Clear cache size or uninstall an app. Restore default settings 1 Go to System Update then select Restore Factory. Projector system settings 2 1 Press or on the remote control to access the projector system setting options.
Image options Other options You can access the image setting options, such as: You can also access the following options. • • • Picture Adjustments: Set the values for brightness, contrast, saturation and sharpness. White Balance: Select a white balance option to best reproduce colours under different lighting conditions. Or configure your own color balance between red, green and blue. Picture Preset: Select a predefined color brightness setting for picture and video display.
9 Service Update SW through Internet 1 Connect the projector to the Internet. Cleaning 2 On the home screen, press once or more to display the shortcut options. Then select the icon on the upper right of the home screen and press OK, then go to System Update - Online Update. DANGER! Instructions for cleaning! Use a soft, lint-free cloth. Never use liquid or easily flammable cleansers (sprays, abrasives, polishes, alcohol, etc.). Do not allow any moisture to reach the interior of the projector.
Troubleshooting 1 Turn the projector off by pressing times Power cycling 2 Wait at least ten seconds. If a problem occurs that cannot be corrected with the instructions in this user manual, follow the steps given here. 3 Turn the projector on by pressing 4 If the problem persists, please contact our technical service centre or your dealer. two once. Problems Solutions The projector cannot be turned on. • Disconnect and reconnect the power cable, and try to turn the projector on again.
Problems Solutions The projector does not react to remote control commands. • Check the batteries of the remote control. Measures to take if Screen Mirroring does not work anymore after a firmware update of an Android or iOS device? • We recommend checking regularly for new firmware of your projector (see Update software, page 23). Screen mirroring does not work with the available Android device. • In order to allow screen mirroring, your device must support Miracast.
10 Appendix Technical data Technology/optical Apps Pre loaded apps........................... Smart Philips OS Netflix, YouTube, Firefox, Express VPN, VLC...(continuously expanding and thus may differ when shipping) Display technology ...............................................LCD Product details Light source .............................................................LED Dimensions (W × D × H) ..........220 x 170 x 90 mm Resolution .....................................
CE statement 15.105 Information to user. • The product shall only be connected to a USB interface of version USB 2.0 or higher. • Adapter shall be installed near the equipment and shall be easily accessible. • The operating temperature of the EUT can’t exceed 35°C and shouldn’t be lower than 5°C. • The plug is considered as disconnect device of adapter. • The UNII Band 5150-5250 MHz is for indoor use only. • The device complies with RF specifications when the device is used at 20 cm from your body.
RF Radiation Exposure statement: The device meets the exemption from the routine evaluation limits in section 2.5 of RSS102 and users can obtain Canadian information on RF exposure and compliance. The paper and cardboard packaging used can be disposed of as recyclable paper. Have the plastic wrapping recycled or dispose of it in the non-recyclable waste, depending on the requirements in your country. This device should be installed and operated with a minimum distance of 7.
Screeneo Innovation SA Route de Lully 5c - 1131 Tolochenaz - Switzerland Philips and the Philips Shield Emblem are registered trademarks of Koninklijke Philips N.V. used under license. Screeneo Innovation SA is the warrantor in relation to the product with which this booklet was packaged. NeoPix Ultra 2 2021 © Screeneo Innovation SA. All rights reserved.