NeoPix 330 User Manual Home Projector Register your product and get support at www.philips.
Table of contents Introduction �������������������������������������������������3 4 Connect to other devices ������������������10 Dear customer ���������������������������������������������������������������3 About this user manual ����������������������������������������������3 Connect to a playback device through HDMI™ ������������������������������������������������������������������������������������������10 What’s in the box ����������������������������������������������������������3 Connect to a
Introduction What’s in the box Dear customer b Remote control with 2 AAA batteries Thank you for purchasing this projector. d AC power cables with plugs x 3 We hope you enjoy this product and the many functions it offers! a NeoPix 330 projector (NPX330/INT) c Quick Start Guide with Warranty Card a b About this user manual The quick start guide supplied with this product allows you to start using this product quickly and easily.
1 General safety information Take note of all warning and safety notes indicated. Do not make any changes or settings that are not described in this user manual. Incorrect operation, and improper handling can lead to physical injury, damage to the product or loss of data. Setting up the product This product is for indoor use only. Place the product securely on a stable, flat surface.
Power supply Use only a power adapter which is certified for this product (see Technical data, page 18). Check whether the mains voltage of the power supply matches the mains voltage available at the setup location. This product complies with the voltage type specified on the product. 2 Overview Top view a b The power outlet shall be installed near the product and shall be easily accessible. CAUTION! Always use the projector off.
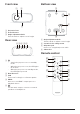
Front view a Bottom view b a b c c a Projection lens b Front IR sensor c Angle adjustment knob d Turn the knob to adjust screen height. Rear view a Angle adjustment knob Turn the knob to adjust screen height. ab c de USB HDMI b Screw hole for ceiling mount c AC power jack Connect to a supplied power cable. d Subwoofer Remote control k a • Switch the projector on or to standby mode. • When the projector is on, the LED lights up in white.
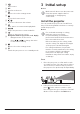
a Input source b OK Confirm a selection. 3 Initial setup Notice Make sure all devices are disconnected from their power supplies before establishing or changing any connections. c Open or close the settings menu. d e Access the home screen. / Increase or decrease the volume. f g Start, pause or resume media playback. / Skip to the previous or next media file. Install the projector You can install the projector in four different ways. Follow the guidelines below to correctly install the projector.
Rear Ceiling 1 Mount the projector on ceiling with upside up behind the projection screen. To mount the projector on ceiling behind the screen, a projector mount and a special rear projection screen are required. 2 If the projection direction is incorrect, press on the remote control to open the settings menu, go to Projector > Install Mode > Rear Ceiling and press the OK button. Front Ceiling 1 Mount the projector on the ceiling with upside up in front of the projection screen.
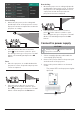
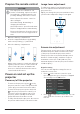
Prepare the remote control CAUTION! The improper use of batteries can lead to overheating, explosion, risk of fire and injury. Leaking batteries can possibly damage the remote control. Image focus adjustment To adjust the image focus (sharpness), turn the focus adjustment knob attached to the projection lens. Tip: If you change the projection distance later, you'll need to adjust the image focus again. Never expose the remote control to direct sunlight.
Screen height adjustment To adjust the screen height when placing the projector on a flat surface, turn the angle adjustment knob located at the bottom of the projector. 4 Connect to other devices Connect to a playback device through HDMI™ Image shape adjustment V/H Keystone You can connect a playback device (e.g. a Bluray player, gaming console, camcorder, digital camera or PC) to the projector through HDMI™ connection.
2 To activate the HDMI™ ARC function on the projector, press on the remote control and then select Sound > Output > ARC. Connect to a dongle You can connect a dongle (e.g. Amazon Fire Stick, Roku Stick and Chromecast) to the projector to easily watch videos over the internet. With this connection, images are shown on the projection screen, and audio is played on the projector. 1 2 Connect to wired speakers or headphones You can connect wired speakers or headphones to the projector.
5 Change projector settings Picture settings You can view and change the following picture settings. This section helps you change the projector settings using the settings menu. 1 Press on the remote control to access the projector's settings menu. 2 Use the navigation buttons and the OK button to select a menu item. Press to return to the previous level of the menu tree. 3 Press / or / to select a value for the menu item. 4 Press the OK button to make the change.
Sound settings Image settings You can view and change the following sound settings. You can view and change the following image settings. • • • • • • • • Sound Mode: You can set the projector to use the following sound modes, depending on your environment, audio type or preferences. • Movie: Optimize the bass and treble levels for movies. • Music: Optimize the bass and treble levels for music. • User: Define your own bass and treble levels. Output: Select the projector's audio output type.
Other settings You can view and change the following additional settings. • • • • • Language: Select your preferred display language. Sleep Timer: Select a period of time after which the projector turns off automatically. The default value is Disabled. Information: View the hardware version, software version and serial number of this product. Firmware Upgrade: Update the projector's software. For more details, see Update software, page 15.
6 Maintenance Cleaning DANGER! Update software The latest software for the projector can be found on www.philips.com/support for you to get the best features and support from the projector. Follow the following instructions when cleaning the projector: Use a soft, lint-free cloth. Never use liquid or easily flammable cleansers (sprays, abrasives, polishes, alcohol, etc.). Do not allow any moisture to reach the interior of the projector. Do not spray the projector with any cleaning fluids.
7 Troubleshooting Power cycling If a problem occurs and you cannot resolve it using the instructions in this user manual, try the following steps to resolve the problem. 1 Turn the projector off by pressing 2 Wait at least 10 seconds. twice. 3 Turn the projector on by pressing 4 If the problem persists, contact one of our customer service centers or your dealer. . Problem Solution The projector cannot be turned on.
Problem Solution The temperature of the projector’s surface is warm. • For this projector it is normal to generate moderate heat during operation. The projector does not work after I connect • Check that the HDMI™ cable is plugged in it to a laptop. correctly. • Make sure that the laptop has been switched to projector display. Black / White Pixels An LCD display may contain a small number of pixels that do not function normally (also known as “dead pixels” or “black pixels”).
8 Appendixes Technical data Technology/optical Display technology................................................LCD Light source............................................single LED W Lumens....................................................................... 250 Resolution.................................... 1920 x 1080 pixels LED lifetime.................................over 30,000 hours Contrast ratio..................................................... 3000:1 Aspect ratio............................
CE statement • The product shall only be connected to a USB interface of version USB 2.0 or higher. • Adapter shall be installed near the equipment and shall be easily accessible. • The operating temperature of the EUT can’t exceed 35°C and shouldn’t be lower than 5°C. • The plug is considered as disconnect device of adapter. Hereby, Screeneo Innovation SA declares that this product is in compliance with essential requirements and other relevant provisions of Directive 2014/53/EU.
regulations ask you to dispose of it selectively: • At sales points in the event of the purchase of similar equipment. • At the collection points made available to you locally (drop-off center , selective collection, etc.). In this way you can participate in the reuse and upgrading of Electrical and Electronic Equipment Waste, which can have an effect on the environment and human health. The paper and cardboard packaging used can be disposed of as recyclable paper.
Screeneo Innovation SA Route de Lully 5c - 1131 Tolochenaz - Switzerland Philips and the Philips Shield Emblem are registered trademarks of Koninklijke Philips N.V. and are used under license. Screeneo Innovation SA is the warrantor in relation to the product with which this booklet was packaged. NeoPix 330 2023 © Screeneo Innovation SA. All rights reserved.