
Operation Manual

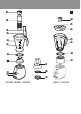


H Opening in lid
I Fruit lter (HR2004 only)
J Measuring cup
Mill (HR2011/HR2001 only):
K Mill blade unit
L Mill sealing ring
M Mill beaker
Blender with glass jar (HR2011/HR2010 only):
N Blender blade unit
O Sealing ring
P Level indication
Q Glass blender jar
R Lid of glass blender jar
S Opening in lid
T Measuring cup
Thoroughly clean the parts that come into contact with food before you use the appliance for the
rst time (see chapter ‘Cleaning’).
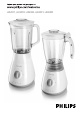
Blender
The blender is intended for ne pureeing, chopping and blending. With the blender you can prepare
soups, sauces and milk shakes. You can also use it to process vegetables, fruit, meat, pancake batter
etc.
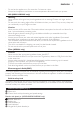
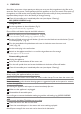
1 Assemble the sealing ring on the blender blade unit (Fig. 2).
2 Screwthebladeunitontothebottomoftheblenderjaruntilthebladeunititisxed
properly. (Fig. 3)
3 Puttheblenderjarwiththebladeunitattachedonthemotorunitandxitbyturningit
clockwise (‘click’). (Fig. 4)
The blender jar can be mounted in two positions: with the handle on the right side or on the left
side.
4 Put the mains plug in the wall socket.
1 Put the ingredients in the blender jar.
2 Close the lid.
HR2011/HR2010: Place the lid on the blender jar, push it down and turn the lid clockwise (‘click’).
3 Insert the measuring cup into the opening in the lid. (Fig. 5)
4 Turn the control knob to speed 1 or 2.
Turn the control knob to the pulse setting if you want to process ingredients very briey.
ENGLISH8