3 3 4 A F B C G D E K H I J
4
HQ8253, HQ8251, HQ8250, HQ8241, HQ8240, HQ8200 English 6 Français 21
6 English Introduction Congratulations on your purchase and welcome to Philips! To fully benefit from the support that Philips offers, register your product at www.philips. com/welcome. Please read this user manual, as it contains information about the wonderful features of this shaver as well as some tips to make shaving easier and more enjoyable. Important Read this user manual carefully before you use the appliance. Save the user manual for future reference.
English 7 Caution -- Never immerse the shaver in water. -- Charge (all types except HQ8200), use and store the shaver at a temperature between 10°C and 35°C. -- Always put the protection cap on the shaver to protect the shaving heads when you are travelling. -- The shaver and the other accessories are not dishwasher-proof. -- Never use water hotter than 80°C to rinse the shaver. -- Do not use the shaver in the bath or in the shower. -- Only use the adapter supplied.
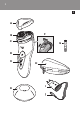
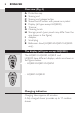
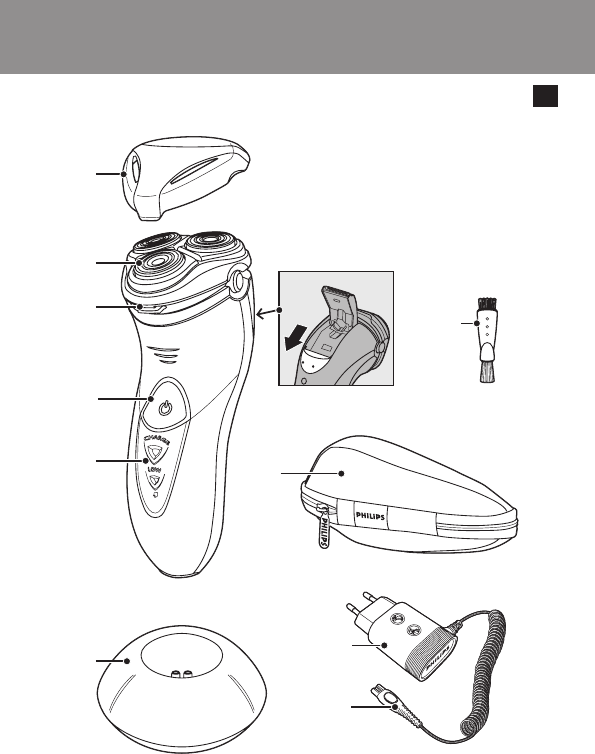
8 English Overview (Fig. 4) A B C D E F G H Protection cap Shaving unit Shaving unit release button Shaver on/off button with power-on symbol Display (all types except HQ8200) Trimmer Cleaning brush Storage pouch (your pouch may differ from the one shown in the figure) I Adapter J Small plug K Bathroom stand (HQ8253/HQ8251/HQ8250 only) The display (all types except HQ8200) The HQ8251, HQ8250, HQ8241 and HQ8240 have different displays, which are shown in the figures below.
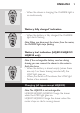
English 9 -- When the shaver is charging, the CHARGE light is on continuously. ’Battery fully charged’ indication -- When the battery is fully charged, the CHARGE light starts flashing. Note:When you disconnect the shaver from the mains, the CHARGE light stops flashing. ’Battery low’ indication (HQ8253/HQ8251/ HQ8250 only) Note: If the rechargeable battery runs low during shaving, you can connect the shaver to the mains to finish the shave.
10 English It takes approx. 60 minutes to fully charge the battery. When you charge the shaver for the first time or after a long period of disuse, let it charge for 12 hours. Tip:To optimise the battery capacity, fully charge the shaver and then use it normally until the battery is completely empty. Repeat this process three times in a row. If you optimise the battery capacity in this way, you can also charge the shaver in between shaves, even if the battery is not completely empty yet.
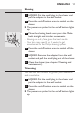
English 11 Shaving 1 HQ8200: Put the small plug in the shaver and put the adapter in the wall socket. 2 Press the on/off button once to switch on the shaver. ,, The power-on symbol in the on/off button lights up. 3 Move the shaving heads over your skin. Make both straight and circular movements. -- Shaving on a dry face gives the best results. -- Your skin may need 2 or 3 weeks to get accustomed to the Philips shaving system. 4 Press the on/off button once to switch off the shaver.
12 English 3 Push the trimmer slide downwards to open the trimmer. ,, You can now start trimming. 4 After trimming, close the trimmer (‘click’) and switch off the shaver. 5 HQ8200: Remove the adapter from the wall socket and pull the small plug out of the shaver. Cleaning and maintenance Never use scouring pads, abrasive cleaning agents or aggressive liquids such as petrol or acetone to clean the appliance. -- Clean the shaver after every shave for optimal shaving performance. -- Be careful with hot water.
English 13 2 Press the release button to open the shaving unit. 3 Rinse the shaving unit and hair chamber under a hot tap for some time. -- Make sure that you clean the inside as well as the outside of the shaving unit. Be careful with hot water. Always check if the water is not too hot, to prevent your hands from getting burnt. 4 Close the shaving unit and shake off excess water.
14 English 2 Press the release button to open the shaving unit. 3 Turn the lock anticlockwise (1) and remove the retaining frame (2). 4 Clean the shaving heads with the brush supplied. Each shaving head consists of a cutter and a guard. Do not clean more than one cutter and guard at a time, since they are all matching sets. If you accidentally mix up the cutters and guards, it may take several weeks before optimal shaving performance is restored. 5 Put the shaving heads back into the shaving unit.
English 15 1 Switch off the shaver and disconnect it from the mains. 2 Push the trimmer slide downwards to open the trimmer. 3 Clean the trimmer with the short-bristled side of the cleaning brush. Brush up and down along the trimmer teeth. 4 Close the trimmer (‘click’). Tip: For optimal trimming performance, lubricate the trimmer teeth with a drop of sewing machine oil every six months.
16 English 1 Switch off the shaver and disconnect it from the mains. 2 Press the release button to open the shaving unit. 3 Turn the lock anticlockwise (1) and remove the retaining frame (2). 4 Remove the shaving heads and place new ones in the shaving unit. Make sure that the projections of the shaving heads fit exactly into the recesses. 5 Put the retaining frame back into the shaving unit and turn the lock clockwise. 6 Close the shaving unit.
English 17 Environment -- Do not throw away the appliance with the normal household waste at the end of its life, but hand it in at an official collection point for recycling. By doing this, you help to preserve the environment. -- All types except HQ8200: The built-in rechargeable shaver battery contains substances that may pollute the environment. Always remove the battery before you discard or hand in the shaver at an official collection point.
18 English 4 Remove the back panel. 5 Remove the two side panels. 6 Bend the 4 hooks aside and take out the power unit. Be careful, the hooks are sharp. 7 Undo the three screws in the power unit. 8 Remove the power unit cover with a screwdriver. 9 Remove the battery. Be careful, the battery strips are sharp. Do not connect the shaver to the mains again after you have removed the rechargeable battery.
English 19 Guarantee & service If you need service or information or if you have a problem, please visit the Philips website at www.philips.com or contact the Philips Consumer Care Centre in your country (you find its phone number in the worldwide guarantee leaflet). If there is no Consumer Care Centre in your country, go to your local Philips dealer. Guarantee restrictions The shaving heads (cutters and guards) are not covered by the terms of the international guarantee because they are subject to wear.
20 English -- The temperature of the shaver may be too high. In this case, the shaver does not work. As soon as the temperature of the shaver has dropped sufficiently, you can switch on the shaver again.
Français 21 Introduction Félicitations pour votre achat et bienvenue dans l’univers Philips ! Pour profiter pleinement de l’assistance Philips, enregistrez votre produit sur le site à l’adresse suivante : www.philips.com/welcome. Veuillez lire ce mode d’emploi, qui contient des informations sur les fonctionnalités remarquables de ce rasoir, ainsi que des conseils pour un rasage plus facile et plus agréable.
22 Français Attention -- Ne plongez jamais le rasoir dans l’eau. -- Utilisez, chargez (tout type à l’exception du HQ8200) et conservez le rasoir à une température comprise entre 10 °C et 35 °C. -- Placez toujours le capot de protection sur le rasoir afin de protéger les têtes de rasoir lorsque vous êtes en voyage. -- Le rasoir et les autres accessoires ne sont pas résistants au lave-vaisselle. -- N’utilisez jamais une eau dont la température est supérieure à 80 °C pour rincer le rasoir.
Français 23 Aperçu (fig.
24 Français -- Lorsque le rasoir est en charge, le voyant CHARGE reste allumé de manière continue. Indication de batterie entièrement chargée -- Lorsque la batterie est complètement chargée, le voyant CHARGE clignote. Remarque : Le voyant CHARGE arrête de clignoter lorsque vous débranchez le rasoir de la prise secteur. Indication de batterie faible (HQ8253/ HQ8251/HQ8250 uniquement) Remarque : Si la batterie s’épuise pendant le rasage, vous pouvez brancher le rasoir sur le secteur pour terminer le rasage.
Français 25 Une charge complète dure environ 60 minutes. Lorsque vous chargez le rasoir pour la première fois ou si l’appareil n’a pas été utilisé pendant une longue période, chargez-le pendant 12 heures. Conseil : Pour optimiser le niveau de charge de la batterie, chargez entièrement le rasoir, puis utilisezle normalement, jusqu’à la décharge complète de la batterie. Cette procédure doit être suivie trois fois de suite.
26 Français Rasoir 1 HQ8200 : insérez la petite fiche dans le rasoir et l’adaptateur dans la prise secteur. 2 Mettez le rasoir en marche en appuyant sur le bouton marche/arrêt. ,, Le symbole d’alimentation du bouton marche/ arrêt s’allume. 3 Déplacez les têtes de rasoir sur la peau en effectuant des mouvements rectilignes et circulaires. -- Vous obtiendrez de meilleurs résultats de rasage sur peau sèche. -- Votre peau pourrait avoir besoin de 2 ou 3 semaines pour s’habituer au système de rasage Philips.
Français 27 3 Dégagez la tondeuse en faisant glisser le bouton coulissant vers le bas. ,, Vous pouvez commencer à vous tailler les favoris et la moustache. 4 Après la tonte, remettez la tondeuse en place (clic) et éteignez le rasoir. 5 HQ8200 : débranchez l’adaptateur de la prise murale, puis retirez la petite fiche du rasoir. Nettoyage et entretien N’utilisez jamais de tampons à récurer, de produits abrasifs ou de détergents agressifs tels que l’essence ou l’acétone pour nettoyer l’appareil.
28 Français 2 Appuyez sur le bouton de déverrouillage pour ouvrir l’unité de rasage. 3 Rincez l’unité de rasage et le compartiment à poils à l’eau chaude. -- Nettoyez l’intérieur et l’extérieur de l’unité de rasage. Veillez à ce que l’eau ne soit pas trop chaude pour ne pas vous brûler. 4 Fermez l’unité de rasage et secouez le rasoir pour en retirer l’eau.
Français 29 2 Appuyez sur le bouton de déverrouillage pour ouvrir l’unité de rasage. 3 Faites tourner le système de fixation dans le sens inverse des aiguilles d’une montre (1), puis retirez-le (2). 4 Nettoyez les têtes de rasoir à l’aide de la brosse fournie. Chaque tête de rasoir est composée d’une lame et d’une grille. Ne nettoyez qu’une lame et une grille à la fois car elles sont assemblées par paires.
30 Français Nettoyage de la tondeuse à l’aide de la brosse fournie Nettoyez la tondeuse après chaque utilisation. 1 Éteignez le rasoir et débranchez-le de la prise secteur. 2 Dégagez la tondeuse en faisant glisser le bouton coulissant vers le bas. 3 Nettoyez la tondeuse avec le côté à poils courts de la brosse de nettoyage. Brossez les dents de la tondeuse de haut en bas. 4 Remettez la tondeuse en place (clic).
Français 31 rasoir tous les deux ans. Remplacez-les également dès qu’elles sont endommagées. Remplacez les têtes de rasoir uniquement par les têtes de rasoir Philips HQ9 d’origine. 1 Éteignez le rasoir et débranchez-le de la prise secteur. 2 Appuyez sur le bouton de déverrouillage pour ouvrir l’unité de rasage. 3 Faites tourner le système de fixation dans le sens inverse des aiguilles d’une montre (1), puis retirez-le (2).
32 Français Environnement -- Lorsqu’il ne fonctionnera plus, ne jetez pas l’appareil avec les ordures ménagères, mais déposez-le à un endroit assigné à cet effet, où il pourra être recyclé. Vous contribuerez ainsi à la protection de l’environnement. -- Tout type à l’exception du HQ8200 : la batterie intégrée du rasoir contient des substances qui peuvent nuire à l’environnement. Veillez à toujours retirer la batterie avant de mettre le rasoir au rebut ou de le déposer à un endroit assigné à cet effet.
Français 33 3 Retirez les deux vis du compartiment à poils. 4 Retirez le panneau arrière. 5 Retirez les deux panneaux latéraux. 6 Écartez les 4 crochets et retirez le bloc d’alimentation. Soyez prudent car les crochets sont pointus. 7 Retirez les trois vis du bloc d’alimentation.
34 Français 8 Retirez le couvercle du bloc d’alimentation à l’aide d’un tournevis. 9 Retirez la pile. Soyez prudent car les languettes de la batterie sont coupantes. Ne rebranchez pas le rasoir sur le secteur après avoir retiré la batterie. Garantie et service Si vous souhaitez obtenir des informations supplémentaires ou faire réparer l’appareil, ou si vous rencontrez un problème, rendez-vous sur le site Web de Philips à l’adresse www.philips.
Français 35 -- Les têtes de rasoir sont peut-être bloquées par de longs poils. Nettoyez les lames et les grilles à l’aide de la brosse fournie (voir le chapitre « Nettoyage et entretien »). 2 Le rasoir ne fonctionne pas lorsque j’appuie sur le bouton marche/arrêt. -- Tout type à l’exception du HQ8200 : la batterie est peut-être vide. Rechargez la batterie (voir le chapitre « Charge ») ou branchez le rasoir sur le secteur. -- HQ8200 : le rasoir n’est pas branché sur le secteur.
36
37
38 4222.002.5150.