
User manual


Note: The charger does not work when the massager is placed incorrectly.
Duringchargingthelightringashes.
Note: When you charge the massager for the rst time or after a long period
of disuse, it may take a few minutes before the light ring starts ashing. This
is normal
Note: The appliance may produce a smell the rst few times you charge it.
This is normal.
When the battery is fully charged, the light ring goes out.
Preparing for use
Cleaning
Thoroughlycleanthemassagerbeforerstuse,aftereveryuseand
when you use it on another body area, to reduce the risk of
infection (see chapter ‘Cleaning’).
Pre-warming the massager
The charger has a pre-warming button that you can use to pre-warm the
bottom of the massager to a comfortable temperature (approx. 40°C).
Never warm the massager in an oven or microwave.
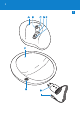
1 Placethemassageronthecharger.Itonlytsproperlyonthe
charger with the buttons facing up.
2 Press the pre-warming button (Fig. 3).
Thepre-warminglightringstartsashingtoindicatethatthe
massager is warming up.
Afterapprox.5minutes,thepre-warminglightringstopsashing
and lights up continuously to indicate that the massager has
reached a comfortable temperature.
After 30 minutes, the pre-warming function automatically switches
off, but you can also switch it off by pressing the pre-warming
button again.
,
,
,
,
,
ENGLISH 9