
User manual

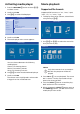


Settings 25
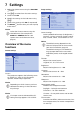
7 Settings
1 Select the Option menu using the OPTION/
Ă button.
2 Use ¡/¢ to select from the main settings.
3 Confirm with OK.
4 Modify the settings in the Sub menu using
À/Á.
5 Confirm the settings with OK (if requested).
6 The BACK/¿ button takes you one step up
in the menu.
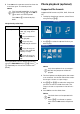
Overview of the menu
functions
Source settings
Source
The projector supports the following sourc-
es: HDMI 1,2,3, VGA, AV-IN, Bluetooth
Speaker, Media Player (optional).
Image settings
Smart Settings
Selects predefined settings for brightness /
contrast / colour saturation: Bright, Stand-
ard, Cinema, Game, Presentation or User.
Format
Adjusts the screen format:
Original, 4:3, 16:9, Full screen.
Brightness
Adjusts the brightness: 0 – 100.
Contrast
Adjusts the contrast: 0 – 100.
Saturation
Adjusts the saturation: 0 – 100.
Sharpness
Adjusts the sharpness: 0 – 100.
Lamp power mode
Modifies the lamp power mode:
Daylight – for bright environment.
Primetime – for semi-darkness.
Cinema – for very dark rooms and smaller
screen sizes.
Flow motion
Switches the MEMC (Motion estimation/mo-
tion compensation) for motion interpolation
On and Off.
Notice
Select the Shortcut menu using the
related button (for example the
SMART or FORMAT button
(see
Option menu and Shortcut menus,
page 9).
Notice
Depending on which Source you have
selected the settings in the Sub menu
may change.
Notice
If no input source is detected the fol-
lowing message appears: NO SIGNAL
OK
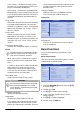
Source
Image
3D
Sound
System
Information
HDMI1
HDMI2
HDMI3
VGA
AV-In
Bluetooth speaker
Source settings
Notice
The default setting depends on the
choice of Shop mode or Home mode
(see Initial installation, page 14).
The default settings of all related set-
tings (except Wall colour correction
and White point) are changed accord-
ingly.
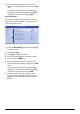
Source
Image
3D
Sound
System
Information
OK
Smart settings
Format
Brightness
Contrast
Saturation
Sharpness
Lamp power mode
Flow motion
Wall colour correction
Advanced colour settings
Standard
Original
50
50
50
16
Standard
On
OFF
Image settings