User Manual Screeneo 2.0 Full HD projector HDP2510 Register your product and get support at www.philips.
Table on Contents Overview ........................................................3 7 Settings ...................................................25 Dear customer ............................................................ 3 About this user manual ............................................3 What's in the box ....................................................... 3 Customer service centre .......................................... 3 Overview of the menu functions ........................
Overview Dear customer What's in the box Thank you for purchasing our projector. 1 – Projector We hope you enjoy your device and its many functions! 2 – Remote control (with two AAA batteries) About this user manual With the quick start guide that is supplied with your device, you can start using your device quickly and easily. Detailed descriptions can be found in the following sections of this user manual.
1 General safety information Do not make any changes or settings that are not described in this user manual. Physical injury or damage to the device or loss of data can result from improper handling. Take note of all warning and safety notes indicated. Setting up the device The device is for indoor use only. The device should be placed securely on a stable, flat surface.
Power supply 3D glasses use Before turning on your device, check that the outlet that you are going to plug it into conforms to the indications shown on the information plate (voltage, current, power network frequency) located on your device. This device shall be connected to a single phase power network. The device shall not be installed on bare ground. When using 3D glasses at home, keep in mind: Only use the power cable that is supplied with your device.
2 Overview Top view Side view k a b c d e f ghi j 1 OPTION / e Opens the Option menu. 2 BACK / ¿ Goes one level back in menu / cancels a function. 3–6 Navigation keys – ¡/¢/À/Á Navigate in menu / modify settings, confirms selection. a b 3 1 Handle (retractable) 2 HDMI HDMI port for a playback device. 3 Ï – Audio output Headphone connection or connection for external speakers. 7 OK Goes one level down in menu / confirms selection. 8–9 FOCUS Adjusts the focus for image sharpness.
Rear view ab c d e f g h i 1 TRIG OUT Remote screen connection. 2 ý USB port for firmware update. 3 AUDIO AUDIO OUT: Connection for external speakers. AUDIO IN: Connection for external audio devices – only with VGA input. 4 SPDIF OPTICAL Digital audio connector. 5 HDMI 1 and 2 HDMI port for a playback device. 6 VGA Personal computer input. 7 AV-IN RCA plug for composite video. 8 AUDIO Analogue audio connector. 9 Power supply socket.
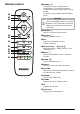
Remote control a b c d e 1 POWER / B Short press: Turns on the projector. Double press: Turns off the projector. Long press (three seconds): Starts Pairing mode. Long press (ten seconds): Resets the projector. CAUTION! Always use the B button to turn off the projector. This is essential to allow the necessary cooling-down time for the UHP lamp! 2 SOURCE / ÿ Opens the Source shortcut menu. f g 3 OPTION / Ă Opens the Option menu. h 4 OK Goes one level down in menu / confirms selection.
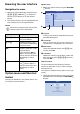
Browsing the user interface Navigation for menu 1 Navigation can be done by navigation keys (¡,¢, À,Á), OK and ¿ on the panel control of your device or on the remote control. Option menu 1 Select the Option menu using the OPTION/ Ă button. a Below the navigation with the infrared remote control (IR) is described. Keys Action ¡ or ¢ Scrolls through the menu level up and down. À or Á Modifies settings / confirms selection (depending on which menu). OK Confirms selection / goes one level down.
Overview of the Main menu functions Source Displays the available sources. Image Displays the image setting related functions. 3D Displays all settable 3D functions. Sound Displays the sound functions. System Displays the content of all system related functions. Information Displays an overview of the status and version of the device.
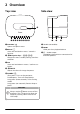
3 Initial operation Setting up the device Before installing your device, make sure that the projector is turned off and the power cable is unplugged from the power outlet. The size of the screen (b) is comprised between 0.1 and 0.42 metres depending on the projection distance (a), as described in the following table.
Installing or changing the batteries of the IR remote control Using the remote control The remote control can be used within an angle of 22.5 degrees and up to 10 meters from the device. When using the remote control, there should be no obstacles between the remote control and the remote sensor. DANGER! Risk of explosion with incorrect type of CAUTION! batteries! • The improper use of batteries can lead to overheating, explosion, risk of fire and injury.
Activate 3D glasses 1 Press the ON / OFF button on the top of the glasses. 2 On the remote control, press the 3D key. 3 The 3D menu appears, select your choice and press OK. 4 Press the ON/OFF button on the top of the glasses for one and a half seconds. 3x 1.5 SEC The LED flashes green three times and then stays on. Your glasses are ready.
Initial installation 1 Turn the device with the rear side towards a suitable projection surface or wall. Note that the distance to the projection surface must be a minimum of 0.1 meter and a maximum of 0.42 meter (see Setting up the device, page 4). Make sure the projector is in a secure position. 3 The first time you turn on the device, you need to set the following settings.
Turning off the projector 1 To turn off the projector, press the B button on the panel control of the device or on the remote control twice. 2 A message displays asking if you really want to turn off the device. Confirm with the B button or stop shutting down with any other key. Shut down system For shutting down the system please click again the Power button B Or any other key to stop shutting down the system Setting up the language The device has already been installed.
4 Connect to the playback device Notice If no input source is detected the following message appears: NO SIGNAL Connecting to a computer (VGA) Use a VGA cable to connect the projector to a computer, laptop or other devices. Connecting to devices with HDMI output Notice Many laptops do not activate the external video output automatically when you connect a second display such as a projector. Check your laptop's user manual to find out how to activate the external video output.
Notice Screen Resolution 1 Connect the A/V adapter to the projector's AV-IN socket. The projector supports the following resolutions: VGA/SVGA/WXGA, HD and FULL HD. For best results, please check the best resolution. 4 In the Option menu, select VGA. Connecting a screen using the automatic Trigger input Use a Trigger cable to connect the projector to a screen. 1 Connect the Trigger cable to the projector's TRIGGER outlet.
Connecting to a home cinema amplifier 2 After connecting the headphones, increase the volume to a comfortable level using the VOLUME buttons N/O. Use a S/PDIF optical cable to connect the DIGITAL AUDIO output on the projector to the input of your home cinema amplifier. For example, to show digital channels in DTS or DOLBY DIGITAL quality sound. Connecting to headphones DANGER! Danger of hearing damage! Do not use the device over a longer time at high volume – especially when using headphones.
Update firmware with USB storage medium CAUTION! Never pull out the digital media while the device is accessing it. This could cause data to be damaged or lost. You can find the Screeneo firmware version on the Philips website: www.philips.com You must download the file on USB storage medium in order to update your projector. Turn the device off in order to make sure that the device does not access the USB storage medium.
5 Bluetooth speaker The projector can be used as Bluetooth speaker. In this mode, you can play music from smart phones, tablets or other devices. Notice Pairing mode 1 After activating the Bluetooth connection the pairing mode can be started. In this mode it is not possible to do anything else than playing music. Waiting for pairing (60/60) The projector can only connect to, and play audio from one device at a time. Activating Bluetooth speaker 1 Press the OPTION/Ă button and use ¡/¢ to select System.
6 Media playback (optional) Navigation by colour keys Notice Read the informations on the best settings for optimal use of your device (see Settings, page 25). Keys Action RED key Music and movie player: Allows to set the repeat mode: off, song, directory, all Navigation for media playback : Play mode deactivated (greyed). Navigation can be done by navigation keys (¡,¢, À,Á), OK, ¿, Î and colour keys on the remote control. Keys Action ¡ or ¢ Selects folders or files in the displayed list.
Activating media player Movie playback 1 Press the OPTION/Ă button and use ¡/¢ to select Source. Supported file formats 2 Confirm with OK. Supported file formats are *.avi, *.mov, *.mp4, *.mkv, *.flv, *.ts, *.m2ts, *.3gp. 3 Use ¡/¢ to select Media player. 1 To display the movies content, select Movie using the keys À/Á. Source settings Source HDMI1 HDMI2 HDMI3 VGA AV-In Bluetooth speaker Media Player Image 3D Sound System Media Player OK Information Photo Movie Music 4 Confirm with OK.
5 Press OK on the remote control to show the status bar again. The movie pauses. Notice Fast forward/rewind (2x, 4x, 8x with each click) using :/;. Press OK or Á to return to normal speed. Press OK or Á to continue playback. Photo playback (optional) Supported file formats Supported file formats are JPEG, BMP, PNG and GIF. 1 To display the photos content, select Photo using the keys À/Á.
5 When you press the HOME/Î button, you will return to the media player main screen. Navigation by colour keys 2 Press OK to start the playback. The title or information is shown for two seconds. Notice The playback can be paused with OK. To stop the music press ¿. Keys Action RED key Allows to set the slide speed: off, 3 sec, 5 sec, 10 sec 3 When you press the HOME/Î button, you will return to the media player main screen.
7 Settings 1 Select the Option menu using the OPTION/ Ă button. Image settings Image settings 2 Use ¡/¢ to select from the main settings. 3 Confirm with OK. 4 Modify the settings in the Sub menu using À/Á. Source Image OK 3D Sound 5 Confirm the settings with OK (if requested). System 6 The BACK/¿ button takes you one step up in the menu.
Wall colour correction Colour correction of the projected image to adjust to coloured projection surface. Advanced colour settings Adjust detailed colour corrections. Colour temperature – set to Warm to enhance hotter colours such as red, set to Cool to make picture bluish or set to Natural.
Front Ceiling – the device is hanging from the ceiling in an upside-down position; the image is rotated by 180 degrees. Rear ceiling – the device is located behind the projection surface, hanging from the ceiling in an upside-down position; the image is rotated by 180 degrees and reflected horizontally. Sleep mode Adjusts the time until the projector should go into sleep mode and powers off after ten seconds if user doesn’t stop it. The following options are available: Off, 30 min., 45 min., 60 min.
7 A message displays asking if you want to reset smart mode to default. Confirm with OK (YES). If resetting of the settings is not desired at this point, exit the menu by pressing À/Á to select NO and confirming with OK. Reset all settings This function resets the complete System settings back to default mode – starting with the initial installation again.
8 Service Cleaning DANGER! DANGER! Instructions for cleaning! • To reduce the risk of electrical shock, always turn the projector off and disconnect the power cable before changing the lamp. • To reduce the risk of severe burns, allow the projector to cool for at least 45 minutes before replacing the lamp. • To reduce the risk of injuries to fingers and damage to internal components, use caution when removing lamp glass that has shattered into sharp pieces.
CAUTION! • Do not turn the power on while the lamp cover is removed. • Do not insert your fingers between the lamp and the projector. • The sharp edges inside the projector may cause injuries. 1 Loosen the two screws that secure the lamp. 2 Gently insert the new lamp.If it doesn’t fit easily, make sure its facing the correct way. 3 Tighten the two screws that secure the lamp. CAUTION! • Loose screws may cause a bad connection, which could result malfunction. • Do not overtighten the screws.
1 Turn the device off by pressing the B button twice. Troubleshooting 2 Wait at least ten seconds. Power cycling 3 Turn the device on by pressing the B button once. If a problem occurs that cannot be corrected with the instructions in this user manual, follow the steps given here. 4 If the problem persists, please contact our technical service centre or your dealer. Problems Solutions The projector cannot be turned on • Disconnect and connect the power cable and try to turn it on again.
Problems Solutions The device turns itself off • • • The device cannot read the USB stick The projector does not react to remote control commands 32 • When the device is running for a long period of time, the surface becomes hot and a warning symbol appears. Check that the power cable is connected correctly. Check the sleep mode status in the setting menu. When the sleep mode is activated, the device turns off after the programmed duration. • The device does not support the exFAT file system.
9 Appendix Technical data Technology / optical Display technology ........ Single 0.65” DarkChip3 1080p DLP® Technology by Texas Instruments Light source ............ Philips UHP Image life lamp Lamp type .................................................... 250 watt UHP light source ........... lasts over ~10000 hours Colour wheel segment .....6 segment (RGBRGB) Contrast ratio .......................................... 200 000: 1 Brightness ................................
• Connect the equipment into an outlet on a circuit different from that to which the receiver is connected. The CE marking certifies that the product meets the main requirements of the European Parliament and Council directives 1999/5/CE, 2006/ 95/CE, 2004/108/CE and 2009/125/CE on information technology equipment, regarding safety and health of users and regarding electromagnetic interference. • Consult the dealer or an experienced radio/TV technician for help.
or alterations to this product, or failure to strictly comply with X-GEM SAS operating and maintenance instructions. Packaging: The presence of the logo (green dot) means that a contribution is paid to an approved national organisation to improve package recovery and recycling infrastructures. Please respect the sorting rules set up locally for this kind of waste. Batteries: If your product contains batteries, they must be disposed of at an appropriate collection point.
PHILIPS and the PHILIPS’ Shield Emblem are registered trademarks of Koninklijke Philips N.V. used under license. This product was brought to the market by X-GEM SAS, further referred to in this document as X-GEM SAS, and is the manufacturer of the product. 2016 È X-GEM SAS. All rights reserved. Headquarters: X-GEM SAS 9 rue de la Négresse 64200 Biarritz – FRANCE Tel: +33 (0)5 59 41 53 10 www.xgem.