Screeneo_User-Manual_HDP16x0_TV_EN_253637294-A.book Page 1 Jeudi, 12. février 2015 10:33 10 Register your product and get support at Screeneo www.philips.
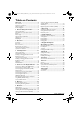
Screeneo_User-Manual_HDP16x0_TV_EN_253637294-A.book Page 2 Jeudi, 12. février 2015 10:33 10 Table on Contents Overview ...................................................3 Dear Customer ....................................................................3 About this User Manual ......................................................3 What's in the Box ................................................................3 Product Highlights ...............................................................
Screeneo_User-Manual_HDP16x0_TV_EN_253637294-A.book Page 3 Jeudi, 12. février 2015 10:33 10 Overview Dear Customer What's in the Box Thank you for purchasing our projector.
Screeneo_User-Manual_HDP16x0_TV_EN_253637294-A.book Page 4 Jeudi, 12. février 2015 10:33 10 1 General Safety Information Do not make any changes or settings that are not described in this user manual. Physical injury or damage to the device or loss of data can result from improper handling. Take note of all warning and safety notes indicated. Do not expose the device to extreme vibrations. It may damage the internal components. Do not allow children to handle the device without supervision.
Screeneo_User-Manual_HDP16x0_TV_EN_253637294-A.book Page 5 Jeudi, 12. février 2015 10:33 10 Power Supply Before turning on your device, check that the outlet that you are going to plug it into conforms to the indications shown on the information plate (voltage, current, power network frequency) located on your device. This device shall be connected to a single phase power network. The device shall not be installed on bare ground. Only use the power cable that is supplied with your device.
Screeneo_User-Manual_HDP16x0_TV_EN_253637294-A.book Page 6 Jeudi, 12.
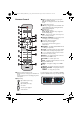
Screeneo_User-Manual_HDP16x0_TV_EN_253637294-A.book Page 7 Jeudi, 12. février 2015 10:33 10 3 EPG –To display the electronic program guide. 3D – To display the 3D menu. Favorite – To display the favourite list in DVB-T mode. Remote Control 4 To display the home menu. 5 TAB key or Toggle between TV and Radio channels in DVB-T mode and browsing the Internet without external keyboard. a b c 6 Navigation keys – Confirms selection / , À/Á – Navigation keys / navigate the menu / modify settings.
Screeneo_User-Manual_HDP16x0_TV_EN_253637294-A.book Page 8 Jeudi, 12. février 2015 10:33 10 Browsing the user interface Navigation for setting menu Infrared Remote Control (IR) Navigation can be done by navigation keys ( , , À,Á, OK and ¿) on the control panel or the remote control, as well as by an air mouse. Navigation by keys: • / scrolls trough the menu level up and down. • OK/Á goes one level down, with À / ¿ one level up. • u goes back to the main screen.
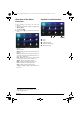
Screeneo_User-Manual_HDP16x0_TV_EN_253637294-A.book Page 9 Jeudi, 12. février 2015 10:33 10 Overview of the Menu Functions Symbols in the Statusbar 1 After switching on the device the main menu appears. 2 Select the desired menu using the navigation keys / , À/Á. 3 Confirm with OK. 4 By pressing the u key you will return to the main menu. a b c de 1 – Time 2 – Date 3 – LAN status display 4 – Bluetooth status display 5 – WiFi status display HDMI 1, 2, & 3 – Switch to the external video input HDMI.
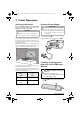
Screeneo_User-Manual_HDP16x0_TV_EN_253637294-A.book Page 10 Jeudi, 12. février 2015 10:33 10 3 Initial Operation Setting up the Device Before installing your device, make sure that the projector is turned off and the power cord is unplugged from the power outlet.
Screeneo_User-Manual_HDP16x0_TV_EN_253637294-A.book Page 11 Jeudi, 12. février 2015 10:33 10 2 Insert the new batteries into the battery compartment with the positive and negative poles as shown. Make sure the polarities(+ and -) are aligned correctly. 3 Push the battery compartment back into the remote control until the locking mechanism engages. CAUTION! • The improper use of batteries can lead to overheating, explosion, risk of fire and injury. Leaking batteries can possibly damage the remote control.
Screeneo_User-Manual_HDP16x0_TV_EN_253637294-A.book Page 12 Jeudi, 12. février 2015 10:33 10 2 Press the black latch locking. 3 Lift the lever blue retention. Notice Normally the batteries will last for around one year. If the remote control stops working, please replace the batteries. If the device is not used for a long time, take out the batteries. This will prevent leakage and possible damage to the remote control.
Screeneo_User-Manual_HDP16x0_TV_EN_253637294-A.book Page 13 Jeudi, 12. février 2015 10:33 10 2 Now do move your remote control right and left arrow moves as you move. Notice Remote Control (RF) pairing If the Screeneo does not react to RF remote control commands, the remote control has to be paired with the USB receiver again. For renewing the pairing please connect the USB receiver to a rear USB port of the Screeneo.
Screeneo_User-Manual_HDP16x0_TV_EN_253637294-A.book Page 14 Jeudi, 12. février 2015 10:33 10 3D glasses The 3D glasses are equipped with a battery. They have to be charged before first use. 1 Take USB mini cable (supplied), connect the USB mini on the 3D glasses and the another plug on a USB port of the device. Charging takes several hours and is complete when the LED on the glasses is on green. When the LED turns red, do a new charge.
Screeneo_User-Manual_HDP16x0_TV_EN_253637294-A.book Page 15 Jeudi, 12. février 2015 10:33 10 Initial Installation ECO mode 1 To turn on the projector, push the POWER B button once. 2 Turn the device towards a suitable projection surface or wall. Note that the distance to the projection surface must be a minimum of 0.1 meter and a maximum of 0.5 meter (see Setting up the Device, page 4). Make sure the projector is in a secure position.
Screeneo_User-Manual_HDP16x0_TV_EN_253637294-A.book Page 16 Jeudi, 12. février 2015 10:33 10 4 Connect to the Playback Device Connecting to Devices with HDMI Output Connecting to a Computer (VGA) Use the HDMI cable to connect the projector to a computer, laptop or others devices. Notice Many laptops do not activate the external video output automatically when you connect a second display such as a projector. Check your laptop's manual to find out how to activate the external video output.
Screeneo_User-Manual_HDP16x0_TV_EN_253637294-A.book Page 17 Jeudi, 12. février 2015 10:33 10 Connecting Using an Audio/ Video (CVBS) Adapter Cable Use the projector's audio/video adapter cable (A/V cable) (not included) to connect camcorders, DVD players or digital cameras. The jacks for these devices are yellow (video), red (audio right) and white (audio left).
Screeneo_User-Manual_HDP16x0_TV_EN_253637294-A.book Page 18 Jeudi, 12. février 2015 10:33 10 Connecting the headphones 1 Before connecting the headphones, turn down the volume on the device. 2 Connect the headphones to the projector's headphone slot. The device speakers deactivate automatically when the headphones are connected. PHILIPS 3 After connecting the headphones, increase the volume to a comfortable level.
Screeneo_User-Manual_HDP16x0_TV_EN_253637294-A.book Page 19 Jeudi, 12. février 2015 10:33 10 Update the software in my projector 20 The device turns off and on again. After around 5 minutes the Language Selection screen appears. The firmware update is now completed. You can find the Screeneo firmware version on the site « Philips »: www.philips.
Screeneo_User-Manual_HDP16x0_TV_EN_253637294-A.book Page 20 Jeudi, 12. février 2015 10:33 10 Link your projector and computer with WiFi 4 Click Search. Both devices must be connected to the same access point, no other network connection must be activated. As a precaution, note the name and the key to protection of your access point. On the Screeneo, Use / to select Settings. Confirm with OK. Using / select Wireless and Networks. Confirm with OK. Using / select WIFI. Confirm with OK.
Screeneo_User-Manual_HDP16x0_TV_EN_253637294-A.book Page 21 Jeudi, 12. février 2015 10:33 10 5 Memory Inserting a Memory Card Connecting USB Storage Medium PHILIP S PHILIP S 1 Insert a memory card with the contacts facing downwards into the / slot at the back of the device. Your device supports the following memory cards: SD/SDHC/SDXC/MMC. 2 Insert the memory card into the slot until it snaps into position.
Screeneo_User-Manual_HDP16x0_TV_EN_253637294-A.book Page 22 Jeudi, 12. février 2015 10:33 10 6 Network The projector can be connected to the network by a network hard-wired cable or through a wireless (Wi-Fi) connection. Use the procedure below appropriate to the type of connection you want. LAN Network Notice Connection! The LAN connection takes priority over the Wi-Fi connection. Connecting to the LAN network 1 Connect one end of a LAN cable (not supplied) to the ETHERNET port of your projector.
Screeneo_User-Manual_HDP16x0_TV_EN_253637294-A.book Page 23 Jeudi, 12. février 2015 10:33 10 DANGER! Information on Using WLAN! The functioning of security systems, medical equipment or sensitive devices can be disrupted by the transmission power of the device. Observe any usage regulations (or restrictions) in the vicinity of such equipment.
Screeneo_User-Manual_HDP16x0_TV_EN_253637294-A.book Page 24 Jeudi, 12. février 2015 10:33 10 Using WPS with Push Button Configuration (PBC) Wifi Hotspot Notice 1 Switch the device on using the on/off key. 2 After the initial screen the main menu appears. Important! The projector can work as an access point, if only a wired lan network is installed in the location of use. Use the portable Wi-Fi hotspot to share the device’s network connection with computers or other devices through the Wi-Fi network.
Screeneo_User-Manual_HDP16x0_TV_EN_253637294-A.book Page 25 Jeudi, 12. février 2015 10:33 10 Setting up a WiFI hotspot To modify the WiFi hotspot name and define the security level. 1 Switch the device on using the on/off key. 2 After the initial screen the main menu appears. 3 Use the navigation keys to select Settings. Digital Living Network Alliance (DLNA) This device supports Digital Living Network Alliance (DLNA). Using this standard you can quickly interconnect your multimedia devices.
Screeneo_User-Manual_HDP16x0_TV_EN_253637294-A.book Page 26 Jeudi, 12. février 2015 10:33 10 7 Bluetooth Activating the Bluetooth connection 1 Switch the device on using the on/off key. 2 After the initial screen, the main menu appears. 9 Using / select the desired setting. 10 Confirm with . 11 Modify the desired settings. Menu Description Select device The list shows all paired devices. Paired device To unconnect or unpair the paired device.
Screeneo_User-Manual_HDP16x0_TV_EN_253637294-A.book Page 27 Jeudi, 12. février 2015 10:33 10 6 Press the Green key to make the speaker discoverable during 60 seconds. 7 On your external device, activate the Bluetooth connection and select the speaker name from the list. When the device is connected, his name is displayed on the top of the screen. 8 Press the Green key to play music. During music playback, the following actions are available: Red key: To stop the connection. Green key: To make a pause.
Screeneo_User-Manual_HDP16x0_TV_EN_253637294-A.book Page 28 Jeudi, 12. février 2015 10:33 10 8 Media Playback Notice Navigation Keys All the keys shown are buttons on the remote control. Keys Action Green key of the remote control Allows to set the slide show parameters for picture files. or Allows to set the shuffle mode for music files: Notice Best Settings for Optimal Use Read the informations on the best settings in the chapter settings (see Settings, page 36) for optimal use of your device.
Screeneo_User-Manual_HDP16x0_TV_EN_253637294-A.book Page 29 Jeudi, 12. février 2015 10:33 10 Video playback Supported file formats 7 Use / to select the video file that you wish to play. Notice Supported file formats are *.avi, *.mov, *.mp4, *.mkv, *.flv, *.ts, *.m2ts, *.3gp. Video Playback (USB/SD Card/ Internal Memory/DLNA) 1 Switch the device on using the on/off key. 2 The main menu appears. Displaying Video Files Only those videos that are compatible with the projector will be displayed.
Screeneo_User-Manual_HDP16x0_TV_EN_253637294-A.book Page 30 Jeudi, 12. février 2015 10:33 10 The explorer searches for servers and shows them in a list. Select the desired DLNA server. 4 Confirm with . The content of selected media is displayed. 5 To only display the picture content, select Picture using the keys / on the left of the screen and confirm with . Notice The use of color keys The Green key allows to set the slide show parameters.
Screeneo_User-Manual_HDP16x0_TV_EN_253637294-A.book Page 31 Jeudi, 12. février 2015 10:33 10 Music Playback 5 To only display the music content, select Music using the keys / on the left of the screen and confirm with . Notice Notice Switch off the Image Playback You can switch off the screen while playing music in order to save power by a long press on the The use of color keys The Red key allows to set the repeat mode: key. Supported file formats • : Play mode deactivate (greyed).
Screeneo_User-Manual_HDP16x0_TV_EN_253637294-A.book Page 32 Jeudi, 12. février 2015 10:33 10 Managing Files Delete Files You can delete files from the internal memory, the connected USB storage medium or the memory card. 1 Switch the device on using the on/off key. 2 The main menu appears. 3 Use the navigation keys to select the desired media (USB, Memory or DLNA). 4 Confirm with . 5 Use / to select the file that you want to delete. 6 Press the Blue key on the remote control to delete the file.
Screeneo_User-Manual_HDP16x0_TV_EN_253637294-A.book Page 33 Jeudi, 12. février 2015 10:33 10 9 Digital TV Playback (Depending on model) Connecting the Aerial First Playback Notice Notice Aerial Size and Orientation In some regions it is necessary to connect a larger aerial in order to grant the reception. In some countries it is necessary to point the aerial horizontally in order to grant the reception. 1 Connect the aerial to the aerial socket.
Screeneo_User-Manual_HDP16x0_TV_EN_253637294-A.book Page 34 Jeudi, 12. février 2015 10:33 10 Television Notice Navigation Keys All the keys shown are buttons on the remote control. 1 Switch the device on using the on/off key. 2 The main menu appears. 3 Use the navigation keys to select TV. 4 Confirm with OK. 5 The last viewed channel is played. Change the channel using keys CH+/CH-, / or enter directly the number with the keypad.
Screeneo_User-Manual_HDP16x0_TV_EN_253637294-A.book Page 35 Jeudi, 12. février 2015 10:33 10 10 Android Your projector uses the Android operating system. Starting Android Apps 1 Switch the device on using the on/off key. 2 After the initial screen the main menu appears. 6 Confirm with OK. 7 Use the navigation keys to select ApkInstaller. 8 Confirm with OK. 9 Use the navigation keys to select Install. 10 Confirm with OK. 11 Navigate to the memory card and select the APK package you want to install.
Screeneo_User-Manual_HDP16x0_TV_EN_253637294-A.book Page 36 Jeudi, 12. février 2015 10:33 10 11 Settings 1 Switch the device on using the on/off key. 2 After the initial screen the main menu appears. 3 Use the navigation keys to select Settings. 4 Confirm with OK. 5 Use / to select from the following settings. 6 Confirm with OK. 7 Modify the settings using OK, / , 8 Confirm with OK. The ¿ key takes you one step back in the menu.
Screeneo_User-Manual_HDP16x0_TV_EN_253637294-A.book Page 37 Jeudi, 12. février 2015 10:33 10 Sleep mode – With this function, the projector automatically goes to ECO mode after a specified period of time or at the end of a movie. Auto Power Down (APD) – turn on/off the auto power down. The default setting is depending on the choice of: - shop mode: APD off, - dome mode on: APD off, - home mode: APD on. When the parameter is switched on, it works like this: - it should go into off mode after 3 hours.
Screeneo_User-Manual_HDP16x0_TV_EN_253637294-A.book Page 38 Jeudi, 12. février 2015 10:33 10 12 Service Cleaning DANGER! Instructions for Cleaning! Use a soft, lint-free cloth. Never use liquid or easily flammable cleansers (sprays, abrasives, polishes, alcohol, etc.). Do not allow any moisture to reach the interior of the device. Do not spray the device with any cleaning fluids. Wipe over the surfaces gently. Be careful that you do not scratch the surfaces.
Screeneo_User-Manual_HDP16x0_TV_EN_253637294-A.book Page 39 Jeudi, 12. février 2015 10:33 10 Troubleshooting 1 Switch the device off using the on/off key on the panel control. 2 Wait at least ten seconds. 3 Switch the device on using the on/off key on the panel control. 4 If the problem repeats, please contact our technical customer service or your retailer.
Screeneo_User-Manual_HDP16x0_TV_EN_253637294-A.book Page 40 Jeudi, 12. février 2015 10:33 10 Problems Solutions The device turns itself off • • • The device changes from maximum level of brightness to • minimum level of brightness when the device is connected over USB to play videos. • The device cannot connect with an Android device (for example a mobile phone/smartphone with the Android operating system) when connected via USB.
Screeneo_User-Manual_HDP16x0_TV_EN_253637294-A.book Page 41 Jeudi, 12. février 2015 10:33 10 13 Appendix Technical Data Accessories Dimensions (L×H×W) .................... 287 × 148× 339 mm Weight ........................................................................... 5,3 kg Recommended Ambient......................................5 – 35 ºC Relative Humidity ................15 – 85 % (non-condensing) File format................................ *.avi, *.mov, *.mp4,*.mkv, ..............................
Screeneo_User-Manual_HDP16x0_TV_EN_253637294-A.book Page 42 Jeudi, 12. février 2015 10:33 10 • At sales points in the event of the purchase of similar equipment. • At the collection points made available to you locally(drop-off centre, selective collection, etc.). In this way you can participate in the re-use and upgrading of Electrical and Electronic Equipment Waste, which can have an effect on the environment and human health. The paper and cardboard packaging used can be disposed of as recyclable paper.
Screeneo_User-Manual_HDP16x0_TV_EN_253637294-A.book Page 43 Jeudi, 12. février 2015 10:33 10 PHILIPS and the PHILIPS’ Shield Emblem are registered trademarks of Koninklijke Philips N.V. and are used by Sagemcom Documents SAS under license from Koninklijke Philips N.V. È 2015 Sagemcom Documents SAS All rights reserved Sagemcom Documents SAS Documents Business Unit Headquarters : 250, route de l’Empereur 92848 Rueil-Malmaison Cedex · FRANCE Tel: +33 (0)1 57 61 10 00 · Fax: +33 (0)1 57 61 10 01 www.sagemcom.