
User Manual


6
Introduction
Congratulations on your purchase and welcome to Philips! To fully benet from the support that
Philips offers, register your product at www.philips.com/welcome.
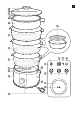
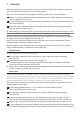
General description (Fig. 1)
1 Control panel
- a Turbo light
- b Steaming basket buttons (1, 2, 3)
- c Timer adjustment knob with light ring
- d Start/stop and pause button
- e ‘Keep-warm’ light
- f ‘Water tank empty’ light
- g Timer indication
2 Base with water tank
3 Drip tray
4 Aroma infuser
5 Small steaming basket (1)
6 Medium steaming basket (2)
7 Large steaming basket (3)
8 Soup bowl
9 Lid
10 Steam vents
11 Lid handle
12 Removable bottom
13 Water rell spout
14 Cord storage facility
Note: The steaming baskets are numbered from 1 to 3. You nd the numbers of the steaming baskets on
their handles. You can stack any larger basket on top of a smaller basket, but the baskets t best if you
stack them in logical ascending order: the smallest basket (1) rst, then the medium basket (2) and then
the large basket (3).
Note: The soup bowl can best be used in combination with the large basket (3).
Note: Always use the drip tray under the steaming baskets and only use steaming baskets that are lled
with food.
Important
Read this user manual carefully before you use the appliance and save it for future reference.
Danger
- Never immerse the base in water or rinse it under the tap.
Warning
- Check if the voltage indicated on the appliance corresponds to the local mains voltage before
you connect the appliance.
- Only connect the appliance to an earthed wall socket. Always make sure the plug is inserted
rmly into the socket.
- This appliance is not intended to be operated by means of an external timer or a separate
remote-control system.
- Do not use the appliance if the plug, the mains cord or the appliance itself is damaged.
- If the mains cord is damaged, you must have it replaced by Philips, a service centre authorised by
Philips or similarly qualied persons in order to avoid a hazard.
ENGLISH