FC6148, FC6146
1
FC6148, FC6146 English 6 简体中文 15
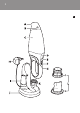
English Introduction Congratulations on your purchase and welcome to Philips! To fully benefit from the support that Philips offers, register your product at www.philips. com/welcome. General description (Fig.
English 7 -- The charger and its adapter cannot be replaced. If the charger or its adapter is damaged, the appliance must be discarded. -- If the cord of the adapter is damaged, it cannot be replaced and the adapter must be discarded. -- The adapter contains a transformer. Do not cut off the adapter to replace it with another plug, as this causes a hazardous situation.
English Preparing for use Installing the charger 1 Attach the charger to the wall as shown in the figure. (Fig. 2) If you attach the charger to the wall, the space between the screw holes has to be 12cm. 2 You can also place the charger on a horizontal surface (e.g. a table or desk) (Fig. 3). 3 Wind excess mains cord around the reel in the back of the charger and pass the cord through the slot (Fig. 4).
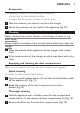
English 9 Accessories The appliance comes with the following accessories: -- a brush tool to clean delicate surfaces; -- a crevice tool to vacuum corners or narrow gaps. 1 Take the accessory you want to use from the charger. 2 Attach the accessory to the nozzle of the appliance (Fig. 10). Cleaning Never immerse the vacuum cleaner or the charger in water or any other liquid. Always remove the adapter from the wall socket before you clean the charger.
English 3 Empty the dust compartment by shaking it with your free hand (Fig. 15). 4 If necessary, clean the dust compartment with a damp cloth. 5 If necessary, clean the filter unit. See section ‘Cleaning the filter unit’. 6 To reattach the dust compartment, align the slot on the dust compartment with the projection on the appliance. First attach the bottom of the dust compartment (1). Then push the top of the dust compartment towards the appliance (2) until it locks into place (‘click’) (Fig. 16).
English 11 Replacement We advise you to replace the inner filter after a prolonged period of use or if you can no longer clean it properly. Replacing the inner filter 1 Remove the filter unit from the dust compartment (Fig. 14). 2 Turn the outer filter anticlockwise (1) and remove it from the filter holder (2) (Fig. 17). 3 Gently turn the inner filter anticlockwise (1) and remove it from the filter holder (2) (Fig. 21).
English can also take the appliance to a Philips service centre. The staff of this centre will remove the batteries for you and will dispose of them in an environmentally safe way (Fig. 25). Removing the rechargeable batteries Only remove the rechargeable batteries if they are completely empty. Never let the rechargeable batteries come into contact with metal. Remove the rechargeable batteries in the following way. 1 Let the vacuum cleaner run until it stops.
English 13 Troubleshooting This chapter summarises the most common problems you could encounter with the appliance. If you are unable to solve the problem with the information below, contact the Consumer Care Centre in your country. Problem Solution The appliance does not work. The batteries may be low. Recharge the batteries. You may not have placed the appliance on the charger properly. Place the appliance on the charger properly. The charging light goes on to indicate that the appliance is charging.
English Problem Solution The dust compartment may be full. Empty the dust compartment. The filter unit may be clogged. Clean the inner filter and the outer filter (see chapter ‘Cleaning’). Dust escapes from the vacuum cleaner. The dust compartment may be full. Empty the dust compartment. The dust compartment may not be attached properly to the appliance. Attach the dust compartment properly to the appliance. Perhaps the filter unit is not placed properly in the dust compartment.
简体中文 15 产品简介 感谢您的惠顾,欢迎光临飞利浦!为了您能充分享受飞利浦提供 的支持服务,请登陆以下网站注册您的产品,www.philips.
简体中文 -- 充电器及其适配器无法更换。如果产品的充电器或适配器已损 坏,则必须弃置产品。 -- 如果适配器的电源线损坏,则不能更换,应弃置该适配器。 -- 电源适配器内含有一个变压器。切勿将其剪断,而用另一个插 头代替,否则将导致严重后果。 -- 本产品不打算由肢体不健全、感觉或精神上有障碍或缺乏相关 经验和知识的人(包括儿童)使用,除非有负责他们安全的人 对他们使用本产品进行监督或指导。 -- 应照看好儿童,确保他们不玩耍本产品。 注意 -- 清洁充电器之前,务必将适配器从墙上的电源插座中拔出。 -- 只能用本产品随附的充电器为吸尘器充电。充电期间,适配器 会有微热,这是正常现象。 -- 使用后,务必切断吸尘器的电源。 -- 充电器接触片上的电压为低电压(最高 12 伏),因此是安全 的。 -- 吸尘时切勿阻塞排气口。 -- 充电时请关闭产品电源。 -- 使用吸尘器时总是装上过滤器。 -- 为避免触电危险,在墙上钻孔安装充电器时应特别小心,尤其 是在靠近墙上电源插座时。 -- 产品充电、存放和使用的温度范围在 5°C 到 35°C 之间。 -- 不要拆卸电池或致使其短路。防止电池接触火源、热源
简体中文 17 2 也可以将充电器放置在水平表面(如桌面或写字台 上)。 (图 3) 3 将多余的电源线缠绕在充电器背面的卷轴上,电源线从插槽中 通过。 (图 4) 为产品充电 在第一次使用前,要给本产品充至少 16 个小时的电。 提示: 如果在较长一段时间内不使用本产品,请将适配器从插座 上拔下,以节约能源。 1 确保产品电源已关闭。 2 将电源适配器插入电源插座。 3 -,, ,, 将吸尘器放置在充电器上。 (图 5) 确保将吸尘器背面的出口置于充电器的挂钩上。 (图 6) 充电指示灯闪烁,表示吸尘器正在充电。 (图 7) 充电指示灯持续亮起,表示吸尘器已充满电。 使用本产品 1 向前推动开/关滑钮以接通产品电源。 (图 8) -- 如果要使用正常吸力,请选择速度 1。 -- 如果要使用较高吸力,请选择速度 2。 2 向后推动开/关滑钮以切断产品电源。 (图 9) 附件 产品随附有以下配件: -- 一个用于清洁柔软表面的毛刷; -- 一个用于角落或狭窄缝隙吸尘的缝隙吸嘴。 1 从充电器上取下所需配件。 2 将配件安装在产品的吸嘴上。 (图 10) 清洁 切勿将真空吸尘器或充电器浸入水中或任何其它液
简体中文 清洁充电器之前,务必将适配器从墙上的电源插座中拔出。 1 可用湿布清洁产品和充电器外部。 2 如果充电器的触点很脏,可用干布擦拭。 倒空并清洁集尘桶 确保定期倒空并清洁集尘桶。 快速清洁 要快速倒空集尘桶: 1 按吸嘴拆卸按钮 (1),从吸尘器 (2) 上取下可分离吸 嘴。 (图 11) 2 晃动集尘桶中的尘垢以将其倒入垃圾桶。 (图 12) 彻底清洁 1 将吸尘器拿到垃圾箱上方,按下集尘桶拆卸按钮 (1),然后卸 下集尘桶 (2)。 (图 13) 2 将过滤器从集尘桶中取出。 (图 14) 3 用另一只手晃动集尘桶以将其倒空。 (图 15) 4 如果必要,可用湿布清洁集尘桶。 5 必要时,应清洁过滤器部件。见“清洁过滤器”部分。 6 要重新安装集尘桶,可以将集尘桶的槽与吸尘器的突出部分对 齐。首先连接集尘桶的底部 (1),然后将集尘桶的顶部推向吸 尘器 (2),直到它锁定到位(“咔哒”一声)。 (图 16) 清洁过滤器 确保定期清洁过滤器。 1 逆时针旋转外层过滤器 (1),将其从过滤器架上取下 (2)。 (图 17) 让内层过滤器继续留在过滤器架上。 2 如果过滤器很脏,请用毛刷或普通
简体中文 19 注意: 如果必要,还可以用冷水或温水清洁内层和外层过滤器。 在您再次使用内层和外层过滤器之前,务必将其彻底擦干。 3 将外层过滤器放回过滤器架 (1),然后顺时针旋转将其安装好 (2)。 (图 18) 4 将过滤器重新装回集尘桶。 (图 19) 注意: 确保正确插入过滤器。 存放 1 您可以将吸尘器和配件存放在充电器上。 (图 20) 更换 在长时间使用之后或者无法再清洁干净时,我们建议您更换内层 过滤器。 更换内层滤芯 1 将过滤器从集尘桶中取出。 (图 14) 2 逆时针旋转外层过滤器 (1),将其从过滤器架上取下 (2)。 (图 17) 3 逆时针轻轻旋转内层过滤器 (1),将其从过滤器架上取下 (2)。 (图 21) 4 将新的内层过滤器放在过滤器架上 (1),然后顺时针旋转将其 安装好 (2)。 (图 22) 5 将内层过滤器的顶端向内推。 (图 23) 6 将外层过滤器放到过滤器架上 (1),然后顺时针旋转将其安装 好 (2)。 (图 18) 7 将过滤器重新装回集尘桶。 (图 19) 注意: 确保正确插入过滤器。 附件 可提供 FC8035 型号的全新内层滤芯。请与飞利
简体中文 环境 -- 弃置产品时,请不要将其与一般生活垃圾堆放在一起;应将其 交给官方指定的回收中心。这样做有利于环保。 (图 24) -- 内置可充电电池含有可污染环境的物质。在扔掉本产品前取出 电池。请勿将电池与普通家庭垃圾一同丢弃,而应将其送到正 式的回收点,也可以将产品交给飞利浦服务中心。维修中心的 员工会帮您取出电池,并以环保的方式处理。 (图 25) 卸下充电电池 只在充电电池的电量完全用尽时将其取出。 切勿让充电电池与金属物体接触。 按照以下方法取出充电电池。 1 让吸尘器运行到停止为止。 尝试再次打开产品电源,检查电池是否确实耗尽。如果马达仍可 启动,请重复该过程。 2 拧松并卸下螺钉。打开真空吸尘器。 (图 26) 3 将仍装有电池的马达放在盛有 3 升水和 3 茶匙盐的大碗中。 -- 确保将整个马达部件完全浸入水中。如有必要,可按照上述比 例添加水和盐(1 茶匙盐对 1 升水)。 -- 将马达部件和电池留在碗中,保持 24 小时。 4 将电线一一剪断,然后取出电池。 (图 27) 保修与服务 如果您需要服务或信息,或者有任何疑问,请访问飞利浦网站: www.philips.
简体中文 21 故障种类和处理方法 本章归纳了使用本产品时最可能遇到的问题。如果您无法根据下 面的信息解决问题,请与贵国(地区)的飞利浦客户服务中心联 系。 问题 解决方法 产品不能工作。 电池可能电量不足。请给电池充电。 您可能没有将吸尘器正确放置在充电器上。 请将吸尘器正确安放在充电器上。充电指示 灯亮起,表示吸尘器正在充电。 您可能没有将适配器正确插入电源插座。请 将适配器正确插入电源插座。 吸尘器和/或充电器上的触点可能脏了。用干 布将它们擦干净。 吸尘器在放到充电器上时,电源可能已打 开。充电前要先关闭吸尘器电源。 如果产品仍无法正常工作,请将产品送往当 地的飞利浦经销商,或经飞利浦授权的顾客 服务中心,请他们检查。 充电指示灯不 亮。 确保将适配器正确电源插座并且关闭了吸尘 器的电源。 吸尘器不能正常 吸尘。 集尘桶可能没有正确安装到产品上。将集尘 桶正确安装到吸尘器上。 集尘桶可能已满。清空集尘桶。 过滤器可能阻塞。清洁内层过滤器和外层过 滤器(请参阅“清洁”章节)。 尘土从吸尘器中 溢出。 集尘桶可能已满。清空集尘桶。
简体中文 问题 解决方法 集尘桶可能没有正确安装到产品上。将集尘 桶正确安装到吸尘器上。 可能过滤器没有正确放置在集尘桶中。将过 滤网正确安装到集尘桶中。 在将一个配件安 装到吸嘴时,吸 尘器不能正常工 作。 集尘桶可能已满。清空集尘桶。 配件可能阻塞。从配件中取出阻塞物。 过滤器可能阻塞。清洁内层过滤器和外层过 滤器(请参阅“清洁”章节)。
简体中文 23 2009/07/01
简体中文 㤻墿㧺呄㨕䢓ૻڶֆ ˦˨ˡ˦˧˥ˢˡ˚ʳ˜ˡ˧˘˥ˡ˔˧˜ˢˡ˔˟ʳ˜ˡ˗˨˦˧˥˜˔˟ʳ˟˜ˠ˜˧˘˗ ଉཽಆ㻨ߡဩˋˆˀˌˆ㢆㬽䤥ՠ䢓Օ㹓˄˃ڗ䀊ˈˀˌ㢆 ˧˸˿ˍ˅ˇ˄˄ʳˉ˃ˉ˅ʳʻˋ˿˼́˸̆ʼʳ˙˴̋ˍ˅ˇ˄ˉʳˊˈˉˋ 㡌䢕ઊ䢕๏ؑჀ㹓反ޘ㤻墿ՠ䢓㥀 ˧˸˿ˍ˃ˊˉˌˀˋˊˋ˄ˆˆˆ˃ʳʳˋˊˋ˄ˆˆˆ˄ʳʳ˙˴̋ˍ˃ˊˉˌˀˋˊˊ˅ˊ˅ˈˇ ˘̀˴˼˿ˍʳ̀˴˵˿˸˲˻̂˓̆˸˿ˁ˶̂̀ˁ˻˾ ڼ䰬兘䢠ഗՊ˅˃˃ˉ˂˃˅˂˅ˋֆؒऱˮ䶣ॾஒۆ൳ࠫጥ㡞ऄ˰֗ˮ䰬兘˰ޣʿ⃰شՊڇխ㧺ࢬഇ䶣ॾ ஒ䣈ऱ㩾অཚૻհ䰬兘ˁլ㡖ૻՊޣᙅښᩓڼ䣈ઌ䤤ऱڜ٤ᩓࠌشՂऱࣹრࠃ咊ʿࠫطڇທֲ ದጩऱ具ࢬૻ㡕ޣ㡰ڂ䣈խऱڶ୭ढ凝ऱ䦡س؆इࢨડ䦣ʿۖ㢑㩾ቼທګ䢘ૹۆࢨ㢑ࠌشթ Գߪʿ凗䣈ທګ䢘ૹհ䮦୭ˁʿૻࢬڼޣഗՊˮ䶣ॾஒ䣈ऱ㩾অࠌشཚૻຏ䥉˰ऱݾ㢜㥣ࡎऄʵۖ 䪰נհૻڣˁ ! ˏॵڶ㺉ऱ㦍ʿאՀ䢠兂剧ʻࠏʼˑ ࣹʼԫץٵ
2 3 4 5 6 7 8 9 11 12 10 2 14 1 1 2 15 16 2 17 2 1 1 18 1 19 20 21 1 2 2 13
22 23 26 27 2 1 24 25
www.philips.com u 4222.003.3382.