cover 1024.
first choice warranty 26-06-2003 15:35 Pagina 1 Your International Philips First Choice Warranty English - GB Just a phone call away Philips’ customer help desks are located worldwide.You can contact Philips Monday – Friday from 08.00 – 20.00 hrs Central European Time (CET) and on Saturdays and Sundays from 10.00 to 18.00 hrs CET. Deutsch - DE-CH-BE Nur einen Anruf entfernt Philips verfügt über Hilfstellen für den Kunden in der ganzen Welt.
first choice warranty 26-06-2003 15:35 Pagina 2 Dansk - DK Philips’ kundeservice er fordelt over hele verden. Philips kan kontaktes Mandag – Fredag fra 08.00 – 20.00 centraleuropæsk tid (CET) samt lørdag og søndag fra 10.00 – 18.00 CET. Norsk - NO Ikke lenger unna enn en rask telefon Philips’ kundestøttejenester finner du over hele verden. Du kan ta kontakt med Philips fra mandag til fredag kl.9-21 og på lørdag og søndag kl.11-19.
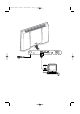
1024.4 en 16x24 26-06-2003 15:44 Pagina 1 Unpacking and wall mounting instructions Make sure that the wall mount is being fixed securely enough so that it meets safety standards.The weight of the monitor (excl. packaging) is about 35 kg. English For the unpacking instructions follow the illustrated steps printed on the packaging (outside and inside). For the wall mounting instructions follow the illustrated steps ‘ to § printed on the separate template. Note: Stands are optional accessories.
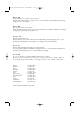
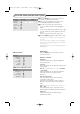
1024.4 en 16x24 26-06-2003 15:44 Pagina 2 Computer Display modes VGA Wide VGA Wide VGA MAC MAC MAC MAC SVGA XGA SXGA 640x480 848x480 852x480 640x480 832x624 1024x768 1152x870 800x600 1024x768 1280x1024 60, 72, 75, 85 Hz 60 Hz 60 Hz 66.67 Hz 74.55 Hz 74.93 Hz 75 Hz 56, 60, 72, 75, 85 Hz 60, 70, 75, 85 Hz 60, 72 Hz (not with DVI-D-source) When a VGA computer is connected, the display selection is made automatically. A message is displayed when the monitor does not support the connected VGA mode.
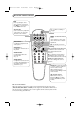
1024.4 en 16x24 26-06-2003 15:44 Pagina 3 Use of the remote control VGA press repeatedly to select your computer connected to the VGA 1 or 2 connector or to the DVI-D connector. B to switch to standby or on again AV1, AV2, AV3 press to select the peripherals connected to the connector indicated on the monitor.
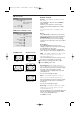
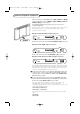
1024.4 en 16x24 26-06-2003 15:44 Pagina 4 Use of the menus and the menu system 1 Pict. a 2 Pict. a Contrast G H (Colour) C Brightness Sharpness & Press the MENU key on the remote control to summon the different menu headers. é Press the cursor left/right to move the cursor horizontally through the menu headers. “ Press the cursor down to access the menu. In case of a slider, move the cursor left/right to adjust. Colour temp.
1024.4 en 16x24 26-06-2003 15:44 Pagina 5 SD video-mode Picture 2 menu 2 Pict. a Format q 4:3 Movie expand 16:9 Wide screen Zoom Z Zoom factor  VGA-mode + HD video mode 2 Pict. a (Format) q 4:3 Wide screen (Phase) Z  ‹ S fi (Auto align) X Zoom Zoom factor (Shift) (Clock frequency) 4:3 VGA-mode 4:3 Wide screen Format (only available in 4:3 VGA mode and SD video mode) Select Format to summon a list of available display formats.
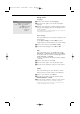
1024.4 en 16x24 26-06-2003 15:44 Pagina 6 Setup menu Language & Use the cursor down to select Language. Setup º Language ‡ US English Power savings ) English AV3 ( Nederlands VGA2 § Deutsch Français Español é Press the cursor right to enter the list of selectable languages. “ Use the cursor up/down to scroll through the list and to bring up other languages which are not displayed on the screen at present.
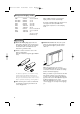
24.4 en 16x24 26-06-2003 15:44 Pagina 7 Connect peripheral equipment You may connect 3 possible VGA sources (VGA 1, VGA 2 or DVI-D) and 3 possible video sources (VIDEO 1 (AV1), VIDEO 2 (AV2) and VIDEO 3 (AV3)) to the monitor. The following diagrams show you where you can connect your peripheral equipment. Note: in case the monitor is operating in combination with a receiver box, the VGA and video inputs on the monitor will be disabled and the VGA 2 connector becomes an output.
1024.4 en 16x24 26-06-2003 15:44 Pagina 8 High Definition equipment with VGA connector VGA 2 VIDEO 1 (AV1) VGA 1 VGA 2 CVBS B/Pb/Cb H G/Y/Y R/Pr/Cr VIDEO 3 (AV3) V RC-OUT RS232 DVI-D ~ MAINS Y/C S-VHS VIDEO 2 (AV2) Connect the VGA output of your equipment to the VGA2 connector.
1024.4 en 16x24 26-06-2003 15:44 Pagina 9 Tips Ambient temperature Do not hang up the monitor above a central heating or other heating sources. Care of the screen Clean the anti-reflex coated flat glass screen with a slightly damp soft cloth. Do not use abrasives solvents as it can damage the glass surface of the screen.
1024.