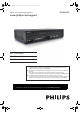
E8E2CCD_E8E2CCH_EN_v1.book Page 1 Friday, March 9, 2012 6:37 PM Register your product and get support at www.philips.com/support EN User Manual FR Manuel d’Utilisation ES Manual del Usuario DVP3345VB EN: For further assistance, call the customer support service in your country. • To obtain assistance in the U.S.A., Canada, Puerto Rico, or the U.S.
E8E2CCD_E8E2CCH_EN_v1.book Page 2 Friday, March 9, 2012 6:37 PM Introduction English 2 Return your Product Registration Card or register online at www.philips.com/support today to get the very most from your purchase. Registering your model with Philips makes you eligible for all of the valuable benefits listed below, so don’t miss out. Complete and return your Product Registration Card at once, or register online at www.philips.
1. 2. 3. 4. 5. 6. 7. 8. 6:37 PM Safety Informations 3 IMPORTANT SAFETY INSTRUCTIONS Read these instructions. Keep these instructions. Heed all warnings. Follow all instructions. Do not use this apparatus near water. Clean only with dry cloth. Do not block any ventilation openings. Install in accordance with the manufacturer’s instructions. Do not install near any heat sources such as radiators, heat registers, stoves, or other apparatus (including amplifiers) that produce heat. 9.
E8E2CCD_E8E2CCH_EN_v1.book Page 4 Friday, March 9, 2012 6:37 PM English 4 Safety Information (cont’d) IMPORTANT COPYRIGHT INFORMATION Unauthorized copying, broadcasting, public performance and lending of discs are prohibited. This item incorporates copy protection technology that is protected by U.S. patents and other intellectual property rights of Rovi Corporation. Reverse engineering and disassembly are prohibited. Never use a gas duster on this unit.
6:37 PM Safety Information (cont’d) 5 Cleaning the Disc Lens • If this unit still does not perform properly although you refer to the relevant sections and to “Helpful Hints” in this user manual, the laser optical pickup unit may be dirty. Consult your dealer or an Authorized Service Center for inspection and cleaning of the laser optical pickup unit. Disc Handling • Handle the discs so that fingerprints and dust do not adhere to the surfaces of the discs.
E8E2CCD_E8E2CCH_EN_v1.book Page 6 Friday, March 9, 2012 6:37 PM English 6 Contents Introduction Disc Playback Features Safety Informations ........................................................... 3 Introduction........................................................................ 7 Playable Discs and Video Cassettes .............................. 8 Display Panel.....................................................................18 Front Panel, Rear Panel and Remote Control..........19 Menus ...
6:37 PM Introduction 7 Welcome! This DVD/VCR combines a Digital Video Disc (DVD) player and a Hi-Fi Video Cassette Recorder (VCR) into one unit, letting you play DVDs, Audio Compact Discs (Audio CDs), and Video Cassettes on one piece of equipment. Read this owner’s manual carefully to learn how to use the features listed below.
E8E2CCD_E8E2CCH_EN_v1.book Page 8 Friday, March 9, 2012 6:37 PM English 8 Playable Discs and Video Cassettes Playable Discs The DVD player will play Digital Video Discs (DVDs); finalized Digital Video Discs Recordable (DVD+R, DVD-R); finalized Digital Video Discs Rewritable (DVD+RW, DVD-RW); Audio Compact Discs (CDs); finalized Compact Discs Recordable (CD-R) and Compact Discs Rewritable (CD-RW). To play a DVD, make sure it meets the requirements for Region Codes and Color Systems as described below.
6:37 PM Initial DVD/VCR Setup Hookups 9 Determining the best possible connection... Your hookup will be determined primarily by your existing equipment, especially your TV. These guidelines describe which options have the best picture and sound quality. You will not use all the jacks on the DVD / VCR.
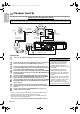
E8E2CCD_E8E2CCH_EN_v1.book Page 10 Friday, March 9, 2012 6:37 PM English 10 Hookups (cont’d) DVD / VCR to An External Tuner This DVD / VCR does not have a tuner input jack. To record TV programs on your DVD / VCR, you need to connect this DVD / VCR to an external tuner device (e.g., set top box, cable box or satellite receiver) that has audio / video output jacks. e.g.) Back of TV RF coaxial cable (not supplied) TV Signal AUDIO IN 1 2 ANT.
Friday, March 9, 2012 6:37 PM Hookups (cont’d) 11 DVD/VCR to a TV that has Audio/ Video, Component Video or S-Video In jacks AUDIO IN L 2 a 1 COMPONENT VIDEO IN AUDIO IN Audio Cable (supplied) AUDIO OUT Cb/Pb 1 R CR / PR Back of TV DVD AUDIO OUT L COAXIAL 4 CB / PB Cr/Pr VIDEO IN DIGITAL AUDIO OUT 2 2 2 3 S-VIDEO COMPONENT VIDEO OUT OUT Y L R R Video Cable (supplied) DVD Y L AUDIO IN 1 2b Back of TV Audio and Video IN Jacks on TV R S-VIDEO COMPONENT VIDEO OUT OUT Y CB
E8E2CCD_E8E2CCH_EN_v1.
Friday, March 9, 2012 6:37 PM Hookups (cont’d) 13 DVD/VCR to a TV and to a Stereo that is Dolby Digital-compatible Using Digital Audio connections Back of TV (example only) DVD DIGITAL AUDIO OUT AUDIO OUT S-VIDEO COMPONENT VIDEO OUT OUT Y DVD/VCR VCR AUDIO OUT AUDIO IN L L R R L CB / PB COAXIAL VIDEO OUT VIDEO IN R CR / PR Stereo COAXIAL DIGITAL AUDIO IN 1 2 3 4 1 2 Video Cable (supplied) VIDEO IN Coaxial Digital Audio Cable (not supplied) Connect a coaxial digital audio cable (not supp
E8E2CCD_E8E2CCH_EN_v1.book Page 14 Friday, March 9, 2012 6:37 PM English 14 Remote Control Setup Putting Batteries in the Remote Control 1 2 3 Remove the battery compartment lid on the bottom of the remote control by pressing the tab, then lifting the lid. Place two AA (1.5 V) batteries inside the battery compartment with their + and – ends aligned as indicated. Replace the battery compartment lid.
Friday, March 9, 2012 6:37 PM First-time DVD/VCR Setup 15 Before turning on your DVD/VCR,make sure batteries are in the remote control and the DVD/VCR and TV are connected correctly. These menus may not appear if you have already turned on the DVD/VCR. 1 2 Turn on the TV. Set it to the correct Video In channel. (Check your TV owner’s manual for details.) Press y. VCR light will appear on the front of the DVD/VCR. The display shown below will appear.
E8E2CCD_E8E2CCH_EN_v1.book Page 16 Friday, March 9, 2012 6:37 PM 16 Video Cassette Playback Basic Playback English Read and follow the steps below to play a tape. 1 2 Turn on the TV. Set it to the correct Video In channel. (Check your TV owner’s manual for details.) Details are on page 9. Insert a tape in the cassette compartment of the DVD/VCR. VCR light will appear on the front of the DVD/VCR. If the tape’s record tab has been removed, playback will start automatically.
Friday, March 9, 2012 6:37 PM Disc Playback 17 Before you begin, turn on the TV, Stereo and other equipment connected to the DVD/VCR. Make sure the TV and the Stereo (if applicable) are set to the correct channel. Details are on pages 9-13. 1 2 3 4 5 Press y to turn on the DVD/VCR. OPEN/CLOSE Press DVD so DVD light appears on the front of the DVD/VCR. 1 2 3 4 5 6 7 8 9 +10 0 1 3,5 TRACKING Press OPEN/CLOSE A to open the disc tray. CLEAR VCR Place a disc onto the tray.
E8E2CCD_E8E2CCH_EN_v1.book Page 18 Friday, March 9, 2012 6:37 PM English 18 Display Panel Basic DVD/VCR Controls DVD light This light appears when the DVD/VCR is in DVD mode. You can only watch DVDs when DVD light is on. To make DVD light come on, press SOURCE on the front of the DVD/VCR or DVD on the remote control. VCR light This light appears when the DVD/VCR is in VCR mode. You can only watch videotapes or access VCR features when VCR light is on.
Friday, March 9, 2012 6:37 PM Front Panel, Rear Panel and Remote Control 19 Front Panel TRACKING K / L Buttons Remote Sensor OPEN/CLOSE A Button (DVD) y STANDBY-ON Button OPEN/CLOSE DVD VIDEO PLAYER ONE TOUCH RECORDING • LONG PLAY STANDBY-ON VIDEO L AUDIO R REW F.FWD STOP/EJECTPLAY REC TRACKING VCR VCR AUDIO and VIDEO IN jacks (L2) DVD SOURCE REW E Button (VCR) REC I Button (VCR) F.
E8E2CCD_E8E2CCH_EN_v1.book Page 20 Friday, March 9, 2012 English 20 Clock (VCR) 6:37 PM Additional VCR Setup Follow these steps to set the VCR clock. Make sure : 1 Press VCR, then press SETUP so MENU appears. If the clock has never been set, the CLOCK SET Menu may appear when you press SETUP. If so, follow the instructions from step 3 on this page.
Friday, March 9, 2012 6:37 PM Language (VCR) 21 Follow the steps below to change the language of the VCR On-Screen Displays and menus. Press VCR, then press SETUP so MENU appears. 1 -MENUTIMER PROGRAMMING SATELLITE LINK AUTO REPEAT [OFF] CLOCK SET LANGUAGE SELECT 2 3 Press ▲ or ▼ to choose LANGUAGE SELECT, then press ►. 9 CLEAR +10 4 TITLE 0 VCR SETUP DVD DISC INPUT MENU OK REW Press ▲ or ▼ to choose ENGLISH, FRANCAIS (French) or ESPAÑOL (Spanish).
E8E2CCD_E8E2CCH_EN_v1.book Page 22 Friday, March 9, 2012 6:37 PM English 22 Videotape Recording VCR Recording Options Read and follow the steps below to record a television program onto a videotape. Before you begin : ● This DVD/VCR does not have a tuner input jack. To record TV programs on your DVD/VCR, you need to connect this DVD/VCR to an external tuner device (e.g., set top box, cable box or satellite receiver) that has audio/video output jacks.
Friday, March 9, 2012 6:37 PM One-Touch Recording 23 One-Touch Recording (OTR) lets you set a timed recording 30 minutes to 8 hours long. Before you begin : ● This DVD/VCR does not have a tuner input jack. To record TV programs on your DVD/VCR, you need to connect this DVD/VCR to an external tuner device (e.g., set top box, cable box or satellite receiver) that has audio/video output jacks. See page 10 on how to connect the DVD/VCR to the external tuner. ● Place the DVD/VCR in VCR mode.
E8E2CCD_E8E2CCH_EN_v1.book Page 24 Friday, March 9, 2012 6:37 PM English 24 Rerecording (Tape Duplication) These instructions are made on the premise that the DVD/VCR 1 is already connected to the TV. The instructions show you how to copy videotapes. The illustration uses two DVD/VCRs.Other VCRs or Camcorders may operate differently. 1.
Friday, March 9, 2012 6:37 PM Timer Recording 25 Follow the steps below to program the VCR of the DVD/VCR to record TV programs while you’re away from home. Before you begin : ● This DVD/VCR does not have a tuner input jack. To record TV programs on your DVD/VCR, you need to connect this DVD/VCR to an external tuner device (e.g., set top box, cable box or satellite receiver) that has audio/video output jacks. See page 10 on how to connect the DVD/VCR to the external tuner. ● Set the clock.
E8E2CCD_E8E2CCH_EN_v1.book Page 26 Friday, March 9, 2012 6:37 PM English 26 Timer Recording (cont’d) 7 Press ▲ or ▼ to select a recording tape speed. The arrow will appear beside your choice. The selected speed will flash beside REC SPEED. Details about tape speed are on page 58. You must select the recording speed to complete the timer programming.
Friday, March 9, 2012 6:37 PM Satellite Link 27 You can set the DVD/VCR to start recording whenever it detects a video signal from the external tuner. Before you begin : ● Set the clock. Details are on page 20. ● Put a tape in the cassette compartment of the DVD/VCR. Make sure the tape’s record tab is intact and the tape is long enough to record the program(s). ● Press VCR so VCR light appears on the front of the DVD/VCR. ● Turn on the external tuner.
E8E2CCD_E8E2CCH_EN_v1.book Page 28 Friday, March 9, 2012 6:37 PM English 28 Satellite Link (cont’d) 4 5 6 Press ▲ or ▼ to set the desired start hour, then press ►. SATELLITE LINK Helpful Hint ● The hour can be selected from 1-12 with AM or PM. ● When the external tuner signal is stopped, recording will be stopped • If you have not set the clock, CLOCK also. SET menu will appear at step 3. Refer Press ▲ or ▼ to set the desired start minutes. to “Clock (VCR)” on page 20.
Friday, March 9, 2012 6:37 PM DVD to Videotape Duplication 29 Follow the steps below to copy a DVD to a videotape. This will be possible only if the DVD is not copy protected. Before you begin : ● Put a videotape in the cassette compartment. Make sure the tape’s record tab is intact and the tape is long enough to record the DVD. ● Put the DVD you want to copy in the disc tray. ● Press VCR so VCR light appears on the front of the DVD/VCR. ● Turn on the TV and set it to the correct Video In channel.
E8E2CCD_E8E2CCH_EN_v1.book Page 30 Friday, March 9, 2012 English 30 Repeat Playback 6:37 PM Video Cassette Playing Options Follow the steps below to play a videotape repeatedly. Press VCR, then press SETUP so MENU appears. 1 2 3 Press ▲ or ▼ to select AUTO REPEAT. Press ► so ON appears next to AUTO REPEAT. Tape playback will begin immediately. AUTO REPEAT will appear on the TV screen briefly.
Friday, March 9, 2012 6:37 PM Time Search, Index Search 31 Time Search Follow the steps below to search forward or backward on a tape a specific length of time. There must be a tape in the cassette compartment. Press VCR, then press SEARCH repeatedly until the TIME SEARCH Screen appears. 1 TIME SEARCH 2 3 Within 30 seconds, press ▲ or ▼ until your desired length of time appears. Or, press and hold ▲ or ▼ until you reach the desired length of time.
E8E2CCD_E8E2CCH_EN_v1.book Page 32 Friday, March 9, 2012 6:37 PM English 32 Special Effects Playback ● Before you begin, press VCR so VCR light appears on the front of the DVD/ VCR. Forward and Reverse Searching (SP/LP/SLP) / Super High Speed Searching (LP/SLP) During tape playback, press and release FFW D or REW E. A fast forward or reverse picture search will begin. Press FFW D or REW E, then press again. The search speed will increase.
Friday, March 9, 2012 6:37 PM Additional VCR Features Hi-Fi Stereo 33 Hi-Fi Stereo To play in Hi-Fi stereo the tapes recorded in Hi-Fi stereo, press AUDIO to switch HI-FI or MONO. Disc Playback Features Helpful Hint • The audio level of a tape recorded in Hi-Fi stereo will differ from the audio level of a tape not recorded in Hi-Fi stereo. Menus DVD Disc Menus Some DVDs contain menus that describe the contents of the disc or allow you to customize disc playback.
E8E2CCD_E8E2CCH_EN_v1.book Page 34 Friday, March 9, 2012 6:37 PM English 34 Fast Forward/Fast Reverse 1 2 Press DVD to put the DVD/VCR in DVD mode. DVD light will appear on the front of the DVD/VCR. During playback, press FFW D or REW E on the remote control. ● During DVD playback, pressing FFW D or REW E will forward or reverse the picture at approximately 2, 8, 20, 50 or 100 times the normal speed. The speed may vary depending on the disc.
Friday, March 9, 2012 6:37 PM Title/Chapter/Time Search 35 Title/Chapter Search 1 2 3 Press DVD to put the DVD/VCR in DVD mode. DVD light will appear on the front of the DVD/VCR. During DVD playback, press SEARCH repeatedly until CH (for chapter) or TT (for title) appears on the TV screen. The number of available titles or chapters will appear at the right ( /4, for example). Enter the title or chapter number using the Number buttons. The title or chapter will play.
E8E2CCD_E8E2CCH_EN_v1.book Page 36 Friday, March 9, 2012 6:37 PM English 36 Track Search There are three ways to play a specific Audio CD, MP3, Windows Media™ Audio or JPEG track : Use the Number buttons, the SEARCH button or and . ● Before you begin, press DVD so DVD light appears on the front of the DVD/VCR. A Using the Number buttons Press the Number buttons to enter a track number. Playback will start at the selected track.
Friday, March 9, 2012 6:37 PM Paused and Step-by-Step Playback, Resume On 37 Paused and Step-by-Step Playback 1 2 3 4 Press DVD to put the DVD/VCR in DVD mode. DVD light will appear on the front of the DVD/VCR. During disc playback, press PAUSE F. Playback will pause and the sound will be mute. ● Pressing PAUSE F once during Dual Playback will pause a JPEG file only. Pressing PAUSE F one more time will pause an MP3 playback.
E8E2CCD_E8E2CCH_EN_v1.book Page 38 Friday, March 9, 2012 6:37 PM English 38 Repeat, A-B Repeat Repeat 1 2 Press DVD to put the DVD/VCR in DVD mode. DVD light will appear on the front of the DVD/VCR. VCR SETUP DVD DISC INPUT During DVD, Audio CD, MP3, Windows Media™ Audio or JPEG playback, press REPEAT repeatedly until the repeat mode you want appears on the TV screen. On a DVD, select CHAPTER, TITLE or OFF. On an Audio CD, select TRACK, ALL (all tracks on the disc) or OFF.
Friday, March 9, 2012 6:37 PM Markers 39 Use Markers to remember your favorite places on a DVD or Audio CD. ● Before you begin, place the DVD/VCR in DVD mode. Press DVD so DVD light appears on the front of the DVD/VCR. Play the disc to within 30 seconds of the point at which you want to set the Marker. Press SEARCH repeatedly until Marker Display appears.
E8E2CCD_E8E2CCH_EN_v1.book Page 40 Friday, March 9, 2012 6:37 PM English 40 Subtitles, Camera Angles Subtitles VCR The DVD/VCR allows you to select a language for subtitles during playback. You may select only languages that are available on the DVD. Press DVD to put the DVD/VCR in DVD mode. DVD light will appear on the front of the DVD/VCR. 1 2 During playback, press SUBTITLE repeatedly to select a subtitle language. The number of available languages appears at the right of the Subtitle Display.
Friday, March 9, 2012 6:37 PM Audio Language, Stereo Sound Mode 41 Audio Language You can select a language for DVDs during playback if multiple languages are available. Press DVD to put the DVD/VCR in DVD mode. DVD light will appear on the front of the DVD/VCR. 1 2 During DVD playback, press AUDIO repeatedly to choose one of the available languages. Audio Display appears at the top of the TV screen, and the new audio will be heard. The display will disappear after about 5 seconds.
E8E2CCD_E8E2CCH_EN_v1.book Page 42 Friday, March 9, 2012 6:37 PM English 42 Slow Motion, Zoom Slow Motion 1 2 VCR SETUP Press PAUSE F during DVD playback. INPUT Press FFW D or REW E. Slow Motion Playback will begin. Press FFW D or REW E repeatedly during Slow Motion Playback to play a DVD forward or backward at approximately 1/16, 1/8 or 1/2 the normal speed. An 1 (1/16), 2 (1/8) or 3 (1/2) will appear briefly on the TV screen to indicate Slow Forward Playback.
Friday, March 9, 2012 6:37 PM Program/Random Playback 43 Program Playback You may determine the order in which Audio CD, MP3, Windows Media™ Audio or JPEG tracks will play. Random Playback VCR You may play the tracks of an Audio CD in Random order instead of the order in which they are recorded (1,2,3...). You can also use this feature for MP3, Windows Media™ Audio and JPEG tracks. Turn on your external tuner. Press DVD to put the DVD/VCR in DVD mode. DVD light will appear on the front of the DVD/VCR.
E8E2CCD_E8E2CCH_EN_v1.book Page 44 Friday, March 9, 2012 6:37 PM English 44 MP3/Windows Media™ Audio/JPEG Playback The DVD/VCR will play MP3, Windows Media™ Audio and JPEG files that you record and finalize on a CD-R (Compact Disc-Recordable) or CD-RW (Compact Disc-Rewritable). These discs may contain pictures in a JPEG format or audio tracks in an MP3 or Windows Media™ Audio format.For example, you may have photographic film developed by a retailer that places the pictures on a CD-R for you.
Friday, March 9, 2012 6:37 PM MP3/Windows Media™ Audio/JPEG Playback (cont’d) 45 Dual Playback This feature lets you play MP3 and JPEG files simultaneously. Available only when DUAL PLAYBACK is ON. See pages 56-57 on how to set the DUAL PLAYBACK ON or OFF. Press DVD to put the DVD/VCR in DVD mode. DVD light will appear on the front of the DVD/VCR. 1 2 3 Press DISC MENU during MP3/JPEG playback. A File List will appear.
E8E2CCD_E8E2CCH_EN_v1.book Page 46 Friday, March 9, 2012 6:37 PM English 46 On-Screen Displays DVD Displays 1 2 Press DVD to put the DVD/VCR in DVD mode. DVD light will appear on the front of the DVD/VCR. OPEN/CLOSE Press DISPLAY repeatedly to see the following displays during DVD playback.
Friday, March 9, 2012 6:37 PM On-Screen Displays (cont’d) 47 MP3/Windows Media™ Audio/JPEG Displays 1 2 Press DVD to put the DVD/VCR in DVD mode. DVD light will appear on the front of the DVD/VCR. OPEN/CLOSE Press DISPLAY repeatedly until the current track or file information appears.
E8E2CCD_E8E2CCH_EN_v1.book Page 48 Friday, March 9, 2012 6:37 PM English 48 Black Level Black Level Helpful Hint Adjust Black Level to brighten the DVD picture. Press DVD to put the DVD/VCR in DVD mode. DVD light will appear on the front of the DVD/VCR. 1 2 3 • Black Level is not available for a PAL DVD. • The Black Level Settings will be saved even if the player is turned off.
Friday, March 9, 2012 6:37 PM Language 49 DVD Player Setup Options You can select different languages for the Audio or Subtitles of DVDs, as well as languages for DVD Disc Menus and the Setup Menus of the DVD player. Press DVD to put the DVD/VCR in DVD mode. DVD light will appear on the front of the DVD/VCR. 1 2 3 While playback is stopped, press SETUP. The QUICK SETUP Screen appears. Press ◄ or ► to select CUSTOM at the top of the menu, then press OK.
E8E2CCD_E8E2CCH_EN_v1.book Page 50 Friday, March 9, 2012 6:37 PM English 50 Language (cont’d) 6 Press ▲ or ▼ to select a language, then press OK. The language lists may continue on multiple screens. Press ▲ or ▼ to move to the other screens. ● If you select OTHER for AUDIO, SUBTITLE, or DISC MENU, press four Number buttons to enter the code for the language you desire. Use one of the Language Codes listed below.
Friday, March 9, 2012 6:37 PM Display 51 You may adjust the TV Aspect ratio and still mode clarity, and Progressive Scan compatibility. Press DVD to put the DVD/VCR in DVD mode. DVD light will appear on the front of the DVD/VCR. 1 2 When playback is stopped, press SETUP. The QUICK SETUP Screen will appear. QUICK SETUP OSD LANGUAGE TV ASPECT PROG. SCAN DOLBY DIGITAL 3 ENGLISH 4:3 LETTER BOX OFF BITSTREAM Press ◄ or ► to select CUSTOM at the top of the menu, then press OK.
E8E2CCD_E8E2CCH_EN_v1.book Page 52 Friday, March 9, 2012 6:37 PM English 52 Display (cont’d) ● If you selected STILL MODE, press ▲ or ▼ to select a setting, then press OK. This determines the quality of an image in still mode. If you select FIELD, still images will be stabilized but coarse due to the small amount of data. If you select FRAME, the images will be highly defined due to the simultaneous output of two fields. The default setting is AUTO.
Friday, March 9, 2012 6:37 PM Audio 53 Change Audio Settings based on other equipment you connected to the DVD player or according to your disc sound features. These setting only affect the Audio from the DVD player of the DVD/VCR. Press DVD to put the DVD/VCR in DVD mode. DVD light will appear on the front of the DVD/VCR. 1 2 2 3 4 5 6 7 8 9 +10 0 TRACKING While playback is stopped, press SETUP. The QUICK SETUP Screen will appear. QUICK SETUP OSD LANGUAGE TV ASPECT PROG.
E8E2CCD_E8E2CCH_EN_v1.book Page 54 Friday, March 9, 2012 6:37 PM English 54 Parental Password Parental Controls prevents viewing of DVDs that exceed your rating limits. This feature will not limit viewing if the DVD is not rated or coded.Check your DVDs and settings before letting children access the DVD/VCR. You will need a password to change the Parental Settings or to play a blocked disc. Follow these steps to change your password. Press DVD to put the DVD/VCR in DVD mode.
Friday, March 9, 2012 6:37 PM Parental Levels 55 Follow these steps to set the rating level for your DVDs. DVDs whose ratings exceed the level you set will not play. Press DVD to put the DVD/VCR in DVD mode. DVD light will appear on the front of the DVD/VCR. 1 2 While playback is stopped, press SETUP. The QUICK SETUP Screen appears. QUICK SETUP OSD LANGUAGE TV ASPECT PROG. SCAN DOLBY DIGITAL 3 ENGLISH 4:3 LETTER BOX OFF BITSTREAM Press ◄ or ► to select CUSTOM at the top of the menu, then press OK.
E8E2CCD_E8E2CCH_EN_v1.book Page 56 Friday, March 9, 2012 6:37 PM English 56 Others You may adjust the Angle Icon, Automatic Power Off, Dual Playback and Slide Show Settings. Press DVD to put the DVD/VCR in DVD mode. DVD light will appear on the front of the DVD/VCR. 1 2 While playback is stopped, press SETUP. The QUICK SETUP Screen appears. QUICK SETUP OSD LANGUAGE TV ASPECT PROG.
Friday, March 9, 2012 6:37 PM Others (cont’d) 57 Instructions continued from the previous ● If you selected AUTO POWER OFF, press OK repeatedly to choose ON or OFF. Choose ON if you want the player to turn off when there is no activity at the player or its remote for 25 minutes. The default setting is ON.
E8E2CCD_E8E2CCH_EN_v1.book Page 58 English 58 Glossary Friday, March 9, 2012 6:37 PM Information You May Need AUDIO IN/OUT Jacks : jacks on the front and back of the DVD/VCR that receive audio from another source (IN) or send audio to another system (OUT). These jacks are red (right) and white (left). COAXIAL DIGITAL AUDIO OUT Jack : sends digital audio to a Stereo, allowing you to adjust the volume at the Stereo. This connection provides the Multi-channel surround sound as heard in movie theaters.
Friday, March 9, 2012 6:37 PM Helpful Hints 59 If you are having problems with your product,check this list of problems and possible solutions before requesting service. You may be able to solve the problem yourself. If you need to call a customer service representative, please know the model number and serial number of your product before you call. This information is displayed on the back of the product.
E8E2CCD_E8E2CCH_EN_v1.book Page 60 Friday, March 9, 2012 6:37 PM English 60 Helpful Hints (cont’d) You cannot change the audio or subtitle language of a DVD. • The DVD does not contain audio or subtitles in the desired language. Not all DVDs contain audio or subtitles in multiple languages. See if other languages are available by referring to the disc case or DVD Disc Menu. Details are on pages 40-41. An X appears in the top right corner of the TV screen when you try a DVD feature.
Friday, March 9, 2012 6:37 PM Helpful Hints (cont’d) 61 DVD/VCR ejects the tape when you press REC I or TIMER SET. • Make sure the tape has a record tab. Details are on page 22. Hi-Fi Stereo Sound • During playback, Hi-Fi audio may normally revert to normal audio when you adjust tracking.
E8E2CCD_E8E2CCH_EN_v1.book Page 62 Friday, March 9, 2012 6:37 PM English 62 Care and Maintenance Cleaning the DVD/VCR • Wipe the front panel and other exterior surfaces of the DVD/VCR with a soft cloth. • Never use a solvent, thinner, benzene or alcohol to clean the DVD/VCR. Do not spray insecticide liquid near the DVD/ VCR. Such chemicals may discolor the surface or damage the DVD/VCR. Cleaning a Disc • • • • • Use a soft, dry cloth to wipe the disc.
Friday, March 9, 2012 6:37 PM Ninety (90) day Limited Warranty 63 WARRANTY COVERAGE: This warranty obligation is limited to the terms set forth below. WHO IS COVERED: This product is warranted to the original purchaser or the person receiving the product as a gift against defects in materials and workmanship as based on the date of original purchase (“Warranty Period”) from an Authorized Dealer.
E8E2CCD_E8E2CCH_EN_v1.book Page 64 Friday, March 9, 2012 6:37 PM English 64 Information Index A I a-b repeat ............................................... 38 a-b repeat button ............................. 19, 38 ac power cord ........................................ 19 angle button ...................................... 19, 40 angle icon .......................................... 40, 56 arrow buttons ........................................ 19 audio button .....................................
E8E2CCD_E8E2CCH_ES_v1.
E8E2CCD_E8E2CCH_EN_v1.book Page 65 Friday, March 9, 2012 6:37 PM P&F USA, Inc. PO Box 2248 Alpharetta, GA 30023-2248 P&F Mexicana, S.A. de C.V. Av. La Palma No. 6, Col. San Fernando La Herradura, Huixquilucan Edo. de México C.P. 52787 Meet Philips at the Internet http://www.philips.com/support Printed In China 1VMN32793 ★★★★★ E8E2CCD/E8E2CCH Philips and Philips Shield are used under license of Koninklijke Philips Electronics N.V.