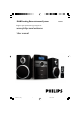
DAB Docking Entertainment System DCB146 Register your product and get support at www.philips.
Important notes for users in the U.K. Mains plug This apparatus is fitted with an approved 13 Amp plug. To change a fuse in this type of plug proceed as follows: 1 2 Remove fuse cover and fuse. 3 Refit the fuse cover. Fix new fuse which should be a BS1362 3 Amp, A.S.T.A. or BSI approved type. If the fitted plug is not suitable for your socket outlets, it should be cut off and an appropriate plug fitted in its place. If the mains plug contains a fuse, this should have a value of 3 Amp.
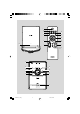
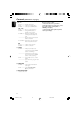
1 2 3 4 % $ 5 # @ @ PULL TO OPEN 6 ! 0 7 9 8 1 2 ! 3 0 9 8 7 4 5 6 3 DCB146_05_Eng 3 7/1/08, 12:02
Contents English General Information FM Radio Supplied accessories ............................................ Environmental Information ................................ Safety Information ................................................ Hearing Safety ....................................................... 5 5 5 6 Tuning to radio stations .................................... 17 Programming radio stations ............................. 17 Tuning to preset radio stations ....................... 17 RDS .
Congratulations on your purchase and welcome to Philips! To fully benefit from the support that Philips offers, register your product at www.philips.com/ welcome. This product complies with the radio interference requirements of the European Community. Supplied accessories English General Information ● Place the system in a location with adequate ventilation to prevent internal heat build-up in your system.
General Information English Hearing Safety Listen at a moderate volume. ● Using headphones at a high volume can impair your hearing. This product can produce sounds in decibel ranges that may cause hearing loss for a normal person, even for exposure less than a minute. The higher decibel ranges are offered for those that may have already experienced some hearing loss. ● Sound can be deceiving. Over time your hearing "comfort level" adapts to higher volumes of sound.
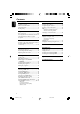
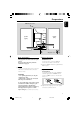
English Preparations DAB/FM wire antenna speaker (left) speaker (right) B A AC power cord B Antenna Connection Rear connections The type plate is located at the rear of the system. For users in the U.K.: please follow the instructions on page 2. DAB/FM Antenna It is unnecessary to connect the DAB/FM antenna since it is fixed to the main unit. ● Adjust the DAB/FM antenna for optimal FM and DAB reception.
Preparations English Notes: – For optimal sound performance, use the supplied speakers. – Do not connect more than one speaker to any one pair of +/- speaker terminals. – Do not connect speakers with an impedance lower than the speakers supplied. Please refer to the SPECIFICATIONS section of this manual. Inserting batteries into the Remote Control 1 2 Open the battery compartment. 3 Close the cover. Insert two R03 or AAA batteries following the indications (+/-) inside the compartment.
Controls on the system – 1 STANDBY-ON2 – switches the system to standby or on. 2 iR SENSOR – – – selects the respective sound source for DISC/ iPod/FM/DAB/AUX. switches on the system. 4 PRESET +/for FM .................. selects a preset FM station. for DAB .............. selects a preset DAB station. VOL +/adjusts the volume level. @ PULL TO OPEN – opens/closes the CD door. – AUX jack (located on the back panel) connects an external source (3.
Controls (illustrations on page 3) English @3 / 4 for iPod ............... navigates iPod menu. for FM .................. selects a preset FM station. for DAB .............. selects a preset DAB station. 4 / ¢ for FM .................. tunes to a radio frequency. for DAB .............. changes DAB stations, or navigates menu options. for CD/iPod ...... skips to the beginning of the current/previous/subsequent track. ................................. fast searches back and forward within a track/CD.
Adjusting volume and sound 1 IMPORTANT: Before you operate the system, complete the preparation procedures. Press VOL +/- to adjust volume. ➜ Display shows the volume level: VOL and a number from 01-32. 2 Press DBB on the remote control to switch bass enhancement on or off. ➜ Display shows: if the DBB is activated. 3 Press MUTE on the remote control to interrupt sound reproduction instantly. ➜ Playback will continue without sound.
CD Operation English Basic playback controls To play a disc ● Press 2; to star t playback. ➜ The current track number and “PLAY” icon are displayed during disc playback. To select a different track ● Press TUNING 4 ¢ (or 4 / ¢ on the remote control ) once or repeatedly until the desired track number appears in the display. To find a passage within a track IMPORTANT: The lens of the CD player should never be touched. 1 Press and hold down on TUNING 4 ¢ (or 4 / ¢ on the remote control).
Programming track numbers Different play modes: SHUFFLE and REPEAT You can select and change the various play modes before or during playback. The play modes cannot be combined with PROGRAMME. SHUF ................ tracks of the entire disc are played in random order. Rep all .............. repeats the entire disc/ programme. Rep one ........... plays the current track continuously. 1 To select Repeat play mode, press REPEAT or SHUFFL on the remote control.
DAB Radio English Switching on DAB radio Scanning for DAB stations For the first time when DAB mode is switched on, the system will perform an auto scan. Then all the available DAB stations will be stored on the set, and the radio will tune to the first available station. New stations and services will be regularly added in the DAB broadcast. To make new DAB stations and service available on your DAB radio, a search is needed.
Selecting a preset DAB station Manual tune - ( or 3 / 4 on the ● Press PRESET +/remote control ) to select desired preset station. 2 By using this feature, it is possible to manually tune to a specific channel/frequency. In addition to antenna orienting for better radio reception, the optimal reception can also be obtained by using this feature. Press OK to confirm the selection. Note – If you have not yet stored a DAB station in one of the presets, "Empty preset" will be displayed.
DAB Radio English Dynamic Range Control (DRC) Software version DRC adds or removes a degree of compensation for the differences in the dynamic range between radio stations. For example, a station broadcasting popular music may have a high level of compensation applied since the emphasis is on a constant high listening level, whereas a station broadcasting classical music will have little or no compensation as the listener requires all of the highs and lows in the music to define the detail.
Manual programming Tuning to radio stations 1 2 Press SOURCE (or TUNER/DAB on the remote control ) repeatedly until the desired waveband (FM) is displayed. Press briefly SCAN. ➜ The radio automatically tunes to a station with sufficient reception. “Searching.... “ is displayed during automatic tuning. 1 Tune to your desired station (see Tuning to radio stations). 2 Press briefly PROG on the remote control to activate programming.
FM Radio AUX English RDS Listening to an external source The feature RDS (Radio Data System) is a service that allows FM stations to send additional information along with the regular FM radio signal. When you are receiving an RDS station, and the station name are displayed. You can listen to the sound of the connected external device through your system’s speakers.
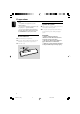
Playing iPod using the dock This system is equipped with a dock used for iPod. You can listen to the sound of the docked player through the powerful speakers of the system. Compatible portable player ● Apple iPod models with 30-pin dock connector as follows: Nano 1st /2nd/3rd generation, iPod 5th generation (video), iPod touch and iPod classic. Dock adaptor Before plugging your player in the dock, snap the suitable dock adaptor into the dock to provide a snug fit for the player to be docked.
Maintenance English Cleaning the Cabinet ● Use a soft cloth slightly moistened with a mild detergent solution. Do not use a solution containing alcohol, spirits, ammonia or abrasives. Cleaning Discs ● When a disc becomes dirty, clean it with a cleaning cloth. Wipe the disc from the centre out. ● Do not use solvents such as benzene, thinner, commercially available cleaners, or antistatic spray intended for analogue records.
4 Press TUNING 4 ¢ (or 4 ¢ on the remote control) to set the hours. 5 Press TIMER/SLEEP again. ➜ The clock digits for the minutes flash. 6 Press TUNING 4 ¢ (or 4 ¢ on the remote control) to set the minutes. 7 Press TIMER/SLEEP to confirm the time. ➜ The timer is now set and activated. English Clock/Timer Setting the clock Notes: . – If CD source is selected and no disc is in the CD tray or the disc has an error, TUNER will be selected automatically.
Specifications English AMPLIFIER Output power .......................................... 2 x 2 W RMS Signal-to-noise ratio .......................... ≥ 60 dBA (IEC) Frequency response ....................... 125 – 16000 Hz Impedance loudspeakers ........................................... 8Ω CD PLAYER Frequency range ............................... 125 – 16000 Hz Signal-to-noise ratio ............................................ 65 dBA TUNER FM wave range ................................... 87.
WARNING Under no circumstances should you try to repair the system yourself, as this will invalidate the warranty. Do not open the system as there is a risk of electric shock. If a fault occurs, first check the points listed below before taking the system for repair. If you are unable to remedy a problem by following these hints, consult your dealer or Philips for help. Solution Problem ✔ Insert a disc. ✔ Check if the disc is inserted upside down.
Troubleshooting English Solution Problem ✔ Set the clock correctly. ✔ In standby mode, press briefly TIMER/SLEEP to The time is not working. switch on the timer. The Clock/Timer setting is erased. ✔ Power has been interrupted or the power cord has been disconnected. Reset the clock/timer. The indication “No station available” is displayed. ✔ DAB coverage is currently not available in your area. Wait until the coverage resumes. ✔ DAB signal is weak. Adjust the position of the antenna.
Meet Philips at the Internet http://www.philips.