4K Ultra HD Blu-ray™ Player BDP7302 Register your product and get support at www.philips.com/welcome User Manual For further assistance, call the customer support service in your country. • To obtain assistance, contact Philips Customer Care Center; In the U.S.A., Canada, Puerto Rico, or the U.S.
CONTENTS INTRODUCTION.................................................. 3 NETWORK SERVICES......................................44 Safety instruction............................................................3 Included accessories..................................................... 6 Before using network services................................. 44 Information on network services............................. 44 Deactivate the network services............................. 44 FEATURES...................
1. INTRODUCTION 1.1. Safety instruction Register online at www.philips.com/welcome today to get the most benefits from your purchase. Registering your model with Philips makes you eligible for all of the valuable benefits listed below, so don’t miss out. Register online at www.philips.com/welcome to ensure: * Product Safety Notification * Additional Benefits By registering your product, you’ll receive notification - directly from the manufacturer - in the rare case of a product recall or safety defect.
IMPORTANT SAFETY INSTRUCTIONS 1. Read these instructions. 2. Keep these instructions. 3. Heed all warnings. 4. Follow all instructions. 5. Do not use this apparatus near water. 6. Clean only with dry cloth. 7. Do not block any ventilation openings. Install in accordance with the manufacturer’s instructions. 8. Do not install near any heat sources such as radiators, heat registers, stoves, or other apparatus (including amplifiers) that produce heat. 9.
IMPORTANT COPYRIGHT INFORMATION Unauthorized copying, broadcasting, public performance and lending of discs are prohibited. This item incorporates copy protection technology that is protected by U.S. patents and other intellectual property rights of Rovi Corporation. Reverse engineering and disassembly are prohibited. Never use a gas duster on this unit. The gas trapped inside of this unit may cause ignition and explosion.
Notice Specifications are subject to change without notice. Trademarks are the property of Koninklijke Philips N.V. or their respective owners. P&F USA reserves the right to change products at any time without being obliged to adjust earlier supplies accordingly. The material in this manual is believed adequate for the intended use of the system.
2. FEATURES 2.1. Features Ultra HD Blu-ray™disc Pop menu You can enjoy Ultra HD Blu-ray™ disc which is capable of storing twice more data than a conventional Blu-ray Disc™. Some BD-videos have a pop menu which is a navigation. Some BD-Videos have a pop menu which is a navigation menu that can be called up and be operated on the TV screen without interrupting playback. You can call up the pop menu by pressing [POP MENU]. Contents in the pop menu vary depending on the disc.
Enjoy content stored on home media servers This unit allows you to play music files, video files, and view photo files stored on home media servers connected to your home network. Netflix With this unit, you can enjoy movies and TV episodes streamed instantly from Netflix via the Internet. In order to use this feature, you must visit www.netflix.com/ on your PC and become a Netflix member. (This feature is available only in the United States.) YouTube™ This unit enables you to access YouTube™.
2.2. Version information “Version info” screen provides information about this unit’s software version. You can also download the latest software from the Philips website and update it yourself if it is newer than the version currently on your unit. The current version of software on your unit can be seen on the “Version info” screen. To access “Version info”, follow the procedure below. 1. Press [Q (HOME)]. ] to select “Setup”, then press [OK]. 2. Use [ 3. Use [ ] to select “Advanced”, then press [OK].
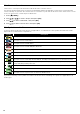
3. FUNCTIONAL OVERVIEW 3.1. Top / front panel Top 2 Front 1 3* 4 5 *) The unit can also be turned on by pressing this button. 1. Disc tray 4. (POWER) button 2. Power-on indicator 5. Infrared sensor window 3. 6. USB input (OPEN/CLOSE) button* 6 CC Cautio • • Do not connect any device other than USB memory stick or USB card reader into the USB input. (e.g. PC, external HDD, digital camera, keyboard, mouse, etc.) When connecting a USB memory stick, connect it directly to the USB input.
3.3. Remote control 1 2* 7. INFO button • Press to display the information display. 8. (SKIP) button • During playback, press once to return to the beginning of the current title, chapter, track or file. • During playback, press twice to return to the previous title, chapter, track or file. • During photo playback, press to return to the previous file. 9. (STOP) button • Press to stop playback. 10. (REVERSE) button • During playback, press to fast reverse the playback. 11.
DD Not CC Using the remote control • Remote control usage guidelines: • Make sure that there are no obstacles between the remote control and the infrared sensor window on the unit. • Remote operation may become unreliable if strong sunlight or fluorescent light is shining on the infrared sensor window of the unit. • Remote controls of different devices can interfere with each other. Avoid using a remote control from another device which is located close to the unit.
3.4. Guide to on-screen display CC Home menu When you turn on the unit, the home menu will appear automatically. Otherwise, press [ 1 2 3 Disc USB Home Network Setup NETFLIX YouTube 5 6 (HOME)]. Disc not inserted. 4 1. ˝Disc˝: Initiates playback of inserted disc, displays thumbnails of tracks / files. 2. ˝USB˝: Displays thumbnails of tracks / files on the connected USB memory stick. 3. ˝Home Network˝: Accesses the home network menu. 4. ˝Setup˝: Accesses the setup menu 5.
4. CONNECTIONS There are four ways to connect this unit. Refer to the following instructions to connect this unit to your TV. • When you change the connections, all devices should be turned off. • When making connections with external devices, please refer to their user manuals for additional setup help. • This unit supports a TV up to 1080i, 1080p, 4K resolution. • This unit is not required for analog audio connection. 4.1.
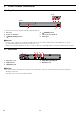
Method 1 CC Connecting the unit directly to a TV With this connection method, the video and audio are output from the TV. HDMI IN HDMI cable DD Not • • For 4K, 4K HDR or Dolby Vision playback, please your TV supports 4K, 4K HDR or Dolby Vision input. The HDMI port on the TV accepts 4K, 4K HDR or Dolby Vision signal. You have set the correct setting in the TV menu for the TV to accept and display 4K, 4K HDR or Dolby Vision signals.
Method 3 CC Connecting the unit through a soundbar or AV receiver With this connection method, the video is output from the TV, and the sound is output from the soundbar or AV receiver. 4K / 4K HDR Pass-through HDMI IN HDMI cable HDMI OUT or and HDMI cable HDMI IN DD Not • • • • For 4K, 4K HDR or Dolby Vision playback, please your TV supports 4K, 4K HDR or Dolby Vision input. Use an 18 Gbps high-speed HDMI cable which supports 4K, 4K HDR or Dolby Vision when you connect to TV.
Method 4 CC Connection to a TV and a non-4K compatible soundbar or AV receiver Connect as follows if your AV receiver or soundbar is not 4K-compatible. With this connection method, the video is output from the TV, and the sound is output from the AV receiver or soundbar. HDMI IN HDMI cable and DIGITAL AUDIO OUT or DIGITAL AUDIO IN Optical cable or or Coaxial cable DD Not • • • • For 4K, 4K HDR or Dolby Vision playback, please your TV supports 4K, 4K HDR or Dolby Vision input.
In order to play 4K, 4K HDR or Dolby Vision content, this unit must be connected to a 4K/60p/4:4:4 and Ultra HD Blu-ray™ HDR compliant device. • For 4K/60p/4:4:4, an 18Gbps high-speed HDMI cable is required.
4.2.
4.3. Connection to the network By connecting this unit to the Internet, you can update software via the Internet and access BD-Live™ and other Network Services such as Netflix and YouTube™. –– Software Update: For more information, refer to “Software update” on page 57. –– BD-Live™: For more information, refer to “Enjoying BD-Live™ discs using Internet” on page 38. –– Netflix / YouTube™ : For more information, refer to “Information on network services” on page 44.
CC Network connection (wireless) Internet LAN WAN Wireless router Ethernet cable (not included) DD Not • • • • • • EN If using the wireless connection, refer to “Network configuration (wireless)” on page 52 to configure network settings. For a wireless router, use a router that supports IEEE 802.11 a/b/g/n/ac specifications. (“ac” is preferred type for a faster stable operation of the wireless network.) This unit supports infrastructure mode when using a wireless router.
5. BEFORE YOU START 5.1. Initial setup After you have completed all of the connections to your TV, review the steps below. 1. Press [ (POWER)] to turn on the unit. 2. Turn on your TV. ] to select your language, then press [OK]. 3. Language setup screen will appear. Use [ Please select your language. If you want to use voice guide, please select “English” or “Español” . Veuillez choisir votre langue pour l'affichage à l'écran.
CC How to reset the OSD language You can reset the OSD language if you selected the wrong language. 1. Press [ (HOME)] to display the home menu. 2. Use [ ] to select “ ”, then press [OK]. • This item is “Setup” (English) / “Installation” (French) / “Instalación” (Spanish). • From here on, please select one of the following items you can find on screen: 3. Use [ ] to select “Preferences” (English) / “Préférences” (French) / “Preferencias” (Spanish), then press [OK]. 4.
6. INFORMATION ON PLAYBACK 6.1. Information on playback CC Playable discs and files Playable discs Logos Blu-ray Disc™ - Ultra HD Blu-ray™ - BD-video - Blu-ray 3D™ Disc - Blu-ray 3D™ only Disc - BD-RE* (ver. 2.1) (Recorded in BDMV format) - BD-R* (ver. 1.1 / 1.2 / 1.3) (Recorded in BDMV format) (Unfinalized disc may not be played back.
CC Recommended specifications Photo file Video file Music file JPEG (.jpg/.jpeg) MP3 (.mp3) PNG (.png) Sampling frequency: Bit rate: GIF (.gif) FLAC (.flac) Sampling frequency: Bit rate: up to 48kHz up to 320kbps H.264/H.265 AVCHD (.m2ts) MPEG2 (TS/PS) AVCHD (.mts / .m2t) VOB up to 192kHz up to 16.2Mbps DD Not for AVCHD • VP9 VP8 AAC (.m4a) Sampling frequency: Bit rate: AVCHD up to 98kHz up to 320kbps WAV (.wav) Sampling frequency: Bit rate: up to 192kHz up to 36Mbps Vorbis (.
CC Unplayable media and files The following discs will not be played back on this unit. • • • • • • • • • • • • • • • CD-ROM • CD-I (compact disc-interactive) DVD-RAM • VSD (video single disc) DVD-audio • video CD HD DVD • SVCD SDXC memory card • microSDXC memory card unfinalized disc • BD-RE (ver. 1.0) BD-RE (ver. 2.1) (Recorded in BDAV format) • BD-R (ver. 1.1 / 1.2 / 1.
CC Description for icons [ ] : group (folder) icon [ ] : music file icon [ ] : photo file icon [ ] : AVCHD / video file icon --˝Folders” refers to the group of files. --˝Track” refers to the contents recorded on the audio CD. --˝Files” refers to the contents on a disc which are recorded in AVCHD or JPEG / PNG / GIF / MP3 / FLAC / AAC / WAV / Vorbis / AIFF / Monkey's Audio file format. DD Not • Unrecognizable characters will not be displayed. 6.2.
CC Video file list 2 Photo Video Music Video AVCHD Root Folder/Current Folder 1 RED Movie Title Direction Name 10/10/201X Movie Title Direction Name 10/10/201X Movie Title Direction Name 10/10/201X Movie Title Direction Name 10/10/201X Movie Title Direction Name 10/10/201X Movie Title Direction Name 10/10/201X Playable file(s) GREEN YELLOW File information 3 BLUE 4 1. Video file 3. Page(s) 2. S ummary information on the file (when available) 4.
7. BASIC PLAYBACK 7.1. Playing back a disc UHD [BD Video] BD [UHDBD] BD 1. VIDEO [DVD Video] DVD VIDEO [DVD VR] DVD CD [CD] VR [AVCHD] AVCHD PHOTO [JPEG] FILE MUSIC [MUSIC] FILE [VIDEO] VIDEO Insert a disc (refer to “How to insert a disc” on page 28). • For Blu-ray Disc™ / DVD / AVCHD / audio CD or a disc containing only one type of file, playback will start automatically. If not, press [ (PLAY/PAUSE)].
CC Resume-on-stop mode UHD [BD Video] BD [UHDBD] BD VIDEO [DVD Video] DVD VIDEO [DVD VR] DVD VR [AVCHD] AVCHD While the disc icon is selected on the home screen, pressing [OK] or [ (PLAY/PAUSE)] will resume playback. Pressing [OK] while the message “To playback from the beginning, press [OK].” is displayed will start playback from the beginning of the currently selected title. CD [CD] While the disc icon is selected on the home screen, pressing [OK] or [ (PLAY/PAUSE)] will resume playback.
TV HDMI Cable 7.2. 4K, 4K HDR or Dolby Vision playback In order for 4K, 4K HDR or Dolby Vision playback, make sure the following before you start: TV HDMI Cable • Your TV supports 4K, 4K HDR or HDMI Cable Dolby Vision input. • Your TV has an HDMI port that accepts 4K, 4K HDR or Dolby Vision signal. • Your TV is enabled to display 4K, Blu-ray Disc™ 4K HDR or Dolby Vision image.
7.3. Playing back an Ultra HD Blu-ray™ disc UHD [UHDBD] BD This unit can play back Ultra HD Blu-ray ™ discs. In order to view Ultra HD Blu-ray ™ videos, you need to have the following: --4K/60p (Color space 4:4:4) and HDCP 2.2 compatible device. --HDR compatible device --18 Gbps high-speed HDMI cable --Ultra HD Blu-rayTM disc 1. Connect this unit to a 4K/60p (4:4:4) compatible TV using an 18 Gbps high-speed HDMI cable. • Refer to “HDMI video /audio connection” on page 14. 2.
7.4. Playing back a Blu-ray 3D™ disc BD [BD Video] VIDEO This unit can play back Blu-ray 3D™ discs which contain stereoscopic 3D video. In order to view Blu-ray 3D™ videos, you need to have the following: --3D capable TV --3D compatible HDMI cable --3D glasses --Blu-ray 3D™ disc or Blu-ray 3D™ only disc 1. Connect this unit to a 3D-compatible TV using a 3D-compatible HDMI cable. • Refer to “HDMI video /audio connection” on page 14. 2. Insert a Blu-ray 3D™ disc or a Blu-ray 3D™ only disc.
7.5. Playing back content from a USB memory stick PHOTO [JPEG] FILE MUSIC [MUSIC] FILE [VIDEO] VIDEO You can play back photo files (JPEG, PNG, GIF), music files (MP3, FLAC, AAC, WAV, Vorbis, AIFF, Monkey's Audio, ALAC), video files (H.264, H.265, MPEG2 (TS/PS), VOB, VP9, VP8) stored on a USB memory stick. With the USB memory stick, you can also enjoy the following functions: • Special additional contents for BD-ROM.
7.6. Using the title / disc / pop menu UHD [BD Video] BD [UHDBD] BD VIDEO [DVD Video] DVD VIDEO [AVCHD] AVCHD Some BD-videos, DVD-videos or AVCHD files may contain a title menu which describes the contents of the disc, or a disc menu which guides you through the available functions on the disc. • With such discs, a title menu or a disc menu may appear automatically when you insert the disc. Otherwise, press [TOP MENU] or [POP MENU] to call up the menu.
8. SPECIAL PLAYBACK 8.1. Fast forward / fast reverse UHD [BD Video] BD [UHDBD] BD VIDEO [DVD Video] DVD VIDEO [DVD VR] DVD 1. During playback, press [ [AVCHD] AVCHD MUSIC [MUSIC] FILE [VIDEO] VIDEO (FORWARD)] repeatedly for fast forward. During playback, press [ 2. Press [ CD [CD] VR (REVERSE)] repeatedly for fast reverse. (PLAY/PAUSE)] to return to normal playback.
8.4. Repeat playback Available repeat functions vary depending on the disc. 1. During playback, press [OPTIONS] to display the play menu. 2. Use [ ] to select “Repeat” then press [OK]. 3. Use [ ] to select the desired repeat mode. REPEAT MODE Chapter repeat The current chapter will be played back repeatedly.
8.7. PiP (BONUSVIEW™) setting BD [BD Video] VIDEO Some BD-videos have the PiP function which enables you to display the secondary video in the primary video. Primary video Secondary video 1 / 2 MPEG 1. During playback, press [OPTIONS] to display the play menu. 2. Use [ ] to select “PiP” then press [OK]. • PiP information will appear. 3. Use [ ] to select the secondary video you want to show. • The secondary video will be displayed with secondary audio. 4. Press [OPTIONS] to exit.
8.9. Title / chapter search UHD [BD Video] BD [UHDBD] BD VIDEO CC Using [ [DVD Video] DVD VIDEO (SKIP)] / [ [DVD VR] DVD VR [AVCHD] AVCHD [VIDEO] VIDEO (SKIP)] 1. During playback, press [ (SKIP)] to skip the current title or chapter and move to the next. The title or chapter will move forward one at a time. • If there is no chapter in a title, the current title may be skipped. To go back to the beginning of the current title or chapter, press [ (SKIP)].
8.11. Time search UHD [BD Video] BD [UHDBD] BD VIDEO [DVD Video] DVD VIDEO [DVD VR] DVD VR CD [CD] [AVCHD] AVCHD MUSIC [MUSIC] FILE [VIDEO] VIDEO 1. During playback, press [OPTIONS] to display the play menu. 2. Use [ ] to select “Search”, then press [OK]. 3. Use [ ] to select Time Search, then press [OK]. • Blu-ray Disc™ / DVD-Video / AVCHD: “Title Time” or “Chapter Time”. Audio CD: “Track Time” or “Disc Time”. (e.g.) Blu-ray Disc™ Title Time 00:00:00/02:03:45 4.
8.13. Switching subtitles UHD [BD Video] BD [UHDBD] BD VIDEO [DVD Video] DVD VIDEO [DVD VR] DVD VR [AVCHD] AVCHD [VIDEO] VIDEO Some video materials may have subtitles in one or more languages. For commercially available discs, the supported languages can be found on the disc case. Follow the steps below to switch the subtitle language during playback. CC Using [OPTIONS] 1. During playback, press [OPTIONS] to display the play menu. 2. Use [ ] to select “Subtitle”, then press [OK]. 3.
8.14. Switching audio soundtrack UHD [BD Video] BD [UHDBD] BD VIDEO [DVD Video] DVD VIDEO [DVD VR] DVD VR [AVCHD] AVCHD [VIDEO] VIDEO When playing back video material recorded with two or more soundtracks (these are often in different audio languages or audio formats), you can switch between them during playback. CC Using [AUDIO] 1. During playback, press [AUDIO]. • Pressing [AUDIO] repeatedly switches the audio. (e.g.
8.15. Switching camera angles UHD [BD Video] BD [UHDBD] BD VIDEO [DVD Video] DVD VIDEO Some BD-videos and DVD-videos contain scenes which have been shot simultaneously from various angles. You can change the camera angle when appears on the TV screen. 1. During playback, press [OPTIONS] to display the play menu. 2. Use [ ] to select “Angle”, then press [OK]. 3. Use [ ] to select your desired angle. 4. Press [OPTIONS] to exit.
9. NETWORK SERVICES 9.1. Before using network services Please follow the instructions below before. 1. Connect this unit to the Internet. • Refer to “Connection to the network” on page 20. 2. Configure necessary network connection settings. • Refer to “Network connection” on page 49. 3. In the home menu, use [ ] to select your desired network service, then press [OK]. 4. Press [Q (HOME)] to exit. DD Not • • Pressing [Netflix] / [YouTube] allows you to directly access the corresponding network service.
10. LIST OF SETTINGS In “Setup”, you can customize various kinds of settings as you prefer. Refer to the following instructions to navigate through the setup menu. 1. Press [ (HOME)] to access the home menu. 2. Use [ ] to select “Setup”, then press [OK]. 3. Use [ ] to select the desired category, then press [OK]. 4. Use [ ] to move up and down the list to select menus / options. 5. To make a selection or to access options of an item, select the desired item, then press [OK].
Category Network Menus / Options Network installation View network settings View Wireless settings BD-Live access level Digital Rights Mgmt Terms of Use Netflix ESN Unit Name Wake-on-LAN Deactivation Preferences Menu language Audio Subtitle Start Connection Test Allow Limited Allow Prohibit On Off Netflix YouTube Auto(XXX) English Français Español Bulgarian Chinese Czech Danish Dutch English Finnish French German Greek Hungarian Icelandic Irish Off Bulgarian Chinese Czech Danish Dutch English Finnis
Category Preferences Disc menu Parental controls Change password Screen saver Angle icon EasyLink One Touch Play One Touch Standby Advanced Software update Automatically check for latest software Quick Start mode Version info Restore default settings Accessibility OSS Voice Guide Voice Guide volume Voice Guide speed Voice Guide pitch Voice Guide verbosity Bulgarian Chinese Czech Danish Dutch English Finnish French German Greek Hungarian Icelandic Irish Off 8 [Adult] 7 [NC-17] 6 [R] 5 [PGR] Menus
Category Accessibility CC style CC font color CC font size CC font style CC font opacity CC font outline CC font outline color CC background color CC background opacity CC window color CC window opacity Menus / Options Auto Custom Default Blue White Yellow Black Magenta Red Cyan Green Default Standard Small Large Default Monospaced with serifs Proportionally spaced with serifs Monospaced without serifs Proportionally spaced without serifs Casual Cursive Small capitals Solid Translucent Transparen
11. SETUPS 11.1. Network connection Q (HOME) A “Setup” A “Network” A “Network installation” Perform the network connection setup in order to use network features, such as BD-Live™, Netflix, YouTube™, and the network update function. CC Connection test After you enable a network connection or change network settings, always perform the connection test to check to see if the connection is correctly made. 1. Use [ ] to select “Setup” in the home menu, then press [OK]. 2.
CC Network configuration (wired) Auto setup In order to make a wired connection, connect an ethernet cable from a router with Internet access. A network will automatically be established. • In order to confirm that this unit is connected to the Internet, perform “Connection test” (refer to page 49). • In order to switch from wireless connection to wired, perform the following steps: 1. Connect an ethernet cable from a router with internet access. ] to select “Setup” in the home menu, then press [OK]. 2.
Manual setup In the following cases, configure each setting as necessary. –– When connection test failed with auto setting. –– When instructed by your Internet service provider to make specific settings in accordance with your network environment. 1. Use [ ] to select “Setup” in the home menu, then press [OK]. 2. Use [ ] to select “Network”, then press [OK]. 3. Use [ ] to select “Network installation”, then press [OK]. 4. Use [ ] to select “Start”, then press [OK]. 5.
CC Network configuration (wireless) If you connect this unit to a wireless network, select “Wireless” and configure necessary settings. Please make a note of your SSID (Service Set IDentifier – wireless network name) and its security key* before proceeding with the setup. *) “Easy Connect” cannot be used when the security protocol is set to “WEP”. Easy Connect PBC (Push Button Configuration) You can set up a wireless connection quickly. (“PBC” is only available when your router supports it.
Auto scan 1. Follow steps 1 to 5 in “Easy Connect” on page 52. 2. Use [ ] to select “Auto Scan”, then press [OK]. • This unit will automatically start searching for nearby wireless networks. 3. The search result will be displayed. Use [ ] to select an appropriate SSID, then press [OK]. • If you select an SSID with “ ” in the security column, press [OK] and move on to step 4.
11.2. EasyLink (HDMI CEC) Q (HOME) A “Setup” A “Preferences” A “EasyLink” EasyLink(HDMI CEC) allows integrated system control over HDMI and is part of the HDMI standard. This function may not work properly depending on the device connected to the unit. When “EasyLink” setting is set to “On” the functions listed below will be available.
11.3. HDMI video resolution Q (HOME) A “Setup” A “Video” A “HDMI video” Set the resolution of the video signal being output from the HDMI OUT jack. You can select the desired video resolution among the settings listed below: “Auto”,˝480p”,˝720p”,˝1080i”,˝1080p”, “4K”.
11.4. Parental controls Some BD-videos or DVD-videos feature parental lock levels. Playback will stop if the ratings of the content exceed the levels you set on the player, it will require you to enter a password before the disc will play back. This feature prevents your children from viewing inappropriate material. CC Change password Q (HOME) A “Setup” A “Preferences” A “Change password” 1. Use [ ] to select “Setup” in the home menu, then press [OK]. 2.
11.5. Software update Q (HOME) A “Setup” A “Advanced” A “Software update” This unit lets you update the software yourself using a software update disc or USB memory stick, or via the Internet. The available discs are below: • BD-RE/-R • DVD-RW/-R • CD-RW/-R CC Disc / USB memory stick update You can update the software by using a disc or USB memory stick. Prepare a blank disc or USB memory stick for software update: Navigate to www.philips.
11.6. Voice guide Q (HOME) A “Setup” A “Accessibility” Menus to configure various settings for the voice guide function. 1. Use [ ] to select “Setup” in the home menu, then press [OK]. 2. Use [ ] to select “Accessibility”, then press [OK]. 3. Use [ ] to select the desired setting, then press [OK]. “Voice Guide”: Turns on/off the voice guide function. “Voice Guide volume”: Configures the volume of the voice. “Voice Guide speed”: Configures the speech rate.
11.7. Restore default settings Q (HOME) A “Setup” A “Advanced” A “Restore default settings” Menus to reset player settings. 1. Use [ ] to select “Setup” in the home menu, then press [OK]. 2. Use [ ] to select “Advanced”, then press [OK]. 3. Use [ ] to select “Restore default settings”, then press [OK]. 4. Use [ ] to select the desired setting, then press [OK]. “Reset AV settings”: All the settings except for “Parental controls” and “Network installation” settings will be reset to default.
12. TROUBLESHOOTING Problem No power. No sound or picture. 4K, 4K HDR or Dolby Vision signal does not output. No reaction to the remote control. No Audio / video signal on the display device via HDMI cable. No high-definition video signal on the TV screen. Distorted picture. Completely distorted picture or black / white picture with Blu-ray Disc™ / DVD. No sound or distorted sound. Cannot mute Voice Guide Picture freezes momentarily during disc playback.
Problem Cannot play back a disc. “BD-ROM Data(USB) Check” message appears when attempting to play a Blu-ray Disc™. A music/photo file does not play. No return to start-up screen when disc is removed. will appear on the TV screen. The unit does not respond to some operating commands during playback. The unit cannot read Blu-ray Disc™ / DVD/ CD. Scene shooting Angle does not switch. Playback does not start when a title is selected. Error message appears when I select “Auto” in the “Menu language”.
Problem Cannot read a USB memory stick. Cannot play back photo files from a disc. Cannot find a photo file. Cannot play back music files from a disc. Cannot find a music file. Music files play choppy. How do I switch to view a currently airing TV program? T ip The format of the USB memory stick is not compatible with this unit. If the USB memory stick has been formatted on a PC or another device, the file system may be incompatible with this unit. This unit supports the FAT16 / FAT32 file systems.
Problem Cannot use “Easy Connect” to connect to the access point. T ip If the access point's security mode is set to “WEP”, change the setting to “AES + TKIP”, then try “Easy Connect” again. Refer to “ DD Not ” on page 52. (For access point configuration, please consult its user manual or manufacturer.) Connect the unit to the access point using “Auto setup” or “Manual setup” mode. Cannot use the wireless connection.
13. SPECIFICATIONS Signal system Power requirements Power consumption Dimensions (width x height x depth) Weight Operating temperature Operating humidity General NTSC Color 120 V AC, 60 Hz 19 W (standby: 0.4 W) 17.0 x 1.9 x 8.2 inches 1.7 kg. (3.
14. NETWORK SERVICE DISCLAIMER Content and services made available through this product are transmitted by third parties by means of networks and transmission facilities over which Company has no control and third party services may be terminated or interrupted at any time, and Company makes no representation or warranty that any content or service will remain available for any period of time.
15. MAINTENANCE CC Servicing • • Please refer to relevant topics in “TROUBLESHOOTING” on page 60 before returning the product. If this unit becomes inoperative, do not try to correct the problem by yourself. There are no user-serviceable parts inside. Eject the disc (if possible), disconnect the USB memory stick (if connected to the unit), place the unit into standby mode, unplug the AC power plug, and please contact: 1-866-202-5960 or visit : www.philips.
16. TRADEMARK INFORMATION ˝Blu-ray Disc™”, “Blu-ray” and “Blu-ray Disc™” logo are trademarks of the Blu-ray Disc Association. For DTS patents, see http://patents.dts.com. Manufactured under license from DTS Licensing Limited. DTS, DTS-HD, the Symbol, & DTS and the Symbol together are registered trademarks, and DTS-HD Master Audio | Essential is a trademark of DTS, Inc. © DTS, Inc. All Rights Reserved. “Ultra HD Blu-ray™” and “Ultra HD Blu-ray™” logo are trademarks of the Blu-ray Disc Association.
THIS PRODUCT IS LICENSED UNDER THE AVC PATENT PORTFOLIO LICENSE FOR THE PERSONAL AND NONCOMMERCIAL USE OF A CONSUMER TO (i) ENCODE VIDEO IN COMPLIANCE WITH THE AVC STANDARD (˝AVC VIDEO˝) AND/OR (ii) DECODE AVC VIDEO THAT WAS ENCODED BY A CONSUMER ENGAGED IN A PERSONAL AND NON-COMMERCIAL ACTIVITY AND/OR WAS OBTAINED FROM A VIDEO PROVIDER LICENSED TO PROVIDE AVC VIDEO. NO LICENSE IS GRANTED OR SHALL BE IMPLIED FOR ANY OTHER USE. ADDITIONAL INFORMATION MAY BE OBTAINED FROM MPEG LA, L. L. C. SEE HTTP://WWW.
17. GLOSSARY AACS Digital audio Advanced Access Content System (AACS) is the content protection scheme used with Blu-ray™ discs. An indirect representation of sound by numbers. During recording, the sound is measured at discrete intervals (44,100 times a second for CD audio) by an analogto-digital converter, generating a stream of numbers. On playback, a digital-to-analog converter generates an analog signal based on these numbers. See also “Sampling frequency” and “Analog audio”.
PCM (Pulse Code Modulation) The most common system of encoding digital audio, found on CD and DAT. Excellent quality, but requires a lot of data compared to formats such as Dolby Digital and MPEG audio. For compatibility with digital audio recorders (CD, MD and DAT) and AV amplifiers with digital Inputs, this unit can convert Dolby Digital, DTS, and MPEG audio to PCM. See also “Digital audio”. Region code Regions associate discs and players with particular areas of the world.
18. I MPORTANT HEALTH AND SAFETY INFORMATION FOR 3D TELEVISIONS Read the following information before viewing 3D television images. CAUTION NOTICE: 1. Ambient fluorescent lighting may cause a flickering effect and direct sunlight may adversely affect the operation of your 3D glasses. 2. DO NOT place your television near open stairwells, balconies or other objects as viewing in 3D images may cause disorientation for some viewers resulting in falls, tripping or walking into objects. 3.
LIMITED WARRANTY ONE (1 ) YEAR WARRANTY COVERAGE: This warranty obligation is limited to the terms as set forth below. WHO IS COVERED: This product warranty is issued to the original purchaser or the person receiving the product as a gift against defects in materials and workmanship as based on the date of original purchase (“Warranty Period”) from an Authorized Dealer. The original sales receipt showing the product name and the purchase date from an authorized retailer is considered such proof.
P&F USA, Inc. 1880 Braselton Hwy, Suite 118 #5012 Lawrenceville, GA 30043 P&F Mexicana, S.A. de C.V. Av. La Palma No. 6, Col. San Fernando La Herradura. Huixquilucan, Edo. de México. C.P. 52787 This product has been manufactured by and is sold under the responsibility of P&F USA, Inc., and P&F USA, Inc. is the warrantor in relation to this product. The Philips trademark and the Philips Shield Emblem are registered trademarks of Koninklijke Philips N.V. used under license.