
User manual


2 If you want to select the low speed setting, press the on/off button
again.
3 To switch off the appliance, press the on/off button once more.
Use areas
Note: This appliance is only intended to be used on the feet.
You can use the callus removal disk in 3 different ways, depending on
the area or callus you want to treat.
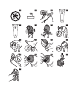
1 To treat a large, flat area, use the entire disk (Fig. 11). Make sure you
place the disk flat onto the skin for good control during use.
2 For precision treatment of smaller areas and good visibility of the
treated area (Fig. 12), use the top part of the disk that sticks out
beyond the top of the head (Fig. 13).
3 For precision treatment and for buffing away hard skin very
quickly, use the narrow edge of the protruding top part of the disk
(Fig. 14).
Move the disk back and forth gently over the skin you want to treat.
Do not push too hard. When you push too hard, the disk might stop
rotating.
Cleaning
- Clean the callus removal disk with the cleaning brush supplied (Fig.
15). Remove the disk and clean the inside and outside of the head
with the cleaning brush (Fig. 16).
- If you prefer, you can rinse the callus removal disk and the inside
of the callus removal head under a running tap (Fig. 17). You can
clean the appliance with a moist cloth (Fig. 18).
Tip: You can also clean the callus removal disk and the inside of the
callus removal head with disinfectant now and then.
Storage
If you travel, disconnect the callus removal head from the appliance.
This protects the abrasive disk and also prevents the immediate
surroundings from being damaged by the abrasive disk.
10
English