AT815 AT814 AT810 Rechargeable Cordless Tripleheader Shaver Always here to help you Register your product and get support at www.norelco.
ENGLISH 4 ESPAÑOL 30 AT815/AT814/AT810 Congratulations on your purchase and welcome to Philips Norelco! To fully benefit from the support that Philips Norelco offers, register your product at www.norelco.com/register ¡Bienvenido a Philips Norelco y felicitaciones por su compra! Para utilizar los servicios de asistencia técnica de Philips Norelco, registre su producto en www.norelco.
ENGLISH IMPORTANT SAFETY INSTRUCTIONS When using an electric appliance, basic precautions should always be followed, including the following: Read all instructions before using this appliance. DANGER To reduce the risk of electric shock: 1. Do not reach for a corded charging stand that has fallen into water. Unplug immediately. 2. Power plug and the accessories connected to it are not for immersion or for use in shower. 3. Do not use an extension cord with this appliance. 4.
ENGLISH 5 4. Keep the shaver, cord, charging stand and charging plug away from heated surfaces. 5. Never drop or insert any object into any opening. 6. Do not use the adapter in or near a power outlet that contains an electric air freshener to prevent damage to the adapter. 7. Do not charge or plug in shaver/charging stand outdoors or operate where aerosol (spray) products are being used or where oxygen is being administered. 8.
ENGLISH 45 - DAY MONEY-BACK GUARANTEE To enjoy the closest and most comfortable shave from your new Philips Norelco Men’s Shaver, the shaver should be used exclusively for 3 weeks. This allows your hair and skin enough time to adapt to the Philips Norelco Shaving System. If, after that period of time, you are not fully satisfied with your Philips Norelco Men’s Shaver, send the product back along with dated sales receipt and we’ll refund you the full purchase price.
ENGLISH Table of Contents Features......................................................... 8-9 LED Multi-Purpose Display........................10 Before First Use............................................11 Charging....................................................11-13 Recharging......................................................14 Quick Charge................................................14 Put It To The Test & Shaving Tips.........14-15 How to Shave With An Electric Shaver....................
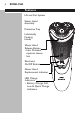
ENGLISH Features Lift and Cut System Shaver Head Assembly Protective Cap Individually Floating Heads Shaver Head Release Button • Hair Chamber captures shaven hair Electronic On/Off Button Shaver Head Replacement Indicator LED Charge Indicators • Battery Charge, Full, Low & Quick Charge Indicators
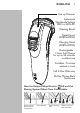
ENGLISH 9 Pop-up Trimmer Automatic Worldwide Voltage 100V to 240V AC Cleaning Brush Travel Pouch (AT815/AT814) Charging Stand (AT815/AT814) Rechargeable 1-hour Full Charge for up to 50 minutes cordless use Cordless - To shave without a cord Full 2-Year Warranty 45-Day Money-Back Guarantee How the Unique Philips Norelco Lift and Cut Shaving System Makes Close Comfortable: Groove channels beard closer to cutting system Lifter raises hair Slots to cut long hairs Holes to cut short hairs even closer
ENGLISH LED Multi-Purpose Display The display provides the following information: ◗ Charging Indicator the shaver is charging, the charging light C -When blinks green. ◗ Full Charge Indicator the battery is fully charged, the charging C -When light lights up green continuously. After approximately 30 minutes the charging light goes off to save energy. C ◗ Low Battery Indicator -When the battery is almost empty (5 or less shaving minutes left), the charging light blinks orange.
ENGLISH 11 Before First Use ◗ Charge the shaver before you start using it (see ‘Charging’). Make sure the shaver is switched off before you start charging it. Important ◗ Only use the power cord provided to charge the shaver. ◗ The power plug transforms 100-240V AC to less than 24V DC. Charging ◗ Charging or recharging at temperatures below 40ºF/4,5ºC or higher than 95ºF/35ºC adversely affects lifetime of batteries.
ENGLISH Charging with a Cord C 1 Connect cord directly to shaver and connect the charging plug into any 100V to 240V AC outlet. Use only the power cord provided. ◗ An adaptor plug may be necessary for charging plug usage in some foreign countries. Use an attachment plug adaptor of the proper configuration for the power outlet. The charging plug will automatically convert to work on 100V to 240V AC systems. display on the shaver will indicate shaver C ◗ The is charging.
ENGLISH 13 Charging in Charging Stand (AT815/AT814) C ◗ Always place shaver in stand in an upright position making sure charging contacts in bottom of stand fit into recess in bottom of shaver. w Always remove shaver from stand by lifting straight up. Do not tilt shaver. 1 Place shaver in charging stand and connect the small plug of cord to charging stand. Connect the charging plug into any 100V to 240V AC outlet. Use only the power cord provided.
ENGLISH Recharging 1 Recharging requires 1 hour. Recharge when the charging light on the shaver display blinks orange. Quick Charge When you charge the empty battery, the charging light alternately blinks orange and green. After approximately 3 minutes, the charging light continues to blink green. The shaver now contains enough energy for a 5-minute shave. Put It To The Test & Shaving Tips ◗ 21 Day Trial and Conversion Process.
ENGLISH 15 ◗ If you are still not convinced after 21 days, Philips Norelco will refund you the full purchase price as long as the request is received within 45 days of purchase. How To Shave With An Electric Shaver C ◗ This symbol on the shaver indicates that the shaver can be used in both the bath and shower. ◗ The shaver will not operate while power cord is connected to an electrical outlet. ◗ For hygienic reasons, the shaver should only be used by one person.
ENGLISH C 3 Turn shaver OFF by pressing the on/off button once. 4 Clean the shaver after each use (see chapter ‘Cleaning’). 5 Put the Protective Cap on the shaver to protect shaver heads. Wet Shaving You can also use the shaver on a wet face with shaving foam or gel. C 1 Apply some water to your skin. C 2 Apply shaving foam or gel to your skin. 3 Rinse the shaving unit under the tap to ensure that the shaving unit glides smoothly over your skin.
ENGLISH C 17 Move the shaving heads in circular movements over your skin. NOTE: Rinse the shaver under the tap regularly to ensure that it continues to glide smoothly over your skin. 5 Turn shaver OFF, dry your face and thoroughly clean the shaver after each use (see chapter ‘Cleaning’). NOTE: Make sure you rinse all foam or gel off the shaver. 6 C 7 When shaver is thoroughly dry, put the Protective Cap on the shaver to protect heads. Trimming To groom sideburns and moustache: 1 Turn shaver ON.
ENGLISH C 3 Hold trimmer as shown and move in downward strokes with gentle pressure. C 4 Close trimmer by pressing trimmer down. 5 Turn shaver OFF. Cleaning ◗ Always clean your shaver after each use. ◗ Always switch shaver OFF, unplug and remove power cord before cleaning. ◗ Never clean, remove or replace head assembly while motor is on. ◗ Do not apply pressure to combs. Do not touch shaving heads with hard objects as this may dent or damage precision-made slotted combs.
ENGLISH 19 Cleaning the Shaving Unit The shaving heads may be quickly cleaned after each use by rinsing with hot water: Water from the tap should be on a hot setting, BUT BE CAREFUL TO TEST WATER FIRST SO AS NOT TO BURN OR SCALD HANDS. ◗ Regular cleaning guarantees better shaving results. w Do not immerse shaver in water. w While rinsing shaving heads, water may drip out of the base of shaver. This is a normal occurrence. 1 Always turn shaver OFF, unplug from outlet and remove power cord from shaver.
ENGLISH C 4 Clean outside of Shaver Head Assembly by running under hot water. 5 Close the Shaver Head Assembly and shake off excess water. Be careful not to hit the shaving unit against anything while shaking off excess water. 6 Open Shaver Head Assembly again and leave open to air dry. NOTE: Do not wipe or dry the shaving heads with a towel or tissue. This could damage the shaving heads.
ENGLISH B 21 C 2 Press the Shaver Head Release Button to open the Shaver Head Assembly. C 3 Pull the shaving unit off the shaver. C 4 Turn the lock counterclockwise to unlock (A) and remove the retaining frame (B). C 5 Remove and clean one set of cutters and combs at a time. C 6 Separate the cutter from the comb and clean it with the short bristled side of the brush supplied. A Do not clean more than one cutter and comb at a time, since they are all matching sets.
ENGLISH 22 C Clean the inside and outside of the comb with the brush supplied. 7 For optimum performance, shaver cutters and combs should be cleaned in a degreasing liquid (e.g. alcohol) and lubricated with one drop of mineral oil (in the center of the head). This helps prevent wear of the shaving heads. C Replace the set back into the Shaver Head Assembly. 8 Make sure that the two pointy edges of the head fit exactly into the recesses.
ENGLISH 23 After Each Use:Trimmer 1 Turn shaver OFF. C 2 Push down spring-release trimmer switch. C 3 Clean trimmer with the short-bristled side of the brush every time you use it. Brush up and down along the trimmer teeth. C 4 Lubricate the trimmer teeth with one drop of mineral oil every 6 months. 5 Close trimmer by pressing trimmer down. Replacing the Shaving Heads ◗ Replace the shaving heads once a year for optimal shaving results.
ENGLISH Shaver Head Replacement Indicator C w The shaver head replacement indicator symbol will light up orange continuously to remind you to replace your shaving heads. B 1 Turn shaver OFF, remove the charging plug from the outlet and power cord from the shaver. C 2 Press the Shaver Head Release Button to open the Shaver Head Assembly. C 3 Pull the shaving unit off the shaver. C 4 Turn the lock counterclockwise to unlock (A) and remove the retaining frame (B).
ENGLISH 6 Replace the frame and turn the lock clockwise until it locks into place. C 7 Insert the notch of the shaving unit into the slot in the top of the shaver (1) and then close the shaving unit (2). C 8 Press and hold the on/off button for at least 5 seconds to reset. The orange shaver head replacement indicator symbol will go out. 1 2 5 sec. 25 NOTE: If the shaving unit does not close smoothly, make sure you inserted the shaving heads properly and that the retaining frame is locked.
ENGLISH C w Do not place or store shaver where it can fall or be pulled into a tub or sink, water or other liquid while plugged in. w Put the Protective Cap on shaver to protect heads. Assistance ◗ For assistance, visit our website: www.philips.com/support or call toll free 1-800-243-3050 ◗ Online information is available 24 hours a day, 7 days a week.
ENGLISH 27 Disposal Philips Norelco shaver contains a C w This rechargeable lithium-ion battery which must be disposed of properly. w Contact your local town or city officials for battery disposal information or call 1-800-822-8837 or www.rbrc.com for battery drop-off locations. w For assistance, visit our website, www.philips.com/support or call toll free: 1-800-243-3050.
ENGLISH Accessories C ◗ Replacement Heads Model HQ8 - For maximum shaver performance, replace your Philips Norelco shaving heads once a year. w Philips Norelco Shaver Accessories may be purchased at a store near you, or on our website www.philips.
ENGLISH FULL TWO YEAR WARRANTY Philips Electronics North America Corporation warrants each new Philips Norelco Product, Model AT815/AT814/AT810 (except cutters and combs) against defects in materials or workmanship for a period of two years from the date of purchase, and agrees to repair or replace any defective product without charge.
ESPAÑOL INSTRUCCIONES IMPORTANTES DE SEGURIDAD Cuando utilice un artefacto eléctrico, tome las precauciones básicas. Lea las instrucciones antes de utilizar este producto. PELIGRO Para reducir el riesgo de descarga eléctrica: 1. No intente sujetar una base de carga enchufada que se haya caído al agua. Desenchúfela inmediatamente. 2. El conector y los accesorios conectados a él no deben sumergirse ni usarse en la ducha. 3. No utilice el artefacto con un cable de extensión. 4.
ESPAÑOL ADVERTENCIA Para reducir el riesgo de quemaduras, incendios, 31 descargas eléctricas y lesiones: 1. Es necesaria una estricta supervisión cuando la afeitadora sea utilizada en niños o personas con discapacidad, en ellos o cerca de ellos. 2. Utilice esta afeitadora para el uso doméstico al cual está destinada según se describe en este manual. No use accesorios no recomendados por Philips Electronics North America Corporation. 3.
ESPAÑOL ambiente húmedo. 12. Para evitar daños en el cable de alimentación, no lo enrolle alrededor de la afeitadora o la base de carga. 13. No intente abrir el artefacto para cambiar la batería. 14. Utilice únicamente el conector de alimentación y los accesorios suministrados con la afeitadora. CONSERVE ESTAS INSTRUCCIONES IMPORTANTE: el conector de alimentación contiene un transformador. Para evitar situaciones de riesgo, no lo sustituya por otro.
ESPAÑOL Tabla de contenido Características.........................................34-35 Pantalla LED multiuso............................36-37 Antes del primer uso...................................37 Carga..........................................................37-40 Recarga............................................................40 Carga rápida...................................................40 Prueba y consejos de afeitado...................41 Cómo usar una afeitadora eléctrica...................
ESPAÑOL Características Tecnología Super Lift y Cut Unidad del cabezal de afeitado Tapa protectora Cabezales flotantes individuales Botón de liberación del cabezal de afeitado • Cámara de recolección del pelo afeitado Botón de encendido/ apagado electrónico (ON/OFF) Indicador de sustitución del cabezel Indicadores de carga LED • Indicadores de carga de batería y batería llena, baja y carga rápida
ESPAÑOL 35 Recortador desplegable Voltaje universal automático entre 100 y 240 V CA Cepillo de limpieza Funda de viaje (AT815/AT814) Base de carga (AT815/AT814) Recargable: carga completa en una hora para hasta 50 minutos de uso sin cable Sistema inalámbrico: para afeitarse sin necesidad de cables Garantía total por 2 años Garantía de devolución del importe de 45 días Afeitado al ras con el exclusivo sistema de afeitado Lift and Cut de Philips: La ranura acerca la barba al sistema de corte.
ESPAÑOL Pantalla LED multiuso La pantalla ofrece la siguiente información: ◗ Indicador de carga C Cuando la batería se está cargando, la luz verde del símbolo de batería parpadea. Indicador de carga completa C ◗Cuando la batería está completamente cargada, la luz de carga permanece encendida de forma continua. Después de 30 minutos aproximadamente, la luz de carga se apaga para ahorrar energía.
ESPAÑOL 37 w Indicador de sustitución del cabezel C -Una vez al año, dependiento de su frecuencia de uso, el símbolo indicador de sustitución del cabezel se encenderá en naranja continuamente como un recordatorio para reemplazar los cabezels. Antes del primer uso ◗ Cargue la afeitadora antes de comenzar a usarla (consulte "Carga"). Asegúrese de que la afeitadora esté apagada antes de comenzar a cargarla. Importante ◗ Utilice sólo el cable de alimentación suministrado para cargar la afeitadora.
ESPAÑOL ◗ Una afeitadora completamente cargada proporciona un tiempo de afeitado sin cable de hasta 50 minutos. ◗ Cuando cargue la afeitadora por primera vez o después de un largo período sin uso, cargue la afeitadora hasta que las luces de carga se mantengan encendidas de manera permanente. ◗ No cargue la afeitadora si se encuentra dentro de una funda.
ESPAÑOL 2 39 La carga y recarga demoran una hora completa. Una afeitadora completamente cargada proporciona un tiempo de afeitado sin cable de hasta 50 minutos. la batería está completamente C w Cuando cargada, el símbolo blanco de batería permanece encendido. Después de 30 minutos aproximadamente, el símbolo de batería se apaga para ahorrar energía. Carga en la base de carga (AT815/AT814) C ◗ Siempre coloque la afeitadora en la base en posición vertical.
ESPAÑOL El conector de carga realizará un proceso automático de conversión de sistemas de 100 V a 240 V de CA. pantalla de la afeitadora indicará que se está C ◗ Lacargando. 2 La carga y recarga demoran una hora completa. Una afeitadora completamente cargada proporciona un tiempo de afeitado sin cable de hasta 50 minutos. la batería está completamente C w Cuando cargada, la luz de carga permanece encendido. Después de 30 minutos aproximadamente, la luz de carga se apaga para ahorrar energía.
ESPAÑOL 41 Prueba y consejos de afeitado ◗ Proceso de prueba y adaptación de 21 días. Es un hecho que la piel y la barba necesitan tiempo para acostumbrarse a un nuevo sistema de afeitado. ◗ Utilice su nueva afeitadora Philips Norelco como método exclusivo de afeitado por 3 semanas para disfrutar de una piel suave. ◗ Al principio, su afeitado no será tan al ras como usted espera, o su cara podría incluso irritarse un poco. Esto es normal, ya que su piel y barba necesitarán tiempo para ajustarse.
ESPAÑOL ◗ Aféitese con la cara limpia para obtener mejores resultados. Afeitado C C 1 Pulse el botón de encendido/apagado una vez para encender la afeitadora (posición ON). Aféitese en el sentido contrario al crecimiento del pelo, con movimientos circulares. 2 Estire la piel con la mano libre para que las cuchillas puedan levantar y cortar la barba. Presione suavemente la afeitadora contra la piel para que los cabezales flotantes sigan los contornos de su rostro.
ESPAÑOL 43 C 1 Humedezca la piel. C 2 Colóquese crema o gel de afeitar en el rostro. 3 Enjuague la unidad de afeitado bajo el grifo para que se deslice suavemente sobre la piel. 4 Pulse el botón de encendido y apagado una vez para encender el artefacto. C Desplace los cabezales de afeitado sobre la piel con movimientos circulares. NOTA: enjuague la afeitadora bajo el grifo regularmente para que se deslice suavemente sobre la piel.
ESPAÑOL Recorte Para recortar las patillas y el bigote: C 1 Encienda la afeitadora. 2 Empuje hacia abajo el accionador del recortador. El recortador puede activarse con la afeitadora en funcionamiento. C 3 Sujete el recortador tal como se indica y muévalo con movimientos descendentes con una suave presión. C 4 Para retraer el recortador, presiónelo hacia abajo. 5 Apague la afeitadora (posición OFF). Limpieza ◗ Limpie la afeitadora después de cada uso.
ESPAÑOL 45 ◗ No aplique presión en los peines. No toque los cabezales de afeitado con objetos duros para evitar deformar o dañar las ranuras de precisión. ◗ No utilice la afeitadora si los peines están dañados o rotos para evitar sufrir lesiones en el rostro. ◗ No use aire comprimido, abrasivos ni líquidos agresivos como la gasolina o acetona para limpiar la afeitadora.
ESPAÑOL C 2 ulse el botón de liberación del cabezal de P afeitado para abrir la unidad del cabezal de afeitado. C 3 Limpie el interior de los cabezales de afeitado y la cámara de recolección de pelo con agua caliente del grifo. C 4 Para limpiar el exterior de la unidad del cabezal de afeitado, enjuáguelo con agua caliente del grifo. 5 Cierre la unidad y sacúdala para retirar el exceso de agua. Tenga cuidado de no golpear la unidad de afeitado al sacudir el exceso de agua.
ESPAÑOL 47 ◗ Si la unidad de afeitado se suelta de la afeitadora, puede volver a encajarla fácilmente. ◗ También puede limpiar la cámara de recogida del pelo sin agua con el cepillo que se suministra. Método de limpieza a fondo No mezcle las cuchillas y los peines, pues puede afectar el rendimiento del afeitado y pueden pasar varias semanas hasta que recupere el rendimiento óptimo. 1 Apague la afeitadora (posición OFF), desenchufe el conector de carga del tomacorriente y el cable de la afeitadora.
ESPAÑOL B C 4 Gire la traba en el sentido contrario al de las agujas del reloj (A) y retire el marco de sujeción (B). C 5 Retire y limpie los conjuntos de cuchillas y peines de a uno por vez. C 6 Separe el cortador del peine y límpielo con el cepillo suministrado. A No limpie más de una cuchilla y su peine al mismo tiempo, ya que forman conjuntos entre sí. Si mezcla accidentalmente las cuchillas y los peines, pueden pasar varias semanas hasta que recupere el óptimo rendimiento de afeitado.
ESPAÑOL C 8 49 Vuelva a colocarlos en la unidad del cabezal de la afeitadora. Verifique que los dos bordes en punta del cabezal encastren exactamente en las ranuras. 9 Repita el proceso con los otros dos conjuntos de cuchillas y peines. 10 Vuelva a colocar el marco y gire la traba en el sentido de las agujas del reloj hasta que encastre. C 11 Inserte la muesca de la unidad de afeitado en la ranura que se encuentra en la parte superior de la afeitadora (1) y cierre la unidad de afeitado (2).
ESPAÑOL C 3 Cada vez que use el recortador, límpielo con el lado suave del cepillo, con movimientos hacia arriba y abajo sobre los dientes del recortador. C 4 Lubrique los dientes del recortador con una gota de aceite mineral cada 6 meses. 5 Para retraer el recortador, presiónelo hacia abajo. Reemplazo de los cabezales de la afeitadora ◗ Reemplace los cabezales de la afeitadora una vez por año para obtener resultados de afeitado óptimos.
ESPAÑOL B C 2 Pulse el botón de liberación del cabezal de afeitado para abrir la unidad del cabezal de afeitado. C 3 Extraiga la unidad de afeitado de la afeitadora. C 4 Gire la traba en el sentido contrario al de las agujas del reloj (A) y retire el marco de sujeción (B). C 5 Retire los cabezales de la afeitadora y coloque los nuevos cabezales en la unidad de afeitado. Verifique que los dos bordes en punta del cabezalencastren exactamente en las ranuras.
ESPAÑOL C 5 sec. 8 Presione y mantenga presionado el botón encendido/apagado durante al menos 5 segundos reiniciar. El símbolo de afeitar naranja recambio cabezel indicador se apagará. NOTA: si la unidad de afeitado no cierra fácilmente, compruebe haber colocado los cabezales de afeitado correctamente y verifique que el marco de sujeción esté bloqueado. Esta afeitadora no contiene ninguna otra pieza que pueda ser reparada por el usuario. Para solicitar asistencia, comuníquese al 1-800-2433050.
ESPAÑOL 53 Almacenamiento C w La afeitadora debe estar apagada. Desenchufe el cable de la toma eléctrica y la afeitadora antes de guardarla en un lugar seguro y seco, donde no se aplaste, golpee ni pueda sufrir daños. w Cuando guarde la afeitadora, no enrolle el cable alrededor de la unidad. w Guarde el cable en un lugar seguro donde no pueda cortarse ni dañarse.
ESPAÑOL Asistencia ◗ Para obtener asistencia, ingrese en nuestro sitio web: www.philips.com/support o llame al número gratuito:1-800-243-3050. ◗ Información disponible por internet las 24 horas del día, los 7 días de la semana.
ESPAÑOL 55 Eliminación afeitadora Philips Norelco contiene una C w Esta batería recargable de iones de litio que debe desecharse de forma adecuada. w Para obtener información sobre la forma de desechar las baterías, comuníquese con las autoridades locales, llame al número 1-800-822-8837 o visite el sitio web www.rbrc.com w Para obtener asistencia, ingrese en nuestro sitio web: www.philips.com/support o llame al número gratuito:1-800-243-3050.
GARANTÍA TOTAL POR DOS AÑOS Philips Electronics North America Corporation garantiza cada nuevo producto Philips Norelco, modelo AT815/AT814/AT810 (excepto cuchillas y peines) contra defectos de materiales o de fabricación durante un período de dos años desde la fecha de compra, y se compromete a reparar o sustituir sin cargo cualquier producto defectuoso.