
User manual
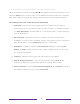
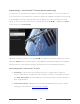
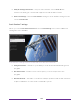
Table Of Contents
- Top cover
- Safety
- Contents
- Welcome
- Connections and setup
- Connecting an antenna, cable, or satellite box
- Connecting external equipment with a composite AV video cable
- Connecting external equipment with an HDMI® cable
- Connecting headphones or analog soundbar
- Connecting headphones to the Roku Enhanced Voice Remote or Roku Voice Report Pro
- Connecting an AV receiver or digital soundbar
- Preparing for Internet connectivity
- AC power
- Roku remote batteries
- Roku TV remote
- Panel buttons
- Guided Setup
- The Home screen
- Benefits of connecting
- Setting up live TV
- Using your TV
- Status indicator
- Standby mode energy savings
- Getting help
- Opting in to Smart TV experience (U.S. only)
- Watching live TV channels
- Using the Live TV Channel Guide (U.S. only)
- Managing channels in connected mode (U.S. only)
- Managing channels in U.S non-connected mode and Canada
- Viewing program information
- Adjusting settings while watching a program
- Pausing live TV
- More Ways to Watch (U.S. only)
- Automatic network recommendation
- Switching TV inputs
- Using Roku Voice commands
- Playing content from USB storage devices
- Playing content from local network media servers
- Setting up a payment method
- Using your TV in a hotel or dorm room
- Using Apple AirPlay and the Apple Home app
- Adjusting TV settings
- Settings menu
- Options menu
- Options menu settings
- Accessibility (U.S. only)
- Video description through Secondary Audio Program (SAP)
- Picture settings
- Sound settings
- Expert Picture Settings (4K models only)
- Changing privacy settings
- Featured Free (U.S. only)
- My Feed
- Searching for something to watch
- Using the Roku Channel Store
- Customizing your TV
- Parental controls
- More settings
- Other devices
- FAQ
- Warranty
- License
- Back cover

103
To change microphone access settings:
1. From the Home screen menu, navigate to Settings > Privacy > Microphone.
2. Select Channel microphone access.
3. Select one of the following settings:
• Prompt – Display a notification the first time a streaming channel requests
the use of the microphone. When such a notification appears, you can
select either Allow microphone access or Deny microphone access on a per-channel
basis. If you choose to allow microphone access, you’ll be prompted to
confirm your choice by entering a numeric code that appears on the screen.
• Always allow – Do not prompt, but always allow any streaming channel to use
the microphone.
• Never allow – Do not prompt, but never allow any streaming channel to use
the microphone.
Channel permissions
After granting or denying microphone access on a per-channel basis, you can reset
channel permissions to enable them to follow the system-wide setting you specify
under Channel microphone access
.
To reset channel permissions:
1. From the Home screen menu, navigate to Settings > Privacy > Microphone.
2. Select Channel permissions.
3. Highlight Reset channel permissions, or highlight a specific listed channel, and then
press OK to deny microphone access to all or to a specific channel.