
User manual
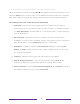
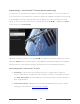
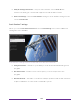
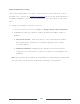
Table Of Contents
- Top cover
- Safety
- Contents
- Welcome
- Connections and setup
- Connecting an antenna, cable, or satellite box
- Connecting external equipment with a composite AV video cable
- Connecting external equipment with an HDMI® cable
- Connecting headphones or analog soundbar
- Connecting headphones to the Roku Enhanced Voice Remote or Roku Voice Report Pro
- Connecting an AV receiver or digital soundbar
- Preparing for Internet connectivity
- AC power
- Roku remote batteries
- Roku TV remote
- Panel buttons
- Guided Setup
- The Home screen
- Benefits of connecting
- Setting up live TV
- Using your TV
- Status indicator
- Standby mode energy savings
- Getting help
- Opting in to Smart TV experience (U.S. only)
- Watching live TV channels
- Using the Live TV Channel Guide (U.S. only)
- Managing channels in connected mode (U.S. only)
- Managing channels in U.S non-connected mode and Canada
- Viewing program information
- Adjusting settings while watching a program
- Pausing live TV
- More Ways to Watch (U.S. only)
- Automatic network recommendation
- Switching TV inputs
- Using Roku Voice commands
- Playing content from USB storage devices
- Playing content from local network media servers
- Setting up a payment method
- Using your TV in a hotel or dorm room
- Using Apple AirPlay and the Apple Home app
- Adjusting TV settings
- Settings menu
- Options menu
- Options menu settings
- Accessibility (U.S. only)
- Video description through Secondary Audio Program (SAP)
- Picture settings
- Sound settings
- Expert Picture Settings (4K models only)
- Changing privacy settings
- Featured Free (U.S. only)
- My Feed
- Searching for something to watch
- Using the Roku Channel Store
- Customizing your TV
- Parental controls
- More settings
- Other devices
- FAQ
- Warranty
- License
- Back cover

98
Sound settings menu for models with DTS® TruSurround/Studio Sound
Tip: Some streaming channels assign STAR to a different function, meaning it will not
open the Options menu. In these cases, use a different streaming channel to configure
DTS
®
Studio Sound. The selected settings remain active for all streaming channels.
Sound settings menu– DTS
®
TruSurround / DTS
®
Studio Sound
• Sound mode – Select from among various preset sound modes to improve
speech, make music sound its best, boost bass or treble, or simulate a theater.
Use Reset audio settings, described below, to return the input’s current settings to
their original values.
• DTS TruSurround –Simulates surround sound that otherwise would require
installation of a surround sound audio system. Sometimes, the effect interferes
with dialog clarity. Use the Dialog clarity option to compensate.
• Dialog Clarity – Available only when DTS TruSurround is On. Choose among Low,
Medium, and High settings to improve the clarity of dialog when you are using
the TruSurround feature.
• TruVolume – Minimizes annoying volume fluctuations in programs.
• Dolby AC-4 Dialog Enhancement – Only on select models: Select On for AC-4 to
enhance the dialog in content that supports the AC-4 audio format.
• Reset sound settings – Returns DTS TruSurround, Dialog Clarity, and TruVolume settings, to
their default settings for the selected Sound mode.