TABLE OF CONTENTS 1 2 3 4 5 6 7 8 9 10 IMPORTANT SAFETY INSTRUCTIONS............................ 1 SUMMARY OF FEATURES................................................... 1 INSTALLATION ...................................................................... 2 3.1 Ostia Application Installation .............................................. 2 3.2 Installing Maps..................................................................... 2 3.2.1 Map Preparation......................................................
Ostia User Manual SECTION 1: Important Safety Instructions For the safety of yourself and others, please observe the following safety requirements: ! ! ! ! ! ! ! Do not attempt to operate a Pocket PC Navigator system in a vehicle while the vehicle is in motion, or in any way that interferes with safe driving. Secure the iGPS receiver and Pocket PC to the vehicle in such a way as not to endanger the driver or passengers during driving or operation.
Ostia User Manual • • • • Moving map while navigating with the iGPS receiver. Selectable “North Up” or “Heading Up” for map display. Selectable “on” or “off” for voice prompt. Satellite constellation display. SECTION 3: Installation 3.1 Ostia Application Installation Installation of Ostia software requires that Microsoft ActiveSync (Windows CE Services) be installed on your desktop computer.
Ostia User Manual 3.2.2 Copying maps from the Desktop PC to your Pocket PC. 1. Make sure your Pocket PC is in its sync cradle and is attached to your PC. 2. Double click My Computer # C:\ # PharosMaps folder 3. In the PharosMaps folder you should see 2 files with the name of the region you just uncompressed. Both the .rmf and .
Ostia User Manual SECTION 5: Using Ostia To start the Ostia program, click the Start # Programs # Ostia. Your Pocket PC may also provide additional methods of running programs, such as a special menu window. Information/instructions provided in this section can also be found in your Pocket PC help menu after Ostia is started. To read the help menu, please click the Start icon on your Pocket PC window, and then click .
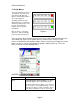
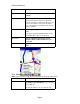
Ostia User Manual 5.1 Ostia Menus The Ostia menu band consists of several parts: The main menu (File, Find, View, GPS and Option), and the GPS indicator. As shown in Figure 4. The GPS indicator has three changeable faces to indicate the different operating status of the receiver. By clicking the indicator you can get more information. Blue arrow keys on the map allow you to shift the viewable portion of map currently open.
Ostia User Manual that were opened. Close Map Close opened map(s), clearing screen and settings. Delete Waypoint Delete waypoint item(s) from the database. Select an item then press Delete to delete the item. Press Finish to complete the delete process and close the window. Press Cancel to delete none of the waypoints and quit the delete process and close window. Simulation Mode Simulating car navigation based on given route.
Ostia User Manual process. 1. On the Street Lookup screen, type the first several numbers (not address numbers such as 1234 “B” street but numbered street names nd such as 2 street) and/or letters of a desired street name. A list of closely related street names will appear in the scrollable window. Select the desired street name, then press Next to proceed to step 2. 2. On the Lookup City screen, the steps are similar to Step 1. Select the desired city, county, township, etc.
Ostia User Manual Press Next to proceed to step 3. 3. All possible street crossings are listed. Make a selection and press Finish to proceed to step 4. 4. Specify if the intersection is an Origin or Destination. If you want to save the location to the waypoint database, check the save-option box and give a waypoint name up to 50 letters. The selected intersection will be displayed in Green if an origin or Red if a destination. Note: To modify a previous selection, press the Back button.
Ostia User Manual 2. Specify if the waypoint location is an Origin or Destination. The selected waypoint location will be displayed in Green if an origin or Red if a destination Note: The save-option check box is disabled. New Route Select this menu item to display a new route starting at the origin and ending at the destination. Before this menu item is active, both the origin and destination must be defined.
Ostia User Manual 5.1.3 View View Menu Items Description Full Map Select this menu item to view the entire map currently open. Destination Select this menu item to display the currently defined destination. Selecting this function may change the map scale. Origin Select this menu item to display the currently defined origin. Selecting this function may change the map scale. Full Route Select this menu item to display the currently defined full route.
Ostia User Manual 5.1.4 GPS Enable GPS Check this menu item to enable the GPS receiver. You should check it only when the iGPS receiver is properly connected to your Pocket PC. The GPS icon (a red arrow) will be displayed on the map indicating your current position. Uncheck Enable GPS will disable the GPS tracking function. GPS Info.
Ostia User Manual 5.1.5 Options Auto Re-route Select this menu item to have the program automatically re-route you when you travel off of the calculated route. Heading Up Select this menu item to change the orientation of the map. With Heading Up selected, the map will be oriented so that in general, your position indicator is moving towards the top of the screen. With Heading Up not selected, the map is oriented to that North is always at the top of the screen.
Ostia User Manual One Touch Re-Route: If you find yourself off-route (voice prompts will let you know that you are off-route while you are traveling), simply push the Action Button* on your Pocket PC to calculate a new route from your current location to the destination. *Note: The Action Button may differ from one Pocket PC to another. 5.2 View controls Here are some tips for controlling map viewing. You may find other techniques unique to your Pocket PC that allows you to change the current map view.
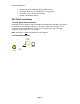
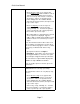
Ostia User Manual 7.2 Installing GPS iGPS-180 1. Place the iGPS-180 receiver on the dashboard of the vehicle close to the windshield. PDA i GPS-180 2. Plug the cigarette lighter adaptor into the lighter socket of your vehicle. 3. Plug the serial adaptor cable into the Pocket PC’s serial port socket. Adaptor Junction Box Serial Adaptor Cable Cigarette Lighter Adaptor Figure 5 iGPS-CF 1. Insert the iGPS-CF into the Compact Flash Card port of the Pocket PC.
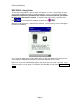
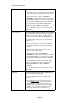
Ostia User Manual 7.3 Using GPS The map sample (Figure 6) shows the driving route (blue path) and the iGPS receiver indicator (red arrow). The arrowhead indicates the direction of travel. 2 (two) steps are required to use an iGPS receiver with Ostia software. 1. Connect the iGPS receiver to your Pocket PC using the instructions in section 7.2. 2. Enable the iGPS receiver function. (See section 5.1.
Ostia User Manual 6. Handle the MMCX connector carefully (hold the metal part not the cable) when plug or unplug the active antenna. 7. Do not leave the unit under the sun for a long period of time. 8. iGPS-CF™ receiver’s performance may be affected by: a. Tinted metallic windows b. Under high raised buildings, bridges, or in tunnels c. Near high voltage cables, CB radios, or radio base stations d. CD ROM player e. Solar flare activities SECTION 8: Troubleshooting See the Pharos website (http://www.
Ostia User Manual Ostia Continental USA maps are made up of 260 map segments, separated into geographical and municipality boundary divided sections.