
Installation Guide


ENGLISH
ENGLISH
7
8
9
10
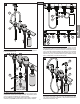
7 CONTROL BODY INSTALLATION
Apply plumber’s putty into groove on bottom of Gasket (7A) per manufacturer’s
recommendations.
Place Gasket (7A) under base of Control Body (7B). From
above sink, insert Threaded Shank (7C) and Flexible Tubing (7D) through side
hole of sink.
8 SECURING CONTROL BODY
From underneath sink, place Washer (8A), and Locknut (8B) onto Mounting
Shank (8C). Make sure Handle (8D) is facing forward and it swings equally in
both directions. Tighten Locknut (8B) rmly to Shank (8C).
Caution: Do not over tighten!
9
GUIDE FLANGE & DISPENSER SHANK INSTALLATION
Insert Hose Guide (9A) through Hose Guide Flange (9B) and insert Soap
Dispenser Shank (9C) through Foam Gasket (9D) and into the sink holes. If
desired, place a small bead of plumber’s putty to the underside of Hose Guide
Flange (9B). (Both Guide Flange and Dispenser Shank can be placed in either
hole).
10
SECURING HOSE GUIDE & SOAP DISPENSER SHANK
From underneath sink, secure Hose Guide (10A) and Soap Dispenser Shank
(10B) by screwing Plastic Locknuts (10C) and (10D). Thread on Bottle (10E)
to Soap Dispenser Shank (10B). Hand tighten. Caution: do not over tighten!
3
9A
10A
7C
7A
7B
7D
8C
8A
8B
9B
9C
9D
10B
10C
10D
10E
8D