
Operation Manual


2:2
ABC
Preparations
Unpacking
3ODFHWKHER[RQDVWHDG\ÁDWVXUIDFH/LIW
WKHPDFKLQHRXWRIWKHER[UHPRYHWKHRXWHU
packaging and lift off the machine carrying
case.
5HPRYHDOORXWHUSDFNLQJPDWHULDODQGWKH
plastic bag.
6OLGHRIIWKHDFFHVVRU\WUD\DQGUHPRYHWKH
styrofoam inside.
Note: Styrofoam left in the accessory tray while sewing
may affect stitch quality. The styrofoam is for packing
purposes only and should be removed.
Note: Your PFAFF
®
Expression
sewing machine is
adjusted to provide the best stitch result at normal room
temperature. Extreme hot and cold temperatures can
affect the sewn result.
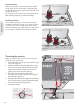
Connect to the power supply
$PRQJWKHDFFHVVRULHV\RXZLOOÀQGWKHSRZHU
cord and the foot control.
Note: Before plugging in the foot control, check to
ensure that it is type ”FR5” (see underside of foot
control).
1. Take out the foot control cord. Turn the foot
FRQWURORYHU&RQQHFWWKHFRUGWRWKHVRFNHW
LQVLGHWKHVSDFHRIWKHIRRWFRQWURO3XVKÀUPO\
to make sure it is properly connected. Lay the
cord in the slot on the underside of the foot
control.
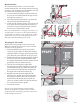
Note: Connecting the foot control cord to the foot
FRQWUROLVRQO\QHFHVVDU\WKHYHU\ÀUVWWLPH\RXDUH
going to use the machine.
2. Connect the foot control cord to the front
socket on the bottom right side of the machine
$
3. Connect the power cord to the rear socket on
WKHERWWRPULJKWVLGHRIWKHPDFKLQH%3OXJ
the cord into the wall socket.
3UHVVWKH212))VZLWFKWR21WRWXUQRQ
SRZHUDQGOLJKW&
For the USA and Canada
7KLVVHZLQJPDFKLQHKDVDSRODUL]HGSOXJRQH
EODGHZLGHUWKDQWKHRWKHU7RUHGXFHWKHULVN
RIHOHFWULFVKRFNWKLVSOXJLVLQWHQGHGWRÀWLQD
polarized outlet only one way. If the plug does not
ÀWIXOO\LQWKHRXWOHWUHYHUVHWKHSOXJ,ILWVWLOOGRHV
QRWÀWFRQWDFWDTXDOLÀHGHOHFWULFLDQWRLQVWDOOWKH
SURSHURXWOHW'RQRWPRGLI\WKHSOXJLQDQ\ZD\