Owner's manual
This household sewing machine is designed to comply with IEC/EN 60335-2-28 and UL1594. IMPORTANT SAFETY INSTRUCTIONS When using an electrical appliance, basic safety precautions should always be followed, including the following: Read all instructions before using this household sewing machine.
Congratulations! &RQJUDWXODWLRQV RQ SXUFKDVLQJ \RXU QHZ 3)$))® sewing PDFKLQH $V D VHZLQJ HQWKXVLDVW \RX KDYH DFTXLUHG D PDFKLQH WKDW IHDWXUHV WKH YHU\ ODWHVW LQ ERWK GHVLJQ DQG WHFKQRORJ\ HQDEOLQJ \RX WR WUDQVIRUP DOO \RXU FUHDWLYH ideas into reality. %HIRUH \RX VWDUW SOHDVH VSHQG VRPH WLPH UHDGLQJ WKLV RZQHU·V PDQXDO
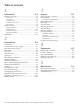
Table of contents 1 Introduction 1:5 0DFKLQH RYHUYLHZ.................................................... 1:6 Front side ...................................................................... 1:6 Top parts ....................................................................... 1:6 $FFHVVRU\ WUD\ .............................................................. 1:7 Included accessories.................................................... 1:7 Presser feet......................................................
1 Introduction
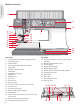
1 0 0 inch mm PFAFF quilt expression 4.2 Introduction Machine overview 10 20 1 30 40 2 50 17 OK 2 18 3 4 5 6 7 8 9 10 11 16 15 14 13 12 5 19 20 21 Front side /LG ZLWK VWLWFK RYHUYLHZ DQG EXWWRQ UXOHU 2. Threading slots 3. Thread cutter 6HQVRUPDWLF EXWWRQKROH IRRW VRFNHW /(' OLJKWV %XLOW LQ QHHGOH WKUHDGHU 7. Needle bar 8. Needle thread guide 6WLWFK SODWH %REELQ FRYHU 11. Free arm 12. Presser foot ,'7 V\VWHP 14. Presser foot bar and presser foot holder 15.
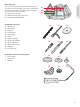
Included accessories 36. Thread net 37. Edge guide 38. Felt pad 6FUHZGULYHU 6HDP ULSSHU %UXVK 6SRRO FDS ODUJH 6SRRO FDS PHGLXP 6SRRO FDS VPDOO 45. Multi-purpose tool %REELQV .
Introduction Presser feet 6WDQGDUG SUHVVHU IRRW $ ZLWK ,'7 DWWDFKHG RQ WKH PDFKLQH XSRQ GHOLYHU\ This foot is used mainly for straight stitching and zigzag stitching with a stitch length longer than 1.0 mm.
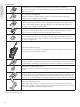
Stitch overview Stitch Stitch number Name Introduction Utility stitches Description 4.2 3.2 1 1 Straight stitch 2 2 Stretch triple straight stitch Reinforced seam. Topstitching. 3 3 Straight stitch reverse Sew continuous reverse. 4 4 Basting stitch For basting projects together. Single stitch used for basting. You determine the length of stitch manually.
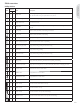
Introduction Stitch 1:10 Stitch number Name Description 22 Overlock Elastic decorative hem for stretch fabrics. 25 23 Closed overlock Seam and overcast in one step, patch, hem. 26 24 Stretch knit overlock Seam and overcast stretch fabrics in one step. 27 – Reinforced overlock Seam and overcast stretch fabrics in one step and reinforce. 28 – Finished edge overlock Seam and overcast stretch fabrics in one step with reinforced edge.
Stitch number Name Description 40 Bartack Automatically reinforce seams and pockets. 49 41 Denim bartack Automatically reinforce seams and pockets decoratively. 50 42 Decorative bartack Automatically reinforce seams and pockets decoratively. 51 – Cross bartack Automatically reinforce seams and pockets. 4.2 3.2 48 Introduction Stitch Quilt stitches Stitch 4.2 52* 53 54 55 56 57 58 59 60 61 62 63 64 65 66 67 68 69 70 71 72 73 74 75 3.
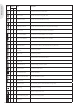
Introduction Stitch 4.2 209 210 211 212 213 214 215 216 217 218 219 220 221 222 223 224 225 226 227 228 229 230 231 3.2 171 172 173 174 – 175 176 177 178 179 180 181 182 183 184 185 186 187 188 189 190 191 192 4.2 232 2331 2341 2351 2361 2372 2383 2394 2405 2415 2426 2436 244 245 246 247 248 249 250 251 252 253 254 3.
Preparations 2
Preparations Unpacking 3ODFH WKH ER[ RQ D VWHDG\ ÁDW VXUIDFH /LIW WKH PDFKLQH RXW RI WKH ER[ UHPRYH WKH RXWHU packaging and lift off the machine carrying case. 5HPRYH DOO RXWHU SDFNLQJ PDWHULDO DQG WKH plastic bag. 6OLGH RII WKH DFFHVVRU\ WUD\ DQG UHPRYH WKH styrofoam inside. Note: Styrofoam left in the accessory tray while sewing may affect stitch quality. The styrofoam is for packing purposes only and should be removed.
Pack away after sewing Preparations 6ZLWFK WKH PDLQ VZLWFK RII 2. Unplug the cord from the wall socket and then from the machine. 3. Unplug the foot control cord from the machine. Wind the cord around the foot control for easy storage. 3ODFH DOO DFFHVVRULHV LQ WKH DFFHVVRU\ WUD\ 6OLGH the tray on to the machine around the free arm. 3ODFH WKH IRRW FRQWURO LQ WKH VSDFH DERYH WKH free arm.
Auxiliary spool pin The auxiliary spool pin is used when winding a bobbin thread from a second spool of thread or for a second spool when sewing with a twin needle. 5DLVH WKH DX[LOLDU\ VSRRO SLQ 6OLGH RQ D ODUJH VSRRO cap and place a felt pad under the thread spool. Main spool pin in vertical position Auxiliary spool pin and main spool pin in vertical position.
Needle threader The needle threader allows you to thread the needle automatically. The needle must be in the up position to use the built-in needle threader. We also recommend lowering the presser foot. 1. Use the handle to pull the needle threader all WKH ZD\ GRZQ 7KH WKUHDGHU KRRN * VZLYHOV through the needle eye. 3ODFH WKH WKUHDG IURP WKH EDFN RYHU WKH KRRN + DQG XQGHU WKH WKUHDG KRRN * 3. Let the needle threader gently swing back.
C C Preparations E Bobbin winding B C Winding from horizontal position 1. Place an empty bobbin on the bobbin spindle, with the logo facing up. Use only the original 3)$)) EREELQV DSSURYHG IRU WKLV PRGHO 2. Place the thread spool on the spool pin in KRUL]RQWDO SRVLWLRQ 6OLGH D VSRRO FDS WLJKWO\ against the spool. 3ODFH WKH WKUHDG LQWR WKH WKUHDG JXLGH $ IURP front to back.
Inserting the bobbin 2 3 4 Preparations 5HPRYH WKH EREELQ FRYHU E\ VOLGLQJ LW WRZDUGV you. 2. Place the bobbin in the bobbin case with the logo facing up and the thread unreeling from the left of the bobbin. The bobbin will then rotate counter-clockwise when you pull out the thread.
Preparations Electronic knee-lift (4.2)
Changing the needle 1. Preparations Use the hole in the multi-purpose tool to hold the needle. /RRVHQ WKH QHHGOH VFUHZ 8VH WKH VFUHZ GULYHU if necessary. 5HPRYH WKH QHHGOH 4. Insert the new needle, using the multi-purpose tool. Push the new needle upwards with the ÁDW VLGH DZD\ IURP \RX XQWLO LW ZLOO JR QR further. 5. Tighten the needle screw as tight as it will go. Lowering feed dogs
Buttons for quilt expression™ 4.2 8 9 10 11 12 14 13 15 16 17 1 2 OK 3 Preparations 4 5 6 7 18 19 20 21 22 23 24 25 26 27 Needle stop up/down with indicator (1) 3UHVV WKLV EXWWRQ WR PRYH WKH QHHGOH XS RU GRZQ The setting of the needle stop position is changed DW WKH VDPH WLPH :KHQ QHHGOH GRZQ LV DFWLYDWHG the indicator is lit, the needle will stop in the down SRVLWLRQ DQG WKH SUHVVHU IRRW ZLOO UDLVH WR SLYRW height.
Presser foot down and pivot toggle (10) Lower the presser foot completely. Press the button RQFH PRUH WR UDLVH WKH SUHVVHU IRRW WR SLYRW KHLJKW The presser foot is lowered automatically when you start sewing. Graphic display (12) 7KH JUDSKLF GLVSOD\ OHWV \RX YLHZ DOO \RXU VHOHFWLRQV DQG RSWLRQV 6WLWFKHV DUH VKRZQ LQ UHDO size. Stitch width or stitch positioning (13) Increase or decrease the stitch width using the + and - buttons.
Buttons for expression™ 3.2 2 1 3 4 9 11 10 12 13 14 4 3 OK 2 1 Preparations 8 5 6 7 15 16 17 18 Thread tension dial (1) ,I QHHGHG DGMXVW WKH WRS WKUHDG WHQVLRQ XVLQJ WKH markings on the tension dial. Needle stop up/down with indicator (2) 3UHVV WKLV EXWWRQ WR PRYH WKH QHHGOH XS RU GRZQ The setting of the needle stop position is changed DW WKH VDPH WLPH :KHQ QHHGOH GRZQ LV DFWLYDWHG the indicator is lit, the needle will stop in the down position.
Stitch width or stitch positioning (10) Increase or decrease the stitch width using the + and - buttons. 3UHVV WKH DOWHUQDWLYHV EXWWRQ WR YLHZ WKH VWLWFK positioning for the selected stitch. Use the + and buttons to change the stitch position.
2:14 Preparations
Settings menu ,Q WKH VHWWLQJV PHQX \RX FDQ RYHUULGH GHIDXOW VHWWLQJV DQG PDNH PDQXDO DGMXVWPHQWV WR WKH PDFKLQH settings, sound settings and screen settings. 2SHQ WKH PHQX E\ SUHVVLQJ WKH VHWWLQJV PHQX EXWWRQ DQG VHOHFW WKH VHWWLQJ \RX ZLVK WR DGMXVW E\ pressing the up and down arrow buttons on the wheel. 8VH WKH OHIW DQG ULJKW DUURZ EXWWRQV WR DGMXVW WKH YDOXHV DQG DFWLYDWH VHWWLQJV RU RSHQ D OLVW RI FKRLFHV E\ SUHVVLQJ 2.
Preparations Spring foot free-motion (4.2) $FWLYDWH WR VHW WKH PDFKLQH LQ VSULQJ IRRW IUHH PRWLRQ PRGH /RZHU WKH IHHG GRJV $ VSULQJ IRRW will raise and lower with each stitch to hold the fabric on the stitch plate while the stitch is being formed. In sewing mode, press the info button. The spring foot free-motion icon will be shown instead of the presser foot recommendation.
Sewing 3
6HZLQJ PRGH LV WKH ÀUVW YLHZ RQ WKH JUDSKLF GLVSOD\ DIWHU \RX WXUQ RQ WKH PDFKLQH
Stitch adjustments
Mirroring 7R PLUURU VWLWFKHV RU VHTXHQFHV VLGH WR VLGH SUHVV the mirror side to side button. For 4.2: To mirror end to end, press the mirror end to end button. Sewing Tie-off options The tie-off options let you program tie-offs both at WKH EHJLQQLQJ $ DQG WKH HQG % RI WKH VWLWFK 1. Press the F2 button to open the tie-off options YLHZ 2. Use the wheel to step between the options and SUHVV 2. WR VHOHFW ZKLFK IXQFWLRQV \RX ZDQW WR use.
Tapering program A Sewing Tapering increases or decreases the width of the stitch during sewing to create symmetrical or asymmetrical tapers. 2SHQ WKH WDSHULQJ SURJUDP YLHZ E\ SUHVVLQJ the F1 button. 2. Use the left and right arrow buttons on the wheel to select beginning or end tapering. 3UHVV 2. WR WXUQ WKH VHWWLQJ RQ RU RII /RQJ SUHVV 2.
Personal stitches Sewing Save personal stitch 6DYH \RXU SHUVRQDO VWLWFKHV LQ \RXU PDFKLQH E\ SUHVVLQJ WKH VDYH EXWWRQ 7KLV ZLOO RSHQ WKH VDYH SHUVRQDO VWLWFK RU VHTXHQFH PHQX 6HOHFW WKH SHUVRQDO VWLWFK RSWLRQ ZLWK WKH DUURZ EXWWRQV RQ WKH ZKHHO DQG FRQÀUP E\ SUHVVLQJ 2. 6HOHFW DQ HPSW\ PHPRU\ E\ XVLQJ WKH DUURZ EXWWRQV &RQÀUP \RXU VHOHFWLRQ E\ SUHVVLQJ 2.
Sewing techniques Handlook quilting Sewing $ TXLOW XVXDOO\ FRQVLVWV RI WKUHH OD\HUV WZR OD\HUV of fabric with a layer of batting sandwiched between. %DVWH WKH FRPSOHWHG TXLOW WRS WR WKH EDWWLQJ DQG backing. 7KUHDG WKH QHHGOH ZLWK DQ LQYLVLEOH PRQRÀODPHQW WKUHDG 8VH FRQWUDVWLQJ RU matching rayon or cotton thread in the bobbin. 6QDS RQ WKH UHFRPPHQGHG IRRW VKRZQ LQ WKH VHZLQJ UHFRPPHQGDWLRQV YLHZ (QJDJH WKH ,'7 V\VWHP 5.
Free-motion position (3.2) Sewing When using the free-motion/darning foot, the presser foot needs to be in the free-motion position. 'LVHQJDJH WKH ,'7 V\VWHP DQG ORZHU WKH IHHG dogs. $WWDFK WKH IUHH PRWLRQ GDUQLQJ IRRW DQG VHOHFW D stitch. 7R HQJDJH WKH IUHH PRWLRQ SRVLWLRQ PRYH WKH SUHVVHU IRRW OLIW XS DQG SXVK WKH VZLWFK $ RQ WKH underside of the lift, towards you until it snaps into place. Release the lift and it will be set in the freemotion position. 4.
Manual buttonhole 1. To sew a manual buttonhole in four steps, use presser foot 5M. 7KH ÀUVW FROXPQ ZLOO EH VHZQ EDFNZDUGV 6HZ WKH ÀUVW FROXPQ DV ORQJ DV \RX ZDQW WKH buttonhole. The graphic display will show the part and sewing direction of the buttonhole that is being sewn. 3UHVV WKH UHYHUVH EXWWRQ 7KH PDFKLQH VHZV the bartack and the second column. When the FROXPQV DUH DOLJQHG SUHVV WKH UHYHUVH EXWWRQ again to sew the second bartack.
Common sewing pop-ups Bobbin thread low (4.2) When the bobbin is almost empty, the machine stops automatically and a pop-up appears on the screen. Replace the empty bobbin with a full one DQG SUHVV 2. RQ WKH ZKHHO WR FRQÀUP Sewing Mainmotor overload ,I \RX DUH VHZLQJ RQ YHU\ KHDY\ IDEULF RU LI WKH machine is blocked when sewing, the mainmotor FDQ JHW RYHUORDGHG DQG WKH PDFKLQH ZLOO VWRS sewing. The pop-up message will close when the mainmotor and power supply are secure. Remove thread jam (4.
Sequencing 4
7KH VHTXHQFLQJ IXQFWLRQ RQ \RXU PDFKLQH PDNHV LW SRVVLEOH WR FUHDWH VWLWFKHV DQG VHTXHQFHV ZLWK \RXU RZQ SHUVRQDO VHWWLQJV DQG WR FRPELQH VWLWFKHV DQG OHWWHUV LQWR VHTXHQFHV
Using the alphabet 0RYH WKH FXUVRU WKURXJK WKH VWLWFK ÀHOG with the left and right arrow buttons on the wheel to where you want to add a letter. 2. Use the down arrow button to step through WKH VHTXHQFH FRPPDQGV WR WKH DOSKDEHW 6HOHFW D OHWWHU XVLQJ WKH DUURZ EXWWRQV DQG SUHVV 2. WR LQVHUW LW ,W ZLOO EH SODFHG DW WKH FXUVRU SRVLWLRQ LQ WKH VWLWFK ÀHOG Note: The selected letter in the alphabet will be highlighted.
Manage your sequences
Maintenance 5
Cleaning the machine To keep your sewing machine operating well, clean LW RIWHQ 1R OXEULFDWLRQ RLOLQJ LV QHHGHG Wipe the exterior surface of your machine with a VRIW FORWK WR UHPRYH DQ\ GXVW RU OLQW EXLOW XS Wipe the graphic display with a clean, soft and damp cloth. Maintenance Cleaning the bobbin area Note: Lower the feed dogs and turn off the machine.
Troubleshooting ,Q WKLV WURXEOHVKRRWLQJ JXLGH \RX ZLOO ÀQG VROXWLRQV WR WKH SUREOHPV \RX PD\ KDYH ZLWK \RXU PDFKLQH )RU IXUWKHU LQIRUPDWLRQ SOHDVH FRQWDFW \RXU ORFDO DXWKRUL]HG 3)$)) GHDOHU ZKR ZLOO EH KDSS\ WR KHOS you.
Is a correct spool cap used? Is the best spool pin position used? Is the stitch plate hole damaged? Bobbin thread breaks 'LG \RX LQVHUW WKH EREELQ SURSHUO\" Is the stitch plate hole damaged? Is the bobbin area clean? Is the bobbin wound correctly? The seam has uneven stitches Is the thread tension correct? $UH \RX XVLQJ WRR WKLFN RU VOXEEHG WKUHDG" ,V WKH EREELQ WKUHDG HYHQO\ ZRXQG" Is a correct needle used? $WWDFK D VSRRO FDS RI WKH ULJKW VL]H IRU WKH DFWXDO thread spool.
:H UHVHUYH WKH ULJKW WR FKDQJH WKH PDFKLQH HTXLSPHQW DQG WKH DVVRUWPHQW RI DFFHVVRULHV ZLWKRXW SULRU QRWLFH RU PDNH PRGLÀFDWLRQV to the performance or design. 6XFK PRGLÀFDWLRQV KRZHYHU ZLOO DOZD\V EH WR WKH EHQHÀW RI WKH XVHU and the product. Intellectual Property Patents protecting this product are listed on a label positioned XQGHUQHDWK WKH 6HZLQJ 0DFKLQH 3)$)) 3(5)(&7,21 67$576 +(5( (;35(66,21 48,/7 (;35(66,21 DQG ,'7 LPDJH DUH WUDGHPDUNV RI .
www.pfaff.com 413 35 59 - 26D (QJOLVK ,Q+RXVH .