WiLoader Revision G User’s Manual July 2017 Version 1.
Table of Contents Specs 2 Pinout 2 Hardware tips 3 How to set up 3 WiLoader Information 7 WiLoader Settings 9 WiLoaderFX Software Settings 12 WiLoaderFX Log Tab 17 WiLoaderFX Terminal Tab 19 WiLoaderFX Programming Tab 22 Application in Mass-Production 25 Command Line Interface 26 WiLoader Smartphone App 28 Connecting to Arduino IDE 31 Connecting to Atmel Studio 33 Connecting to CodeVision AVR 34
User Manual WiLoader Revision G Specs Supply voltage: 3.3v to 5.5v Reverse-voltage protection Over-current protection I/O voltage: 1.8v to 5.
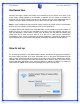
User Manual WiLoader Revision G Hardware tips Normally, the supply voltage and VCCIO are connected by the R1 resistor. As a result, if the power supply voltage applied to the WiLoader is different from IO voltage of the MCU (for example, 3.3v as supply voltage and 1.8v for IO voltage), the user must disassemble the R1 resistor and supply VCCIO through the VIO pin which is on the right corner of WiLoader.
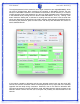
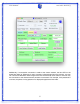
User Manual WiLoader Revision G The original password of this network is set to eight consecutive zero digits(00000000), which can also be changed later. After connecting the computer to WiLoader’s network, the user should run WiLoaderFX software. The software can be found in the bin directory or in case of macOS operating system the application is in the main folder. WiLoader name will be displayed in the software list by clicking the scan button inside WiLoaderFX.
User Manual WiLoader Revision G Additionally, if a successful connection is made to the chosen network, the blue LED on the board also lights up. Otherwise, if user’s computer is disconnected from the network , the user can connect to WiLoader network again and click the WiLoader scan button to find out why the connection to the desired network has been unsuccessful. For example, if the password is incorrect, the phrase “wrong password” is displayed opposite the Net Label.
User Manual WiLoader Revision G Note: After hitting the connect button, there is no need for pressing the “save setting to WiLoader" button or resetting the WiLoader. The network information is automatically stored in WiLoader and it will connect to the entered network after each turn on or reset by itself.
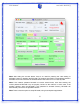
User Manual WiLoader Revision G WiLoader Information WiLoaderFX top section is dedicated to displaying WiLoaders found on user’s computer network and their information. If there are more than one WiLoader available on the network, all of them will be added to drop down list and will be selectable by user. In this section Target voltage shows WiLoader supply voltage and If VCC and VCCIO voltages are different, VCCIO will be displayed as well. Note: The voltage shown may vary up to about 0.
User Manual WiLoader Revision G The number opposite the RSSI shows the strength of the received signal by the WiLoader in the station mode. If this value is small, it indicates the weakness of the network coverage in the place where WiLoader is located. The image and color of logo will also vary according to the value of the RSSI. The number in front of the MAC shows the MAC address in the station mode.
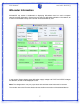
User Manual WiLoader Revision G WiLoader Settings The setting tab of WiLoaderFX should be used, in order to change the name, AP mode password, UART baud-rate or IP settings of WiLoader. For receiving the latest setting applied to WiLoader, the ‘load setting’ button should be utilized. In ‘WiLoader Name’ field, the user can enter any arbitrary name (ASCII or unicode) up to a maximum of 32 bytes (32 ASCII characters or fewer if using Unicode characters).
User Manual WiLoader Revision G Initially, the UART port is active and its speed is set to 115,200, to change this speed, the number can be entered to a maximum value of 4,608,000. The user can enter 0 or the word ‘disable’ for disabling the UART port. Note: If the UART port is deactivated, the Rx and Tx pins on WiLoader will go to TriState or HiZ, when programming operation is not running.
User Manual WiLoader Revision G After entering or changing WiLoader’s setting, in order to save them properly the ‘save setting to WiLoader ’ button must be pressed and after receiving the successful operation message, for applying these new setting to WiLoader, reset the device using ‘Reset WiLoader’ button in the software or by pressing the R button on WiLoader itself.
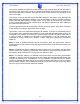
User Manual WiLoader Revision G WiLoaderFX Software Settings In order to adjust the software parameters, use the options available in the bottom section of setting tab. These settings are stored in wiloader.conf file in the etc directory and are loaded and applied every time at the beginning of the software run. Broadcast option is enabled by default. In order to find WiLoader on the network, the software sends packets by the UDP protocol to the local network broadcast address.
User Manual WiLoader Revision G On some routers, the local broadcast address may be blocked, so the multicast option can be used to find WiLoader using WiLoaderFX. In multicast mode, importing an IP to bind is also necessary. This IP is in fact the IP of user’s computer received from the network, and if the user enter this address incorrectly an error massage will be displayed automatically.
User Manual WiLoader Revision G Note: In Broadcast mode, the software automatically sends the discovery packet to all active interfaces on the computer. In order to avoid this operation and send the packet only by one of these interfaces or network cards, the Bind to IP Address option can be employed. If user needs to scan a specific IP for finding WiLoader, it can be entered in “specific address” field.
User Manual WiLoader Revision G Note: Simultaneous use of all the described options before is also possible as shown below: 15
User Manual WiLoader Revision G In this case, the application sends the discovery packets to the multicast address, broadcast address and also the specified address (192.168.1.255) through the Interface or the network card with the IP address that is entered in “Bind to IP Address” field . The volume of the software alert sound can be adjusted in the sound setting section.
User Manual WiLoader Revision G WiLoaderFX Log Tab In order to save the details of software performance and troubleshooting its problems a log tab has been provided. In the event of recurring problems with the functionality of software by activating the option to save the log in a file or displaying it in software’s GUI , the user can submit a detailed report of software issues to the WiLoader Technical Team.
User Manual WiLoader Revision G Note: Due to the fact that the log screen option will save up to 50 MB of log files, employing this method increases the amount of RAM consumed by the software, so it is recommended to use it for short operation and in other cases make use of the logfile option. Note: Enabling any of the log options will be saved in the configuration file and as result after starting the software the next time, the log process will start again.
User Manual WiLoader Revision G WiLoaderFX Terminal Tab In order to utilize the WiFi-UART Bridge feature, the user can use the terminal tab or other network data-transmission softwares (such as “socket test” software). The user must first select the desired WiLoader from the drop down list and then click the connect button on the bottom of the page, in order to send and receive data on WiLoader’s serial port. If successful, the button will turn red and the text will become “Discon".
User Manual WiLoader Revision G When the user selects the options “add CR” or “Add LF,” 0x0D or 0x0A byte will be added at the end of data string that are consecutively the characters for Carriage return and Line feed. The user must use the Enter key, in order to send the written data. The clear button is used for clearing the terminal screen and the reset button is for resetting the MCU, which is usually used to carry out tests in projects along with sending and receiving serial data.
User Manual WiLoader Revision G In order to inform the user, whether data sent from the terminal has been received by WiLoader, an Acknowledgment (Ack) mechanism has been provided. This mechanism enables the user to know if the connection has been lost and WiLoader hasn’t received the sent bytes. The Ack mechanism does not exist for bytes sent by MCU to WiLoader, so the MCU can’t be certain that its sent data has been received by the computer or smartphone software.
User Manual WiLoader Revision G WiLoaderFX Programming Tab This is the main section of WiLoaderFX that is employed by the user, when utilizing GUI interface. The user can select the type of memory he or she wants to perform the operation on (Flash or EEPROM), as well as the type of operation (Write, Read, Verify). The protocol must also be selected to perform the selected operation. If the AVR ISP is selected, the ISP protocol will be used with the SPI port.
User Manual WiLoader Revision G The MCU’s type is selectable from the list of MCUs. Also using the “Read Sig” button, the software reads MCU’s signature via WiLoader and automatically selects the correct MCU. The Erase button clears the memory when the flash memory is selected, and if EEPROM memory is selected, it will write 0xFF all through this memory.
User Manual WiLoader Revision G The user can use the indicated button in the image below for changing the color of that section or tab. Note: The color of different windows and tabs, as well as the path of the 10 last used files and also the last used micro-controller will be stored in the configuration file. These informations will be restored every time the software is launched. Note: The clock frequency in the AVR ISP protocol should be selected according to the MCU’s data sheet.
User Manual WiLoader Revision G Application in Mass-Production The user can program multiple MCU’s simultaneously using multiple WiLoaders. This application is suitable for mass programming in the production lines. For this purpose, the entire software folder (WiLoaderFX) should be duplicated for as many times as needed (for example 4), and opened from the bin folder inside each one separately. Given that the software uses the wiloader.
User Manual WiLoader Revision G Command Line Interface In order to use the WiLoaderFX software in different compilers and IDEs such as Arduino, Atmel Studio and CodeVision AVR, a command line interface is provided and its file is called WiLoaderInterface, which is placed in the bin folder beside the WiLoaderFX file. This interface can be used instead of the GUI. When using the command line interface, an instance of the WiLoaderFX will be opened.
User Manual WiLoader Revision G The following options can be employed for working with this interface: The user should utilize -p switch for introducing the MCU that is being used, -b for clock frequency, -c for protocol selection and -U for choosing operations. For example, in order to program the QC_sketch.ino.standard.
User Manual WiLoader Revision G WiLoader Smartphone App The smartphone app is capable of connecting to WiLoader, changing its various settings and communicating with the target via WiFi-UART bridge using the terminal tab. The app first page shows the list of available WiLoaders in user’s WiFi network. This page displays the name of each WiLoader along with some information such as its IP address, signal strength and WiFi mode.
User Manual WiLoader Revision G When user selects a WiLoader, the interface below will appear on the screen. The setting tab will display all the different options and fields as explained before. In Setting tab, user can select and change WiLoader’s desired WiFi network, adjust UART baud rate, WiLoader’s WiFi properties and choose the necessary terminal options as needed. In order to reset WiLoader, the Restart button can be used.
User Manual WiLoader Revision G The user can employ Terminal tab for connecting to the target MCU and communicating with the desired device via WiFi-UART bridge. This tab works like the terminal tab inside WiLoaderFX software The images shown above are the buttons that can be used to connect, disconnect, reset MCU and clear screen. Note: There are several options available when using this tab for communicating or chatting with the target board. These options are available at the bottom of setting tab.
User Manual WiLoader Revision G Connecting to Arduino IDE A software patch is placed in the software package for integrating WiLoader inside Arduino IDE and for using WiLoader to program Arduino sketches on different boards. The user can start working with WiLoader, after installing the ArduinoPatch on his or her system. After applying the ArduinoPatch, WiCOM will be added to port list and WiLoader as a new programmer. There are two methods for programming the target MCU with WiLoader.
User Manual WiLoader Revision G 1) WiCOM port is selected and upload command is chosen.(boot-loader will be used) 2) WiLoader is selected as the programmer and upload using programmer or burn boot-loader is chosen.(Target MCU will be programmed via SPI pins) Only for the first time, when WiLoaderFX software is not running, Arduino opens the WiLoaderFX software by calling the WiLoaderInterface. Then, the user should press the scan button and choose a WiLoader inside the WiLoaderFX software.
User Manual WiLoader Revision G Connecting to Atmel Studio For connecting to the Atmel Studio, the user can select the External Tools from the Tools menu, and fill the Title field with the desired name (for example, WiLoader) and then fill the Command field with WiLoaderInterface file path. (When there is space in WiLoaderInterface path, its better to put the whole path inside “ ”) .
User Manual WiLoader Revision G the Atmel Studio with the project path. Finally, the green arrow (start without debugging) can be utilized in order to program the MCU. Connecting to CodeVision AVR The connection to this software is similar to Atmel Studio. In this application, the user should select the Execute User's Program option inside After Make tab in project properties and then enter the necessary parameters by pressing the Program Settings button.
User Manual WiLoader Revision G After performing the mentioned tasks, the user can program the MCU using WiLoader. www.wiloader.com info@petuniatech.