PetSafe In-Ground Fence ® ™ Operating and Training Guide Please read this entire guide before beginning.
Thank you for choosing PetSafe®, the best selling brand of electronic training solutions in the world. Our mission is to be the most trusted brand in the pet ownership experience. We want to ensure your pet’s safety by providing you with the tools and techniques to successfully train your pet. If you have any questions, please contact the Customer Care Center at 1-800-732-2677 or visit our website at www.petsafe.net.
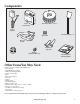
Components Fence Transmitter Boundary Wire - 500 ft.
How the System Works A radio signal travels from the Fence Transmitter through a buried wire, marking the boundaries you wish to set for your dog. Your dog wears a Receiver Collar that detects the signal at the boundary. As your dog approaches the boundary, the receiver issues a warning tone. If he proceeds further, he receives a safe but startling Static Correction. While harmless, the correction will persuade him to stay in the containment area you’ve established.
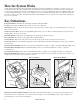
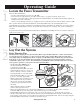
Operating Guide Step 1 Locate the Fence Transmitter Place the Fence Transmitter: • In a dry, well ventilated, protected area (1A, 1B). • In an area where temperatures do not fall below freezing (e.g., garage, basement, shed, closet). • Secured to a stationary surface using appropriate mounting hardware (not included). A mounting template is included in the back of this guide. • At least 3 feet from large metal objects or appliances as these items may interfere with the signal consistency (1C).
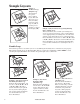
Sample Layouts Sample 1: Perimeter Loop (Single Loop) The Perimeter Loop is the most common layout. This will allow your pet to freely and safely roam your entire property (2C). It can also protect gardens, pools and landscaping (2D). C B D A E Sample 2 (2E): Perimeter Loop Using Existing Fence (Single Loop) This layout allows you to include your existing fence as part of your layout and keep your pet from jumping out or digging under your existing fence.
Sample 6 (2J): Wire Loop Attached to Existing Fence (Double Loop) This layout allows you to include your existing fence as part of your layout and keep your pet from jumping out or digging under your existing fence. It reduces the amount of wire which will need to be buried. Run the wire from the Fence Transmitter to A, A to B, B to C, C to D, D to E, E to F, make a U-turn and follow your path all the way back to A, keeping the wire separated 3 to 5 feet. Twist the wire from A back to the Fence Transmitter.
Additional Boundary Wire Extra direct burial Boundary Wire can be purchased in 500 foot spools at the store where you purchased the kit or through the Customer Care Center at 1-800-732-2677. Note:When adding Boundary Wire, it must act as a continuous loop. The table at right indicates the approximate length of Boundary Wire needed for a square, Single Loop layout. Length will vary due to the amount of twisted wire and layout used.
Over Correction Protection In the unlikely event that your pet “freezes” in the Static Correction Zone, this feature limits the static correction duration to a maximum of 30 seconds. While the system locks out further static correction, the warning tone will continue until the pet leaves the Static Correction Zone.
Next walk all around the Pet Area to ensure there are no areas where the Receiver Collar may activate from signals coupled onto buried wires or cables. Test the collar in and around the inside or the house as well. As mentioned, cable and wires from cable TV, electrical or telephone lines may conduct pet fencing signals inside and outside the house that can activate the dog’s collar accidentally.
To Cross Hard Surfaces (driveways, sidewalks, etc.) • Concrete Driveway or Sidewalk (7D): Place the Boundary Wire in a convenient expansion joint or create a groove using a circular saw and masonry blade. Place the Boundary Wire in the groove and cover with an appropriate waterproofing compound. For best results, brush away dirt or other debris before patching. • Gravel or Dirt Driveway (7E): Place the Boundary Wire in a PVC pipe or water hose to protect the Boundary Wire before burying.
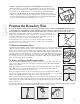
4. Check the tightness of the Receiver Collar by inserting one finger between the end of a Contact Point and your pet’s neck. The fit should be snug but not constricting (9B). 5. Allow your pet to wear the collar for several minutes then recheck the fit. Check the fit again as your pet becomes more comfortable with the Receiver Collar. 6. Once you are satisfied with the fit of the Receiver Collar then you may trim any excess collar strap as follows (9C): a.
Training Guide Be Patient With Your Pet Important: Proper training of your pet is essential to the success of the PetSafe® In-Ground Fence™. Read this section completely before beginning to train your pet. Remember that the PetSafe® In-Ground Fence™ is not a solid barrier. • Have fun with your pet throughout the training process. Training should be fun, fair, firm and consistent. • Train for 10 to 15 minutes at a time. Don’t try to do too much too quickly.
Phase 2 Days 3 and 4 - Continue Boundary Flag Awareness Perform three training sessions per day, each lasting 10-15 minutes. Goal: To introduce your pet to the Static Correction and teach where it happens. Setup: • Place the Receiver Collar on your pet’s neck. • Put a separate non-metallic collar on your pet’s neck ABOVE the Receiver Collar and attach a leash. Note: Be sure the extra collar does not put pressure on the Contact Points.
Steps: 1. Enter the pet area with your pet wearing the Receiver Collar. 2. Walk around the yard and play with your pet, staying within the Pet Area at all times. 3. Preoccupy yourself with another task in the yard while watching your pet. 4. Should your pet escape, take the Receiver Collar off or turn the system off at the Fence Transmitter and lead him back into the Pet Area.
Troubleshooting Receiver Collar is not beeping or correcting. • Check battery to make sure it is installed properly. • Check that both lights are lit on the Fence Transmitter. If not, perform the “Short Loop Test” (page 17). The Receiver Collar is beeping, but the pet is not responding to the Static Correction. • Test the Receiver Collar with the Test Light walking toward the Boundary Wire. • If the Test Light flashes, check the fit of the Receiver Collar.
Short Loop Test The Short Loop Test is a simple test to determine if each component (Fence Transmitter, Receiver Collar and Boundary Wire) is functioning properly. 1. Disconnect the Boundary Wire. 2. Cut approximately 10 feet of unused Boundary Wire and connect it to the Boundary Wire Terminals. 3. Spread the Boundary Wire out into a circle. Set the Boundary Control Switch to B. 4. Set the Boundary Width Control knob to 10. 5.
Terms of Use and Limitation of Liability 1. Terms of Use This Product is offered to you conditioned upon your acceptance without modification of the terms, conditions and notices contained herein. Usage of this Product implies acceptance of all such terms, conditions, and notices. 2. Proper Use This Product is designed for use with pets where training is desired. The specific temperament of your pet may not work with this Product.
Caution The PetSafe® In-Ground Fence™ is NOT a solid barrier. The system is designed to act as a deterrent to remind pets by electric stimulation to remain in the boundary established. It is important that you reinforce training with your pet on a regular basis. Since the tolerance level to electrical stimulation varies from pet to pet, Radio Systems® Corporation CANNOT guarantee that the system will, in all cases, keep a pet within the established boundary.
Layout Grid Mounting Template 3.000" (7.62 cm) Radio Systems® Corporation 10427 Electric Avenue Knoxville, TN 37932 1-800-732-2677 www.petsafe.net Protected by US Patents 6,921,089 and D515,027. Other patents pending.