
Owner's Manual
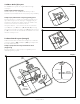
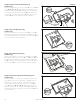
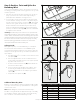
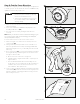
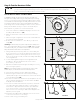
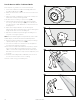
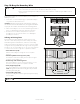
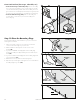
Table Of Contents

1- 8 0 0 - 732 - 26 7 718
Test the Receiver Collar—Traditional Mode
These steps are very similar to the ones we used in Step 8.
1. Set the fence transmitter to Traditional mode (B) and turn the
boundary width dial up to 7 (9E).
2. Make sure that the static correction on the receiver collar is set to
level 6.
3. Place the test light tool against the receiver collar contact points
and hold the contact points facing upwards.
4. Hold the receiver collar at your pet’s neck height (9F).
5. Starting inside the pet area, slowly approach the boundary
wire until you hear the warning tone (9G). 2 seconds later, the
test light will begin to flash. Walk back into the pet area until the
beeping stops.
6. Adjust the boundary width dial to set the warning zone
appropriately. We recommend setting it so that the warning zone
begins at least 10 ft. before the boundary wire.
7. Repeat this test at different places along the boundary wire to
verify that it is working everywhere.
Note: To ensure that the signal is not coupled to any wires or other
metallic objects, we will do one more test inside the pet area.
8. With the test light tool and receiver collar contact points facing
upward, walk throughout the pet area (9H).
9. If the receiver collar does not activate in the pet area (where it
should not) then things are going great.
10. If the receiver collar does activate within the pet area, it means
that you need to adjust the boundary wire where it crosses a
cable or electrical wire or approaches another metallic object.
Refer back to the instructions in Step 1. After the adjustment, retest
the system.
11. Now that the boundary width is established, set the correction
level on the receiver collar to level 1 for training.
12. Now it is safe to bury your boundary wire!
1
AB
1
0
2
5
6
7
8
9
4
3
Set the dial
to 7
Mode B
9E
9F
Boundary
Wire
9G
Pet Area
9H