
Owner's Manual
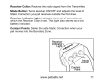
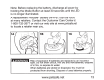
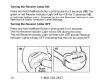
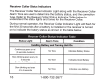
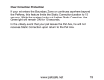
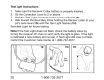
Table Of Contents

Step
1 -
Prepare
the
Receiver
Collar
Your Receiver Collar
comes
with short
Contact
Points installed.
Use
the
Long
Contact
Points
for
pets with
long
or
thick
hair.
Tighten the
Contact
Points using the
Contact
Point Wrench (1A).
Check
tightness weekly.
To
Insert
and
Remove
the
Receiver
Collar
Battery
Note: Do
not
install
the
battery while
the
Receiver
Collar is
on
your
pet.
This Receiver Collar
utilizes a
replaceable PetSafe®
battery (RFA-67).
This unique battery is designed
to
make battery replacement easier
and increase water protection. Once
you
insert
the
battery and turn it
to
the
lock position,
the
unit will
be turned
ON.
To
insert the battery, align
the
symbols on the battery (arrow) and
Receiver
Collar
(triangle)
(1
B). Use the edge
of
the
Test Light Tool
(1
B)
to
turn
the
battery clockwise until
the
arrow lines
up
with
the
lock
symbol on
the
housing.
To
remove the battery, turn
the
battery counter-clockwise using the
edge
of
the Test Light
Tool
(1C).
DO NOT
attempt
to
cut
into
or
pry
open
the
battery. Be sure
to
discard the used battery properly.
12
1-800-732-2677