
Owner's Manual
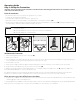
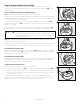

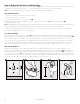
Table Of Contents

1- 8 0 0 - 732 - 26 7 78
Step 2: Prepare the Receiver Collar
Your Receiver Collar comes with short Contact Points installed. Use the Long Contact Points for
pets with long or thick hair. Tighten the Contact Points using the Contact Point Wrench (2A). Check
tightness weekly.
Insert and Remove the Receiver Collar Battery
Note: Do not install the battery while the Receiver Collar is on your pet.
This Receiver collar utilizes a replaceable PetSafe
®
battery (RFA-67). This unique battery is designed to
make battery replacement easier and increase water protection. Once you insert the battery and turn it
to the lock position, the unit will be turned ON.
To insert the battery, align the symbols on the battery (arrow) and Receiver Collar (triangle) (2B). Use
the edge of the Test Light Tool (2B) to turn the battery clockwise until the arrow lines up with the lock
symbol on the housing.
To remove the battery, turn the battery counter-clockwise using the edge of the Test Light Tool (2C).
DO NOT attempt to cut into or pry open the battery. Be sure to discard the used battery properly.
Risk of explosion if batteries are replaced by an incorrect type. Do not short
circuit, mix old and new batteries, dispose of in fire, or expose to water. When
batteries are stored or disposed, they must be protected from shorting. Dispose
of used batteries properly.
Note: Before replacing the battery, discharge all power by holding the Mode Button at least 30
seconds until the LED is no longer illuminated.
A replacement PetSafe
®
battery (RFA-67) can be found at many retailers. Contact the Customer Care
Center at 1-800-732-2677 or visit our web site at www.petsafe.net to locate a retailer near you.
Turn the Receiver Collar ON
Press and hold the Mode Button continuously for 5 seconds (2D) The green or red Receiver Indicator
Light will turn ON for 5 seconds (2E) to indicate battery status, followed by the red Receiver Indicator
Light flashing the Static Correction level settings.
Turn the Receiver Collar OFF
Press and hold the Mode Button continuously for 5 seconds. The red Receiver Indicator Light will be
ON during this time. The red Receiver Indicator Light will then turn OFF and all Receiver Indicator
Lights will stay OFF indicating that the unit is turned OFF.
Set the Static Correction Level
Read all steps before attempting to set the Static Correction Level.
1. Press the Mode Button and release (2D) when the Receiver Indicator Light illuminates Red (2E).
2. The Receiver Indicator Light will emit a series of red flashes representing the Static Correction Level.
3. Increase the Static Correction Level by pressing and releasing the Mode Button within 5 seconds
of the previous series of flashes.
The Static Correction Levels increase in strength from 1 to 6. Pushing the Mode Button while the
Receiver Collar is on Level 6 will cause the Receiver Collar to revert to Level 1. Refer to the Function
and Response Table to choose the Static Correction Level that best fits your pet.
Mode
Button
2E
2D
2C
2B
2A