
Owner's Manual
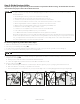
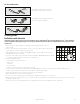
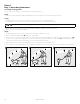
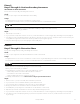
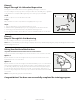
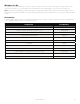
Table Of Contents

1- 8 0 0 - 732 - 26 7 712
Step 5: Fit the Receiver Collar
Important: The proper fit and placement of your Receiver Collar is important for effective training. The Contact Points must have
direct contact with your pet’s skin on the underside of his neck.
Please read and follow the instructions in this manual. Proper fit of the collar is important. A collar worn for too long or made
too tight on the pet’s neck may cause skin damage ranging from redness to pressure ulcers; this condition is commonly
known as bed sores.
• Avoid leaving the collar on your pet for more than 12 hours per day.
• When possible reposition the collar on the pet’s neck every 1 to 2 hours.
• Check the fit to prevent excessive pressure; follow the instructions in this manual.
• Never connect a lead to the electronic collar; it will cause excessive pressure on the contacts.
• When using a separate collar for a lead, don’t put pressure on the electronic collar.
• Wash your pet’s neck area and the contacts of the collar weekly with a damp cloth.
• Examine the contact area daily for signs of a rash or a sore.
• If a rash or sore is found, discontinue use of the collar until the skin has healed.
• If the condition persists beyond 48 hours, see your veterinarian.
• For additional information on bed sores and pressure necrosis, please visit our website.
These steps will help keep your pet secure and comfortable. Millions of pets are comfortable while they wear stainless steel
contacts. Some pets are sensitive to contact pressure. You may find after some time that your pet is very tolerant of the collar.
If so, you may relax some of these precautions. It is important to continue daily checks of the contact area. If redness or
sores are found, discontinue use until the skin has fully healed.
To assure a proper fit, please follow these steps:
1. Make sure that the battery is not installed in the Receiver Collar.
2. Start with your pet standing comfortably (5A).
3. To make it easier to hear the warning tone, place the Receiver Collar on your pet with the logo side of receiver facing up.
4. Center the Contact Points underneath your pet’s neck, touching the skin.
You may need to trim the hair in the area of the Contact Points. Never shave the dog’s neck; this may lead to a rash or infection.
5. Check the tightness of the Receiver Collar by inserting one finger between the end of a Contact Point and your pet’s neck. The fit should be
snug but not constricting (5B).
a. Allow your pet to wear the collar for several minutes then recheck the fit.
b. Check the fit again as your pet becomes more comfortable with the Receiver Collar.
6. Trim the collar as follows (5C):
a. Mark the desired length of the Receiver Collar with a pen. Allow for growth if your pet is young or grows a thick winter coat.
b. Remove the Receiver Collar from your pet and cut off the excess.
c. Before placing the Receiver Collar back onto your pet, seal the edge of the cut collar by applying a flame along the frayed edge.
5A
5B
5C