
Owner's Manual
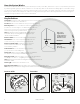
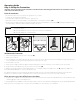
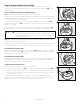

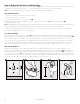
Table Of Contents

1- 8 0 0 - 732 - 26 7 710
Step 3: Adjust the Pet Area to Desired Size
Make sure the entire Pet Area lies within your property boundaries (3A). Always start determining the Boundary Zone at the shortest distance
from Transmitter. Place the Boundary Switch on “–” if the Boundary Zone will be less than 45 feet from the Transmitter.
Note: If your next-door neighbor has a containment system, see Troubleshooting section page 20.
Test Light Instructions
1. Make sure the Receiver Collar battery is properly installed.
2. Set the correction Level to 2 or above.
3. Hold the Test Light Contacts to the Contact Points (3B).
4. Walk toward the Boundary Zone holding the Receiver Collar at your pet’s neck level (3C) until the Test Light flashes (3D).
Save Test Light for future testing.
Note: If the Test Light does not flash, check the battery status by turning the receiver off, then on and verify the light is green. If the light is red
install a new battery and re-test. If Test Light still does not flash, contact the Customer Care Center at 1-800-732-2677.
To maximize your Pet Area, make sure the Boundary Switch is on “+” and the Boundary Control Dial is set to “8”. Plug Power Adapter into
Power Jack and standard 120 volt outlet. Turn the transmitter on.
Two-Person Method
Hold the Receiver Collar at your pet’s neck height (3C) with logo side facing away from the Transmitter and Contact Points facing upwards.
Walk to the edge of the desired Pet Area. Facing away from the Transmitter, hold the Receiver Collar at the edge of the desired Pet Area (3D).
Starting with the Boundary Control Dial set to “8”, have a second person turn the dial down SLOWLY. When the Receiver Collar tone starts,
tell the person to stop turning the Boundary Control Dial. Walk back into the Pet Area until the receiver stops sounding. Verify the Pet Area
boundary by walking towards the Boundary Zone and verifying that the tone/test light flashes begin at the desired location. Test at multiple
locations around the Pet Area to verify the Pet Area is within your desired location. Record your settings on page11 for future reference.
One-Person Method
Measure the shortest distance from the desired Boundary Zone to the Transmitter. Find the distance on the Transmitter Range Chart on
page11and set the Boundary Switch and Boundary Control Dial. Hold the Test Light Contacts to the Contact Points (3B). Take the Receiver
Collar to the Boundary Zone with the logo side facing away from the Transmitter and Contact Points facing upwards (3D). Hold the Receiver
Collar at your pet’s neck level (3C) until the Receiver Collar tone sounds and the Test Light flashes. If the Receiver Collar tone sounds before or
after the desired Boundary Zone, return to the Transmitter and adjust the Boundary Control Dial. Repeat this process until the Receiver Collar
tone sounds at the desired location. Record your settings on page11 for future reference.
Pet Area
Street
Pet
Area
B
o
u
n
d
a
r
y
Z
o
n
e
3A
3C
3D3B