Operating Guide PIF00-15001 Free to Roam Wireless Fence™ Please read this entire guide before beginning
Hereinafter Radio Systems Corporation, Radio Systems PetSafe Europe Ltd., Radio Systems Australia Pty Ltd. and any other affiliate or Brand of Radio Systems Corporation may be referred to collectively as “We” or “Us”. Important Safety Information Explanation of Attention Words and Symbols used in this guide This is the safety alert symbol. It is used to alert you to potential personal injury hazards. Obey all safety messages that follow this symbol to avoid possible injury or death.
These steps will help keep your pet secure and comfortable. Millions of pets are comfortable while they wear stainless steel contacts. Some pets are sensitive to contact pressure. You may find after some time that your pet is very tolerant of the collar. If so, you may relax some of these precautions. It is important to continue daily checks of the contact area. If redness or sores are found, discontinue use until the skin has fully healed. • You may need to trim the hair in the area of the Contact Points.
Thank you for choosing PetSafe® brand. You and your pet deserve a companionship that includes memorable moments and a shared understanding together. Our products provide you with the tools and technologies to successfully train your pet. If you have any questions about our products or training your pet, please visit our website at www.petsafe.net or contact our Customer Care Center at 1-800-732-2677. To get the most protection out of your warranty, please register your product within 30 days at www.petsafe.
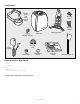
Components Receiver Collar with Short Contact Points Mounting Screws Mounting Anchors Transmitter Battery (PetSafe® RFA-67) Mounting Bracket Test Light Tool Power Adapter Long Contact Points Contact Point Wrench Quick Start Guide Boundary Flags - 50 Other Items You May Need • • • • • • Scissors Lighter Screw Driver Drill Tape measure Non-metallic collar and leash or lead Set up and training help: www.petsafe.net www.petsafe.
How the System Works The PetSafe® Free to Roam Wireless Fence™ system has been proven safe, comfortable, and effective for pets over 5 pounds. The system works by transmitting a radio signal up to 90 feet in all directions. You temporarily define the Pet Area with Boundary Flags for a visual aid in training your pet. Your pet wears a Receiver Collar with Contact Points that touch his neck, and, once trained, is allowed to roam freely in the Pet Area.
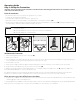
Operating Guide Step 1: Set Up the Transmitter Important: You may need to move the Transmitter several times before determining the final location. The Transmitter is located at the exact center of the Pet Area. Place the transmitter: • • • • • At least 2 feet above the floor located on the ground floor of your home. In a dry, well ventilated, protected area. In an area where temperatures do not fall below -10°F (-23°C).
Step 2: Prepare the Receiver Collar Your Receiver Collar comes with short Contact Points installed. Use the Long Contact Points for pets with long or thick hair. Tighten the Contact Points using the Contact Point Wrench (2A). Check tightness weekly. 2A Insert and Remove the Receiver Collar Battery Note: Do not install the battery while the Receiver Collar is on your pet. This Receiver collar utilizes a replaceable PetSafe ® battery (RFA-67).
Receiver Collar Status Indicators The Receiver Collar Status Indicator Light along with the Receiver Collar Alarm Tone are used to determine the battery status, and the correction type. Refer to the Receiver Collar Status Indicator Table below to understand the status lights and tones for the Receiver Collar.
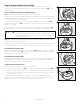
Step 3: Adjust the Pet Area to Desired Size Make sure the entire Pet Area lies within your property boundaries (3A). Always start determining the Boundary Zone at the shortest distance from Transmitter. Place the Boundary Switch on “–” if the Boundary Zone will be less than 45 feet from the Transmitter. Note: If your next-door neighbor has a containment system, see Troubleshooting section page 20. Test Light Instructions 1. Make sure the Receiver Collar battery is properly installed. 2.
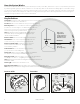
Transmitter Range Chart Boundary Control Dial Position Boundary Switch “–” Boundary Switch “+” 1 5-10 ft. 5-10 ft. 2 5-10 ft. 5-10 ft. 3 15-20 ft. 25-35 ft. 4 20-25 ft. 42-55 ft. 5 25-30 ft. 55-65 ft. 6 35-40 ft. 75-85 ft. 7 40-45 ft. 85-90 ft. 8 40-45 ft. 85-90 ft. Note: These distances are approximate.
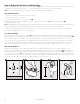
Step 5: Fit the Receiver Collar Important: The proper fit and placement of your Receiver Collar is important for effective training. The Contact Points must have direct contact with your pet’s skin on the underside of his neck. Please read and follow the instructions in this manual. Proper fit of the collar is important. A collar worn for too long or made too tight on the pet’s neck may cause skin damage ranging from redness to pressure ulcers; this condition is commonly known as bed sores.
Re-Thread the Collar Slide Buckle Ridges The slide buckle prevents the collar from becoming loose around your pet’s neck. The ridges must be facing up;the collar will slip if it is not properly threaded. Training Guide Be Patient with Your Pet Important: Proper training of your pet is essential to the success of the PetSafe® Free to Roam Wireless Fence™ system. Read this section completely before beginning to train your pet.
Phase 1 Day 1—Boundary Awareness Tone Only Training Mode Perform three sessions on day 1, each training session lasting 10–15 minutes. Goal: To have your pet learn that the Boundary Flags and warning tone from the Receiver Collar define the new Pet Area. Setup: • Program the Static Correction Level on the Receiver Collar to Level 1 Tone Only training mode. • Put a separate non-metallic collar on your pet’s neck ABOVE the Receiver Collar and attach a leash.
Phase 2 Days 2 Through 4—Continue Boundary Awareness Introduction to Static Correction Perform three sessions per day, each lasting 10–15 minutes. Goal: To train your pet to stay in the Pet Area and respect the boundary. Setup: • Program the Static Correction Level on the Receiver Collar to Level 2. • Put a separate non-metallic collar on your pet’s neck ABOVE the Receiver Collar and attach a leash. Be sure the extra collar does not put pressure on the Contact Points.
Phase 4 Days 9 Through 14—Unleashed Supervision Training sessions should start at 10–15 minutes, gradually increasing to over an hour. Your pet is ready for this step only when he clearly avoids the entire Boundary Zone, regardless of any distractions or temptations. During this step, do not leave your pet unattended. Goal: To give your pet free run of the Pet Area off the leash. Setup: Adjust the Receiver Collar to the permanent setting appropriate for your pet. Steps: 1. 2. 3. 4.
Wireless–to–Go Your PetSafe® Free to Roam Wireless Fence™ system is completely portable. Follow the set-up procedures (steps 1 through 4) wherever you wish to have containment of your pet. Reestablish the Pet Area and mark it with Boundary Flags so your pet knows his Boundary Zone. Note: If setting up in a metal building or vehicle, the maximum size of the Pet Area may be reduced. Be sure to remove the Receiver Collar battery before turning off the Transmitter.
Frequently Asked Questions 18 Is the Receiver Collar waterproof? • Yes. When changing the battery, be sure to keep the battery area free from dirt and debris. Will the PetSafe® Free to Roam Wireless Fence™ system cover a larger circle than 180 feet across? • You can use another Wireless Transmitter with overlapping boundaries of at least 10 feet to increase the size of the Pet Area. Will a sloping yard or hills affect the Pet Area? • The Transmitter signal extends 90 feet in all directions.
Frequently Asked Questions How often do I need to replace the Receiver Collar battery? • The expected battery life is between 1-2 months. Battery life depends on how frequently your pet tests the Boundary Zone. The receiver Indicator Light acts as a low battery indicator, flashing every 4 to 5 seconds when replacement is required. Can I place the receiver on another collar? • Yes. You may use any non-metallic collar that is 3/4 inch wide.
Troubleshooting 20 The Receiver Collar tone is not sounding when setting up the Boundary Zone. • The tone may be difficult to hear in a noisy environment. • Use Test Light as explained in the “Test Light Instructions” section, and use it to determine the location of Boundary Zone. • Check that the Transmitter is set up according to directions and install a new Receiver Collar battery. The Receiver Collar tone is not sounding or administering a Static Correction.
Troubleshooting The Transmitter Power Light is not on. • Make sure the Power Adapter is plugged into a working 120 volt wall outlet. • Verify that the outlet is working properly by plugging in a known working item such as a radio. • If the Power Light still does not come on, the Fence Transmitter and/or Power Adapter needs to be replaced. Contact the Customer Care Center. I was setting up the Pet Area and after I turned down the Boundary Control Dial, the Receiver Collar would no longer tone or correct.
Terms of Use and Limitation of Liability 1. Terms of Use This Product is offered to you conditioned upon your acceptance without modification of the terms, conditions and notices contained herein. Usage of this Product implies acceptance of all such terms, conditions, and notices. 2. Proper Use This Product is designed for use with pets where training is desired. The specific temperament of your pet may not work with this Product.
Perchlorate Battery Perchlorate Material—special handling may apply. See www.dtsc.ca.gov/hazardouswaste/perchlorate. Warranty One Year Non-Transferrable Limited Warranty This Product has the benefit of a limited manufacturer’s warranty. Complete details of the warranty applicable to this Product and its terms can be found at www.petsafe.net and/ or are available by contacting your local Customer Care Center.
Radio Systems Corporation 10427 PetSafe Way Knoxville, TN 37932 1-800-732-2677 www.petsafe.net Protected by US Patents 6,879,300; 6,921,089; 7,142,167 and D515,027.
Expand Your Pet’s Wireless Fence
Expand Your Pet Area with the Use of Additional Transmitters You can increase the coverage of your pet’s wireless fence by overlapping the ranges of 2 transmitters. Overlapping the ranges of 2 transmitters creates one continuous area for your pet. You can even combine different models of PetSafe® wireless transmitters. Refer to the product manual or quick start guide for the range of each transmitter.
Expand Your Pet Area with the Use of Additional Transmitters The maximum range is at least 90 ft. on any of the PetSafe® Wireless Fence systems. It is recommended that you place the 2 transmitters no more than 150 ft. apart. This allows for 30 ft. of overlap coverage. You will need to test the pet area and boundary range using the receiver collar. 90 ft. radius PET AREA Guest House 30 ft. of overlap 90 ft. radius The maximum distance between 2 transmitters is 150 ft.
Safety Information Please review all safety and compliance information provided with the products that you will be using. To prevent an unintended correction, remove the receiver collar from your pet when indoors. Guest House PET AREA No overlap PET AREA = Transmitter Example 3 This example shows how NOT to set up 2 transmitters. Without overlap between the 2 transmitters, your pet will receive static correction in the area between the coverage zones. Coverage overlap should be at least 30 ft.
Pet Fence Planner Visit petsafe.com/petfenceplanner for assistance in finding the perfect placement for your fence transmitter. This is an online tool to help you visualize the approximate coverage area of a wireless fence on your property. Enter your address and Google maps will pull up an aerial view of your property. Click on the (+) sign and a circle will appear over your location showing the maximum coverage. The coverge circle can be moved around and the coverage radius can be reduced.