
Installation Guide

Operating Guide
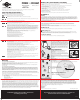
Step 1: Set Up the Transmitter
Important: You may need to move the Transmitter several times before determining the final location.
Do not mount the transmitter until you are satisfied with the containment area the transmitter
creates for your pet.
The Transmitter is located at the exact center of the Pet Area.
Place the transmitter:
• At least 2 feet above the floor located on the ground floor of your home.
• In a dry, well ventilated, protected area.
• In an area where temperatures do not fall below -10º F.
• Mounted to a wall, on a non-metal table or other hard surface to ensure proper ventilation (1A).
• At least 3 feet from large metal objects, as these items may reduce the size and shape of your Pet Area (1B).
Placing the Transmitter inside a metal building or shed can reduce the maximum range of the system.
• Near a standard wall outlet.
See Manual for Transmitter mounting instructions.
Step 2: Prepare the Receiver Collar
Your Receiver Collar comes with short Contact Points installed. Use the
Long Contact Points for pets with long or thick hair
.
Tighten the Contact
Points using
the Contact Point Wrench
(2A)
. Check tightness weekly.
To Insert and Remove the Receiver Collar Battery
Note: Do not install the battery while the Receiver Collar is on your pet.
This Receiver Collar utilizes a replaceable PetSafe
®
battery (RFA-67).
This unique battery is designed to make battery replacement easier
and increase water protection. Once you insert the battery and turn it to
the lock position, the unit will be turned ON.
To insert the battery, align the symbols on the battery (arrow) and Receiver Collar (triangle) (2B). Use the edge of the Test Light Tool (2B)
to turn the battery clockwise until the arrow lines up with the lock symbol on the housing.
To remove the battery, turn the battery counter-clockwise using the edge of the Test Light Tool (2C).
DO NOT attempt to cut into or pry open the battery. Be sure to discard the used battery properly.
Before replacing the battery, discharge all power by holding the Mode Button down at
least 30 seconds until the LED is no longer illuminated.
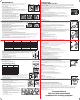
Turning the Receiver Collar ON
Press and hold the Mode Button continuously for 5 seconds (2D) The green or red Receiver
Indicator Light will turn ON for 5 seconds (2E) to indicate battery status, followed by the red
Receiver Indicator Light flashing the Static Correction Level Settings. The indicator light will then
flash the battery status for 30 seconds. Refer to the table below.
Turning the Receiver Collar OFF
Press and hold the Mode Button continuously for 5 seconds. The red Receiver Indicator Light will be
ON during this time. The red Receiver Indicator Light will then turn OFF and all Receiver Indicator Lights
will stay OFF indicating that the unit is turned OFF.
To Set the Static Correction Level
Read all steps before attempting to set the Static Correction Level.
1. Press the Mode Button and release (2D) when the Receiver Indicator Light illuminates Red (2E).
2. The Receiver Indicator Light will emit a series of red flashes representing the Static Correction Level.
3. Increase the Static Correction Level by pressing and releasing the Mode Button within 5 seconds of the previous series of flashes. The Static Correction
levels increase in strength from 1 to 6. Pushing the Mode Button while the Receiver Collar is on level 6 will cause the Receiver Collar to revert to
level 1. Refer to the Function and Response Table to choose the Static Correction level that best fits your pet.
Over Correction Protection
If your pet enters the Boundary Zone or continues anywhere beyond the Pet Area, this feature limits the Static Correction duration to 15 seconds.
While the system locks out further Static Correction, the Green light will remain ON for 10 seconds.
In the unlikely event that your pet leaves the Pet Area, he will not receive a Static Correction upon return to the Pet Area.
Step 3: Adjust the Pet Area to Desired Size
Make sure the entire Pet Area lies within your property boundaries (3A). Always start determining the Boundary Zone at the
shortest distance from the Transmitter. Place the Boundary Switch on “-“ if the Boundary Zone will be less than 45 feet from
the Transmitter. For larger Pet Areas, make sure the Boundary switch is on “+” and the Boundary Control Dial is set to “8” (3B).
Plug Power Adapter into Power Jack and standard 120 volt outlet. Turn the Transmitter ON. See the Transmitter
Range Chart below for approximate settings and distances.
Test Light Instructions
1. Make sure the Receiver Collar battery is properly installed.
2. Set the Correction Level to 2 or above.
3. Hold the Test Light Contacts to the Contact Points (3C).
4. Hold the Receiver Collar at your pet’s neck height (3D) with the logo side facing away from the Transmitter and
the Contact Points facing upwards.
When the collar tones and the Test Light illuminates, this represents the Boundary Zone (3E). To adjust the Pet Area either
turn the Boundary Control Dial SLOWLY up or down to change the size or move the Transmitter within your home to
adjust the location of the Pet Area.
Adjust Boundary to achieve the desired distance/range.
Test at multiple locations around the Pet Area.
Function and Response Table
Indicator Light Response Static Correction Level Receiver Collar Function Temperament of Pet
1 Red Flash 1 No Static Correction, Tone Only Initial Training Mode
2 Red Flashes 2 Low Static Correction Timid
3 Red Flashes 3 Medium-Low Static Correction Timid or Average
4 Red Flashes 4 Medium Static Correction Average Energy
5 Red Flashes 5 Medium-High Static Correction Average or High Energy
6 Red Flashes 6 High Static Correction High Energy
Slow blinking green every 4-5
seconds (for the first 30 seconds)
Indicates Battery Status
Green = Good
Slow blinking red every
4-5 seconds
Indicates Battery Status
Red = Replace
Wall
Mount
Tabletop
1A
3ft.
1B
2A
2C
2B
2E
2D
Mode
Button
Transmitter Range Chart
Boundary
Control Dial
Position
Boundary
Switch
“–”
Boundary
Switch
“+”
1 5-10 ft. 5-10 ft.
2 5-10 ft. 5-10 ft.
3 15-20 ft. 25-35 ft.
4 20-25 ft. 42-55 ft.
5 25-30 ft. 55-65 ft.
6 35-40 ft. 75-85 ft.
7 40-45 ft. 85-90 ft.
8 40-45 ft. 85-90 ft.
Note: These distances are approximate.
The Transmitter has a built-in Power Loss Alarm that sounds a tone indicating power has been removed from
the Transmitter. If power is removed from the unit, your pet is no longer contained. The alarm will sound for
at least 20 minutes. There are 2 ways to turn off the Power Loss Alarm:
1. Plug the power cord back into a functional 120-volt outlet, restoring power to the unit.
2. Unplug the power adapter from the power jack located on the bottom of the Transmitter, indicating power
is intentionally being suspended.
Step 4: Place the Boundary Flags
1. Using the Test Light, with the Static Correction level set at 2 or greater, hold the Receiver Collar at your
pet’s neck height with logo side facing away from the Transmitter.
2. Walk towards the Boundary Zone until the Receiver Collar tone sounds and the Test Light flashes. (4A).
3. Place a Boundary Flag in the ground (4B).
4. Walk back into the Pet Area until the repeating tone stops.
5. Repeat this process around the Boundary Zone until it is marked with Boundary Flags every 10 ft.
Step 5: Fit the Receiver Collar
Important: The proper fit and placement of your Receiver Collar is important for effective training.
The Contact Points must have direct contact with your pet’s skin on the underside of his neck.
To assure a proper fit, please follow these steps:
1. Make sure that the battery is not installed in the Receiver Collar.
2. Start with your pet standing comfortably (5A).
3. Place the Receiver Collar on your pet with the logo side of Receiver facing up.
4. Center the Contact Points underneath your pet’s neck, touching the skin.
5. Check the tightness of the Receiver Collar by inserting one finger between the
end of a Contact Point and your pet’s neck. The fit should be snug but
not constricting (5B).
a. Allow your pet to wear the collar for several minutes then recheck the fit.
b. Check the fit again as your pet becomes more comfortable with
the Receiver Collar.
6. Trim the Collar (see manual for details).
4A
4B
5A
5B
3C
3D
B
o
u
n
d
a
r
y
Z
o
n
e
Pet
Area
3E
Pet
Area
STREET
3A
Training Guide
Be Patient With Your Pet
Important: Proper training of your pet is essential to the success of the PetSafe
®
Free to Roam Wireless Fence™ system.
Read this section completely before beginning to train your pet. Remember that the PetSafe Free to Roam Wireless Fence
system is not a solid barrier.
• Have fun with your pet throughout the training process. Training should be fun, fair, firm and consistent.
• Train for 10 to 15 minutes at a time. Don’t try to do too much too quickly. More-frequent short sessions are better than less-frequent longer sessions.
• We suggest a minimum of 14 days of training. Depending on your pet and how he learns, the training could take more or less time.
• If your pet shows signs of stress, slow down the training schedule, add additional days of training, or increase the amount of
play time with your pet in the Pet Area.
Common stress signals include:
- Pet pulling on leash toward the house
- Ears tucked
- Tail down
- Body lowered
- Nervous / frantic movement or stiffening of pet’s body
• Your pet must be completely comfortable near the Boundary Flags at the end of every training session.
Spend at least 5 minutes of “play time” at the completion of each session within 10 feet of the Boundary Flags.
• Finish each training session on a positive note with lots of praise and play.
• Remove the Receiver Collar after each training session.
• Be sure to contain your pet by another means during the training period (e.g. pen, tie-out, leash, etc.).
• During training, if you need to take your pet out of the Pet Area, remove the Receiver Collar and either pick your pet up
or put him in the car to pass out of the Pet Area.
• Even if you think your pet is responding well to the training, complete the entire training. Reinforcement is important!
Phase 1
Day 1 - Boundary Awareness
Tone Only Training Mode
Perform three sessions on Day 1, each training session lasting 10-15 minutes.
Goal: To have your pet learn that the Boundary Flags and warning tone from the Receiver Collar define the new Pet Area.
Setup:
• Program the Static Correction Level on the Receiver Collar to Level 1 Tone Only training mode.
• Put a separate non-metallic collar on your pet’s neck ABOVE the Receiver Collar and attach a leash.
• Have tiny pieces of treats that your pet will find desirable available (hot dogs or lunch meat work well).
• Have your pet’s favorite play toy available.
Steps:
1. Begin by walking your pet on a leash in the Pet Area. Calmly praise and talk to your pet.
2. Move toward the Boundary Flags (1A). Keep your mood happy.
3. With full control of your pet on a leash, walk to the flags. As your pet enters the Boundary Zone, the Receiver Collar will
begin to tone (1B). Allow your pet to stay in the Boundary Zone for up to 2 seconds then gently help him back into the Pet
Area (1C). Immediately praise and offer your pet a treat as he enters the Pet Area, even if you have helped with the leash.
4. Repeat this process at the same Boundary Flag until your pet resists going into the Boundary Zone.
5. Aim to master 3-4 Boundary Flags per session. Make this FUN! Praise if your pet quickly retreats or resists
going into the Boundary Zone.
Phase 2
Days 2 thru 4 - Continue Boundary Awareness
Introduction to Static Correction
Perform three sessions per day, each lasting 10-15 minutes.
Goal: To train your pet to stay in the Pet Area and respect the boundary.
Setup:
• Program the Static Correction Level on the Receiver Collar to Level 2.
• Put a separate non-metallic collar on your pet’s neck ABOVE the Receiver Collar and attach a leash.
• Have tiny pieces of treats that your pet will find desirable available (hot dogs or lunch meat work well).
• Have your pet’s favorite play toy available.
Steps:
1. Repeat steps 1-5 in Phase One.
2. If your pet does not respond to the Static Correction, confirm that the Receiver Collar is fitting properly according to Step 5.
3. If the Receiver Collar is fitted properly and your pet does not respond to the Static Correction, increase the
Static Correction Level by 1.
Watch for slight reactions at first such as ears up, head turned, looking at the ground.
4. Stay at the same flag until your pet resists going into the Boundary Zone.
Phase 3
Days 5 thru 8 - Distraction Phase
Perform three training sessions per day, each lasting 10 to 15 minutes.
Goal: To train your pet to stay within the Pet Area with distractions outside of the Pet Area.
Setup:
• Program the Static Correction Level on the Receiver Collar to level 2 or higher depending on the reaction
results from days 2 thru 4.
• Put a separate non-metallic collar on your pet’s neck ABOVE the Receiver Collar and attach a leash.
• Have tiny pieces of treats available (hot dogs or lunch meat work well).
• Have your pet’s favorite play toy available.
• Create distractions to tempt your pet to enter the Boundary Zone, such as:
- Have a family member cross from inside the Pet Area to outside of it.
- Throw a ball or treat outside of the Pet Area.
- Have a neighbor walk their pet outside of the Pet Area.
• Gradually increase distraction level. Never coax or call your pet out of the Pet Area.
Steps:
1. With full control of your pet on a leash, have the distraction presented.
2. If your pet does not move toward the distraction, praise and offer a treat.
3. If your pet does react to the distraction, allow him to go into the Boundary Zone.
4. Help your pet back into the Pet Area if he does not turn back after 2 seconds.
5. Treat and praise your pet anytime he comes back into the Pet Area with or without help.
6. Repeat this process with other distractions. Use other family members during this process.
7. If your pet does not respond to the Static Correction, confirm that the Receiver Collar is fitting properly according to Step 5.
8. If the Receiver Collar is fitted properly and if your pet does not respond to the Static Correction, increase the
Static Correction Level by 1.
Phase 4
Days 9 thru 14 - Unleashed Supervision
Training sessions should start at 10-15 minutes, gradually increasing to over an hour.
Your pet is ready for this step only when he clearly avoids the entire Boundary Zone, regardless of any distractions
or temptations. During this step, do not leave your pet unattended.
Goal: To give your pet free run of the Pet Area off the leash.
Setup:
Adjust the Receiver Collar to the permanent setting appropriate for your pet.
Steps:
• Enter the Pet Area with your pet wearing the Receiver Collar.
• Walk around the yard and play with your pet, staying within the Pet Area at all times.
• Preoccupy yourself with another task in the yard while watching your pet.
• Should your pet escape, take the Receiver Collar off and lead him back into the Pet Area.
Phase 5
Days 15 thru 30 - Pet Monitoring
Your pet is ready to run! Check in on your pet at regular intervals.
Note: After you are satisfied your pet’s training is complete, remove every other Boundary Flag every 4 days until all flags are
removed. Save Boundary Flags for future use.
Taking Your Pet Out of the Pet Area
Important: Remove the Receiver Collar and leave it in the Pet Area.
Once your pet learns the Boundary Zone, he will be reluctant to cross it for walks or car rides.
Option 1: Replace the Receiver Collar with a regular collar. Put your pet in a car that is within the Pet Area and drive him
out of the Pet Area.
Option 2: Replace the Receiver Collar with a regular collar and leash. Walk your pet out of the Pet Area while giving a command such as “OK” at a specific
place of the Boundary Zone (the end of your driveway, sidewalk, etc.). Always leave the Pet Area with a leash at this place and your pet will associate
leaving the Pet Area only on a leash, only at this place, and only with a person. You may initially need to convince your pet to leave the Pet Area with
a food treat and lots of praise.
Note: You may also carry your pet out of the Pet Area.
Congratulations!
You have now successfully
completed the training program.
1 2345
67
8910 11 12
13 14
15 16 17 18 19
20 21
22 23 24 26
27 28
29 30 31
SMTWT FS
25
30
0
min.
45
15
1A
1B
1C
3B