PetSafe® In-Ground Cat Fence™ Extra Receiver Operating Guide / Manuel d’utilisation Handleiding / Manual de funcionamiento Betriebsanleitung / Guida all’uso Please read this entire guide before beginning Veuillez lire ce manuel en entier avant de commencer Gelieve deze gids volledig door te lezey voordat u begint Por favor, este manual lea completo antes de empazar Bitte lesen Sie die gesamte Betriebsanleitung vor dem Trainingsbeginn Si prega di leggere attentamente la guida al uso prima di utilizzare il co
Thank you for choosing PetSafe®, the best selling brand of electronic training solutions in the world. Our mission is to ensure your pet’s safety by providing you the tools and techniques to successfully train your pet. If you have any questions, please contact the Customer Care Centre or visit our website at www.petsafe.net. ___________________________________________________________________________ Table of Contents Prepare the Receiver Collar..............................................................
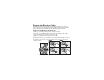
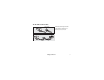
Prepare the Receiver Collar Your Receiver Collar comes with short Contact Points installed. Use the long Contact Points for cats with long or thick hair. Tighten the Contact Points with pliers one-half turn beyond finger tight (A). Check the tightness weekly. To Insert and Remove the Batteries 1. With a coin, unlock the Battery Door and remove it (B). 2. Insert two 3-volt Lithium (CR2032 batteries) into the Battery Door (B). 3. Place the Battery Door back into the Receiver (C). 4.
To set the Static Correction Level Read all the steps before attempting to set the Correction Level. 1. Place the magnet on the Correction Level Key Ring next to the Magnet Key Dot on the Receiver Collar. The Receiver Indicator Light will come on. 2. Remove the magnet from the Key Dot. The number of flashes indicates the Correction Level. 3. To increase the Correction Level, place the magnet next to the Magnet Key Dot within 5 seconds of performing the above step.
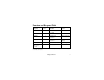
Function and Response Table Indicator Light Response Correction Level Receiver Collar Function Temperament of cat 1 Flash 1 No Static Correction, Beep Only 2 Flashes 2 Low Static Correction Timid 3 Flashes 3 Medium Static Correction Timid or Average 4 Flashes 4 Medium-High Static Correction Average or High Energy 5 Flashes 5 High Static Correction High Energy Flashes once every 4 to 5 seconds Low Battery Note: Begin training with Correction Level 2 and only increase if your cat does
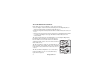
Fit the Receiver Collar Important: The proper fit and placement of your Receiver Collar is important for effective training. The Contact Points must have direct contact with your cat’s skin on the underside of his neck. To assure a proper fit, please follow these steps: D 1. Make sure that the batteries are not installed in the Receiver Collar. 2. Start with your cat standing comfortably (D). 3. Centre the Contact Points underneath your cat’s neck, touching the skin.
6. Trim the collar as follows (F): a. Mark the desired length of the Receiver Collar with a pen. Allow for growth if your cat is young or grows a thick winter coat. b. Remove the Receiver Collar from your cat and cut off the excess. c. Before placing the Receiver Collar back onto your cat, seal the edge of the cut collar by applying a flame along the frayed edge. E F www.petsafe.
Important: For comfort, safety and effectiveness of product, please ensure the following: • During the first 2 weeks of training, do not use the training device on your pet without direct supervision. • Check the fit to prevent excessive pressure by being able to insert one finger between the Contact Point and your pet’s skin. • Your pet must be carefully examined daily for any signs of a rash or sore. • If a rash or sore is observed, discontinue the use of the Receiver Collar for a few days.
To Re-Thread the Collar Slide Buckle The slide buckle prevents the collar from becoming loose around your cat’s neck. www.petsafe.
Terms of Use and Limitation of Liability 1. Terms of Use This Product is offered to you conditioned upon your acceptance without modification of the terms, conditions and notices contained herein. Usage of this Product implies acceptance of all such terms, conditions, and notices. 2. Proper Use This Product is designed for use with pets where training is desired. The specific temperament of your pet may not work with this Product. We recommend that you not use this Product if your pet is less than 2.
whatsoever arising out of or connected with the use or misuse of this Product. Buyer assumes all risks and liability from the use of this Product. 5. Modification of Terms and Conditions Radio Systems Corporation reserves the right to change the terms, conditions and notices under which this Product is offered. _________________________________________________ Caution The PetSafe In-Ground Cat Fence™ is NOT a solid barrier.
Compliance This equipment has been tested and found to comply with relevant EU Electromagnetic Compatibility, Low Voltage and R&TTE Directives. Before using this equipment outside the EU countries, check with the relevant local R&TTE authority. Unauthorised changes or modifications to the equipment that are not approved by Radio Systems Corporation are in violation of EU R&TTE regulations, could void the user’s authority to operate the equipment, and void the warranty.
Français Merci d’avoir choisi PetSafe™, le n 1 mondial des marques offrant des solutions de dressage électronique. Notre mission : assurer la sécurité de votre chien en vous fournissant des outils et des techniques de dressage efficaces. Pour toute question, veuillez contacter le Service d’assistance à la clientèle ou vous rendre sur notre site www.petsafe.net. ___________________________________________________________________________ Table des matières Préparation du collier récepteur ...................
Préparation du collier récepteur Les contacteurs courts sont montés sur le collier récepteur neuf. Utilisez les contacteurs longs pour les chats à poil long ou épais. Dans un premier temps resserrer les contacteurs avec vos doigts, terminer ensuite l’opération à l’aide d’une pince (sans forcer) pour obtenir un serrage optimal (A). Vérifiez le serrage toutes les semaines. Insérer et retirer les piles 1. Déverrouillez le couvercle du compartiment piles avec une pièce de monnaie puis retirez-le (B). 2.
Régler le niveau de correction Veuillez lire toutes les étapes avant de tenter de régler le niveau de correction. 1. Placez l’aimant du porté-clés magnétique sur le point blanc de contact pour l’aimant se trouvant sur le collier récepteur. Le voyant du récepteur s’allume. 2. Retirez le porte-clés magnétique. Le nombre de clignotements indique le niveau de correction. 3.
Indications du voyant lumineux Indications du Niveau de voyant lumineux correction Fonctionnement du collier récepteur 1 clignotement 1 2 clignotements 2 3 clignotements 3 4 clignotements 4 5 clignotements 5 Pas de correction électrostatique, bip uniquement Correction électrostatique faible Correction électrostatique modérée Correction électrostatique modérée à forte Correction électrostatique forte Pile faible Clignote toutes les 4 à 5 secondes Tempérament du chat Timide Timide ou dans la mo
Ajustement du collier récepteur Important: Pour un dressage efficace, il est important de bien ajuster et placer le collier récepteur. Les contacteurs doivent être en contact direct avec la peau de votre chat, sur la face inférieure du cou. Pour l’ajuster correctement, veuillez suivre les D étapes ci-dessous: 1. Vérifiez que les piles ne sont pas dans le collier récepteur. 2. Au départ, installez votre chat dans une position confortable (D). 3.
a. Marquez avec un stylo la longueur souhaitée du collier. Laissez de la marge si votre chat est jeune ou développe un pelage plus épais pendant l’hiver. b. Retirez le collier récepteur à votre chat et coupez la longueur en trop. c. Avant de remettre le collier récepteur à votre chat, soudez le bord du collier qui a été coupé en passant une flamme sur le bord effiloché. 18 E F www.petsafe.
Important: Pour une utilisation optimale, sûre et efficace du produit, soyez attentif aux points ci-après: • Pendant les 2 premières semaines de dressage, n’utilisez pas le dispositif de dressage sur votre animal sans surveillance directe. • Vérifiez l’ajustement du collier pour éviter une pression excessive: vous devez pouvoir passer un doigt entre les contacteurs et la peau de votre chat. • Examinez soigneusement votre chat tous les jours pour vérifier l’absence de tout signe de rougeur ou de douleur.
Renfiler le collier Boucle coulissante 20 La boucle coulissante évite que le collier ne se desserre. www.petsafe.
Conditions d’utilisation et limitation de la responsabilité 1. Conditions d’utilisation Ce produit vous est proposé sous réserve que vous vous engagiez à respecter les conditions d’utilisation définies ci-après. Utiliser ce produit revient à accepter pleinement et entièrement de l’ensemble desdites conditions d’utilisation. 2. Utilisation appropriée Ce produit est prévu pour une utilisation sur les animaux domestiques lorsqu’un dressage est souhaitable.
dommage résultant de l’utilisation ou de l’abus de ce produit. L’acquéreur endosse tous les risques et responsabilités découlant de l’utilisation de ce produit. 5. Modification des conditions d’utilisation Radio Systems Corporation se réserve le droit de modifier les conditions d’utilisation de ce produit. _____________________________________________________ Attention La clôture « In-Ground Cat Fence »™ n’est pas une barrière matérielle.
Conformité Cet équipement a fait l’objet de tests et s’est avéré conforme aux directives européennes Compatibilité électromagnétique, Basse tension et R&TTE. Avant d’utiliser cet équipement en dehors des pays de l’UE, consultez les autorités locales compétentes en matière d’équipements hertziens et d’équipements terminaux de télécommunications (R&TTE).
Nederlands Eerst en vooral willen wij u bedanken voor uw aankoop en uw vertrouwen in ons PetSafe® product. Het is onze opdracht om de veiligheid van uw huisdier te verbeteren door u de middelen aan te beiden om uw huidier succesvol af te richten. Als u vragen hebt, neem dan contact op met de klantendienst, of bezoek onze website op www.petsafe.net. ___________________________________________________________________________ Inhoud De ontvangsthalsband klaarmaken .............................................
De ontvangsthalsband klaarmaken Uw ontvangsthalsband wordt geleverd met gemonteerde korte contactpunten. Gebruik de lange contactpunten voor katten met lang of dik haar. Draai de contactpunten met een tang vaster dan handvast aan (A). Controleer wekelijks of ze nog vastzitten. De batterijen plaatsen en verwijderen 1. Draai het batterijdeksel open met een muntstuk, en verwijder het (B). 2. Plaats twee lithiumbatterijen van 3 volt (CR2032-batterijen) in het batterijencompartiment (B). 3.
Het correctieniveau instellen Lees eerst alle onderstaande stappen door, voordat u probeert het correctieniveau in te stellen. 1. Plaats de magneet op de correctieniveausleutelring op het magneetsleutelpunt (wit puntje) de ontvangsthalsband. Het ontvangstverklikkerlicht zal gaan branden. 2. Verwijder de magneet van het sleutelpunt. Het aantal keren dat het licht knippert geeft het correctieniveau aan. 3.
Tabel “Functies en Reacties” Reactie verklikkerlicht Correctieniveau Functie ontvangsthalsband Temperament van de kat 1 keer knipperen 1 Geen statische correctie, alleen een pieptoon 2 keer knipperen 2 Kleine statische correctie Schuchter 3 keer knipperen 3 Matige statische correctie Schuchter of gemiddeld 4 keer knipperen 4 Middelgrote statische Gemiddeld of correctie energiek 5 keer knipperen 5 Grote statische correctie Knippert één keer om de 4 tot 5 seconden Zeer energiek Batterij
De ontvangsthalsband aanpassen Belangrijk: Een goede pasvorm en plaatsing van de ontvangsthalsband is belangrijk voor het africhten. De contactpunten moeten rechtstreeks contact maken met de huid van de kat onderaan in zijn hals. Volg de onderstaande stappen om de halsband aan te D passen: 1. Zorg dat de batterijen niet geplaatst zijn in de ontvangsthalsband. 2. Begin, wanneer uw kat comfortabel rechtstaat (D). 3. Plaats de contactpunten onderaan in de hals van de kat, in aanraking met de huid.
6. Knip de halsband als volgt bij (F): a. Markeer de gewenste lengte van de ontvangsthalsband met een pen. Voorzie in extra lengte, als uw kat nog jong is, of een dikke winterpels aanmaakt. b. Neem de ontvangsthalsband af, en knip de overtollige lengte af. c. Smelt het gerafelde uiteinde samen met een vlam, alvorens uw kat de ontvangsthalsband opnieuw om te doen. E F www.petsafe.
Belangrijk: Neem voor het draagcomfort, de veiligheid en de goede werking de onderstaande instructies in acht: • Gebruik het toestel in de twee eerste weken van de training niet zonder rechtstreeks toezicht. • Controleer de pasvorm. De druk is niet te groot, wanneer u één vinger kunt steken tussen het contactpunt en de huid van uw huisdier. • Uw huisdier moet dagelijks zorgvuldig onderzocht worden op sporen van huiduitslag of pijnlijke plekken.
De halsband opnieuw inrijgen Schuifgesp De schuifgesp voorkomt dat de halsband los rond de hals van de kat gaat hangen. www.petsafe.
Gebruiksvoorwaarden en aansprakelijkheidsbeperking 1. Gebruiksvoorwaarden Dit product wordt u aangeboden op voorwaarde dat u de voorwaarden en waarschuwingen vervat in dit document ongewijzigd aanvaardt. Het gebruik van het product impliceert de aanvaarding van alle dergelijke voorwaarden en waarschuwingen. 2. Eigenlijk gebruik Dit product is bedoeld om te gebruiken op huisdieren waarvoor training gewenst is. Het specifieke temperament van uw huisdier kan onverenigbaar zijn met dit product.
dan ook die voorvloeit uit, of verband houdt met het gebruik of verkeerd gebruik van dit product. De koper draagt alle risico’s en aansprakelijkheid die ontstaan uit het gebruik van dit product. 5. Wijziging van de Algemene Voorwaarden Radio Systems Corporation behoudt zich het recht voor om de algemene voorwaarden en waarschuwingen waartegen en waarmee dit product wordt aangeboden, te wijzigen.
Naleving Deze apparatuur werd getest en is in naleving bevonden van de relevante Europese richtlijnen inzake elektromagnetische compatibiliteit, lage spanning en R&TTE. Raadpleeg de relevante plaatselijke R&TTE instantie vooraleer deze apparatuur buiten Europa te gebruiken.
Español Gracias por elegir PetSafe®, la primera marca del mundo en venta de soluciones de adiestramiento electrónico. Nuestro objetivo es conseguir la seguridad de su mascota proporcionándole a usted las herramientas y técnicas de adiestramiento correcto. Si tiene alguna duda, consulte el Centro de Atención al Cliente o visite nuestro sitio web www.petsafe.net. ___________________________________________________________________________ Índice de contenidos Preparar el collar receptor ......................
Preparar el collar receptor El collar receptor viene con puntos de contacto cortos instalados. Utilice los puntos de contacto largos para gatos con pelo largo o espeso. Apriete medio giro los puntos de contacto con alicates más allá del ajuste del dedo (A). Compruebe semanalmente el ajuste. Para instalar y extraer las pilas 1. Con una moneda, abra la tapa de la pila y sáquela (B). 2. Introduzca dos pilas de litio de 3 voltios (CR2032) en el compartimiento de pilas (B). 3.
Para ajustar el nivel de corrección Lea todos los pasos antes de intentar ajustar el nivel de corrección. 1. Coloque el imán en el anillo de la llave del nivel de corrección al lado del punto de llave del imán en el collar receptor. La luz indicadora del receptor se encenderá. 2. Quite el imán del punto de llave. El número de parpadeos indica el nivel de corrección. 3. Para aumentar el nivel de corrección, coloque el imán al lado del punto de llave del imán antes de 5 segundos de realizar el anterior paso.
Tabla de respuestas y funciones Respuesta de la Nivel de luz indicadora corrección Función del collar receptor 1 destello 1 Sin corrección estática, sólo pitido 2 destellos 2 Corrección estática baja Tímido 3 destellos 3 Corrección estática media Tímido o normal 4 destellos 4 Corrección estática media-alta Normal o energía alta 5 destellos 5 Corrección estática alta Energía alta Parpadea una vez cada 4 ó 5 segundos Temperamento del gato Pila con poca carga Nota: Empiece a adiestrar c
Ajustar el collar receptor Importante: El ajuste y la colocación adecuados del collar receptor son importantes para un adiestramiento efectivo. Los puntos de contacto deben tocar directamente la piel del gato debajo del cuello. Para asegurar un ajuste correcto, siga el siguiente D procedimiento: 1. Asegúrese de que las pilas no estén instaladas en el collar receptor. 2. Empiece con el gato cómodamente de pie (D). 3. Centre los puntos de contacto debajo del cuello del gato, tocando la piel.
6. Recorte el collar de la siguiente forma (F): a. Marque la longitud deseada del collar receptor con un bolígrafo. Deje un margen para el crecimiento si su gato es aún joven o si le crece un pelo muy espeso. b. Quite el collar receptor del gato y corte la parte sobrante. c. Antes de colocar el collar receptor en el gato, selle el extremo del collar cortado aplicando una llama a lo largo del extremo deshilachado. 40 E F www.petsafe.
Importante: Para conseguir la máxima comodidad, seguridad y efectividad de este producto, asegúrese de lo siguiente: • Durante las primeras dos semanas de adiestramiento, no utilice el aparato de adiestramiento en su animal sin una supervisión directa. • Para evitar una presión excesiva, compruebe el ajuste introduciendo un dedo entre el punto de contacto y la piel del gato. • Examine con cuidado al gato diariamente para comprobar que no haya señales de erupciones cutáneas o ulceraciones.
Para fijar el collar Hebilla deslizante 42 La hebilla deslizante impide que el collar quede holgado en el cuello del gato. www.petsafe.
Condiciones de uso y limitación de responsabilidad 1. Condiciones de uso Este producto se ofrece bajo condición de su aceptación sin modificación de los términos, condiciones y avisos aquí contenidos. El uso de este producto implica la aceptación de estos términos, condiciones y avisos. 2. Uso adecuado Este producto está diseñado para su uso con animales domésticos a los que se quiera adiestrar. El carácter específico de su animal doméstico puede impedir que este producto funcione.
perjuicio directo, indirecto, punitivo, incidental, especial o consecuente, ni por ningún otro perjuicio, sea cual sea, que se produzca como consecuencia de o relacionado con el uso o mal uso de este producto. El comprador asume todos los riesgos y toda la responsabilidad del uso de este producto. 5. Modificación de los términos y condiciones Radio Systems Corporation se reserva el derecho de cambiar los términos, condiciones y avisos bajo los que se ofrece este producto.
Conformidad Este sistema ha sido puesto a prueba y cumple con los requerimientos de las Directivas pertinentes de la Unión Europea sobre compatibilidad electromagnética, baja tensión y equipos de radio y telecomunicaciones (EU Electromagnetic Compatibility, Low Voltage and R&TTE Directives). Antes de utilizar este equipo en un país que no pertenezca a la Unión Europea, consulte con la autoridad local competente en materia de radio y telecomunicaciones.
Deutsch Vielen Dank, dass Sie sich für PetSafe® entschieden haben, die führende Marke für elektronische Trainingslösungen weltweit. Unsere Aufgabe ist, für die Sicherheit Ihres Haustieres zu sorgen, indem wir Ihnen die erforderlichen Hilfsmittel zur Verfügung stellen und Techniken zeigen, um Ihr Tier erfolgreich zu trainieren. Sollten Sie Fragen haben, dann nehmen Sie bitte mit dem Kundendienstzentrum Kontakt auf oder besuchen Sie unsere Webseite unter www.petsafe.net.
Das Empfängerhalsband vorbereiten Das Empfängerhalsband wird mit kurzen Kontaktstiften geliefert, die werksseitig montiert wurden. Benutzen Sie die langen Kontaktstifte für Katzen mit langem oder dichtem Fell. Ziehen Sie die Kontaktstifte mit einer Zange eine halbe Umdrehung über den Punkt hinaus fest, bis zu dem Sie sie mit der Hand schrauben A 2 können (A). Überprüfen Sie ihren festen Sitz ein Mal wöchentlich. 1 Batterien einlegen und auswechseln www.petsafe.net 2 3 5 4 3 A-67 1.
Einstellen der Intensität des statischen Stromreizes Lesen Sie alle Schritte durch, bevor Sie versuchen, die Intensität des statischen Stromreizes einzustellen. 1. Halten Sie den Magneten am Magnetschlüsselring an den Magnetschlüssel-Kontaktpunkt am Empfängerhalsband. Die Empfänger-Leuchtanzeige leuchtet auf. 2. Entfernen Sie den Magneten vom Kontaktpunkt. Die Anzahl der Blinkzeichen zeigt die Intensität des statischen Stromreizes an. 3.
Funktions- und Reaktionsübersicht Blinken der Intensität des Empfängerstatischen Leuchtanzeige Stromreizes Einmaliges Blinken 1 Zweimaliges Blinken Dreimaliges Blinken Viermaliges Blinken Fünfmaliges Blinken Ein Blinkzeichen alle vier bis fünf Sekunden 2 3 4 5 Funktion des Empfängerhalsbandes Kein statischer Stromreiz, nur Piepton Geringer statischer Stromreiz Mittelstarker statischer Stromreiz Mittelstarker bis starker statischer Stromreiz Starker statischer Stromreiz Temperament der Katze Scheu Scheu
Empfängerhalsband anpassen Wichtig: Der richtige Sitz und die richtige Platzierung des Empfängerhalsbandes sind wichtig für ein effektives Training. Die Kontaktstifte müssen direkten Kontakt mit der Haut an der Kehle der Katze haben. Um den richtigen Sitz zu gewährleisten, befolgen Sie D bitte folgende Schritte: 1. Stellen Sie sicher, dass die Batterien nicht in das Empfängerhalsband eingesetzt sind. 2. Lassen Sie Ihre Katze entspannt stehen (D). 3.
6. Kürzen Sie das Halsband wie folgt (F): a) Markieren Sie die gewünschte Länge des Empfängerhalsbandes mit einem Stift. Wenn Ihre Katze noch jung ist oder ein dichtes Winterfell bekommt, sollten Sie berücksichtigen, dass Sie später mehr Länge benötigen könnten. b) Nehmen Sie Ihrer Katze das Empfängerhalsband ab und schneiden Sie die überschüssige Länge davon ab.
Wichtig: Für Komfort, Sicherheit und Effektivität des Produkts sollten Sie bitte Folgendes sicherstellen: • In den ersten zwei Wochen des Trainings sollten Sie Ihre Katze mit angelegtem Gerät nicht ohne direkte Aufsicht lassen. • Überprüfen Sie den Sitz, um zu hohen Druck zu verhindern, indem Sie einen Finger zwischen den Kontaktstift und die Haut Ihrer Katze schieben. • Ihr Tier muss täglich sorgfältig auf Anzeichen eines Ausschlags oder auf wund geriebene Stellen untersucht werden.
Das Halsband einfädeln Gleitschnalle Die Gleitschnalle verhindert, dass das Halsband sich am Hals der Katze lockert. www.petsafe.
Benutzungsbedingungen und Haftungsbeschränkung 1. Benutzungsbedingungen Dieses Produkt wird Ihnen unter der Voraussetzung angeboten, dass Sie die hierin enthaltenen Verkaufs- und Lieferbedingungen und Hinweise ohne Änderung akzeptieren. Die Benutzung dieses Produkts unterstellt die Akzeptanz aller derartigen Verkaufs- und Lieferbedingungen und Hinweise. 2. Sachgemäße Verwendung Dieses Produkt wurde zur Verwendung bei Tieren entwickelt, die Training benötigen.
ergeben oder damit zusammenhängen. Der Käufer trägt alle Risiken und übernimmt die gesamte Haftung im Zusammenhang mit der Verwendung dieses Produkts. 5. Änderung der Verkaufs- und Lieferbedingungen Radio Systems Corporation behält sich das Recht vor, die Verkaufs- und Lieferbedingungen und Hinweise zu ändern, in deren Rahmen das Produkt angeboten wird.
Erfüllung der Auflagen Dieses Gerät wurde getestet und erfüllt die Anforderungen der relevanten EU-Richtlinien für elektromagnetische Verträglichkeit, Niederspannung und R&TTE. Vor dem Gebrauch dieses Gerätes außerhalb von EU-Ländern nehmen Sie mit den entsprechenden für R&TTE-Auflagen zuständigen Behörden vor Ort Rücksprache.
Italiano Grazie per aver scelto PetSafe®, leader mondiale nelle soluzioni elettroniche per l’addestramento. La nostra missione è quella di garantire la sicurezza del vostro animale offrendovi tutti gli strumenti e le tecniche necessarie per addestrare il vostro animale con successo. Per qualsiasi domanda contattate il Centro Assistenza Clienti oppure visitate il nostro sito web www.petsafe.net.
Preparazione del Collare Ricevitore Il Collare Ricevitore è fornito equipaggiato con Punti di Contatto corti. Utilizzate i Punti di Contatto lunghi per gatti a pelo lungo o fitto. Servendovi di pinze serrate i punti di contatto di mezzo giro dopo averli stretti a mano (A). Verificate il serraggio con frequenza settimanale. Come inserire e rimuovere le batterie 1. Utilizzando una moneta, sbloccate lo sportello della batteria e rimuovetelo (B). 2.
Come regolare il Livello di Correzione Leggete attentamente tutte le fasi prima di regolare il Livello di Correzione. 1. Posizionate il magnete del portachiavi magnetico accanto al punto magnetico presente sul Collare Ricevitore. L’Indicatore Luminoso del Ricevitore si accende. 2. Rimuovete il magnete dal punto magnetico. Il numero di lampeggiamenti indica il Livello di Correzione. 3.
Tabella Funzioni e Risposte Risposta dell’Indicatore Livello di Correzione Funzione del Collare Ricevitore Temperamento del gatto 1 lampeggiamento 1 Nessuna correzione statica, solo segnale acustico 2 lampeggiamenti 2 Correzione statica bassa Timido 3 lampeggiamenti 3 Correzione statica media Timido o medio 4 lampeggiamenti 4 Correzione statica medio-alta Mediamente o molto attivo 5 lampeggiamenti 5 Correzione statica alta Molto attivo Lampeggia una volta ogni 4-5 secondi Batteria sc
Applicazione del Collare Ricevitore Importante: Il corretto posizionamento del Collare Ricevitore è fondamentale per un addestramento efficace. I Punti di Contatto devono essere direttamente a contatto con la pelle dell’animale nella parte inferiore del collo. Per assicurare un posizionamento adeguato procedete D come segue: 1. Verificate che le batterie non siano installate nel Collare Ricevitore. 2 Fate assumere al gatto una comoda posizione eretta (D). 3.
4. Controllate il corretto E posizionamento del Collare Ricevitore inserendo un dito fra l’estremità finale di un Punto di Contatto ed il collo dell’animale. Il collare deve essere aderente ma non eccessivamente stretto (E). 5. Lasciate indossare il Collare Ricevitore all’animale per qualche minuto, dopodiché ricontrollate nuovamente l’aderenza, man mano che l’animale si sentirà F a proprio agio con il Collare Ricevitore. 6. Rifilate il collare come segue (F): a.
www.petsafe.
Importante: Per garantire la confortevolezza, sicurezza ed efficacia del prodotto, verificate i seguenti punti: • Durante le prime 2 settimane di addestramento, non utilizzate il dispositivo sul vostro animale senza una supervisione diretta. • Controllate che il collare non eserciti una pressione eccessiva. A tale scopo deve essere possibile inserire un dito fra il Punto di Contatto e la pelle dell’animale.
Come regolare il collare Cinghia scorrevole La cinghia scorrevole impedisce l’allentamento del collare intorno al collo dell’animale. www.petsafe.
Condizioni di utilizzo e limitazione della responsabilità 1. Condizioni di utilizzo Questo Prodotto è offerto soggetto alla vostra accettazione incondizionata dei termini, delle condizioni e delle notifiche contenuti nel presente. L’uso di questo Prodotto implica l’accettazione di tutti questi termini, condizioni ed avvertenze. 2. Utilizzo appropriato Questo Prodotto è destinato all’addestramento di animali. Il temperamento specifico del vostro animale potrebbe non essere compatibile con il prodotto.
natura derivanti da o in associazione all’uso o all’abuso di questo Prodotti. L’acquirente si assume tutti i rischi e le responsabilità derivanti dall’uso di questo Prodotto. 5. Variazione dei Termini e delle Condizioni Radio Systems Corporation si riserva il diritto di modificare i termini, le condizioni e le avvertenze associate all’offerta di questo Prodotto. _____________________________________________________ Avvertenza Il sistema PetSafe In-Ground Cat Fence™ NON è una barriera solida.
Radio Systems Corporation 10427 Electric Avenue Knoxville, TN 37932 (865) 777-5404 www.petsafe.