PARE ARRÊT IF YOU EXPERIENCE ANY DIFFICULTY IN USING THIS PRODUCT, PLEASE CONTACT OUR CUSTOMER SERVICE DEPARTMENT AT 1-800-421-1902 BETWEEN THE HOURS OF 8:30 A.M. AND 5:00 P.M. PACIFIC STANDARD TIME FOR ASSISTANCE. PLEASE HAVE YOUR MODEL NUMBER AND MANUFACTURING DATE AVAILABLE WHEN YOU CALL. THIS INFORMATION CAN BE FOUND ON A SMALL STICKER ON THE PRODUCT.
Read all instructions BEFORE assembly and USE of product. Lea todas las instrucciones ANTES de armar y USAR el producto. Lire toutes les instructions AVANT le montage et l'UTILISATION du produit. KEEP INSTRUCTIONS FOR FUTURE USE. CONSERVE LAS INSTRUCCIONES PARA UTILIZARLAS EN EL FUTURO. GARDER LE MANUEL D'INSTRUCTIONS POUR S'Y RÉFÉRER AU BESOIN.
Warning WARNING: Please follow all of these instructions to ensure the safety of your pet. Keep these instructions for future reference. WARNING: Failure to follow these instructions could result in serious injury or death. Avoid serious injury from falling or sliding out. WARNING: Never leave pet unattended. Do not leave pet unattended in stroller. WARNING: Wheels can detach and cause the jogger to tip over. Pull on the wheels to ensure they are securely attached.
Warning • Before making adjustments to the stroller, make sure the pet is clear of any moving parts. • DO NOT stroll without all compartments closed. When riding with the bike adapter, always secure your pet with the adjustable safety leash adjusted to the correct length. • Apply brakes whenever the stroller is parked. • Fabric is machine washable with like colors, gentle cycle, line dry only. • Check your stroller for loose screws, worn parts, torn material or stitching on a regular basis.
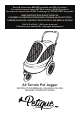
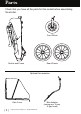
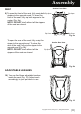
Parts Check that you have all the parts for this model before assembling the stroller. Front Wheel Stroller and Frame Rear Wheels Optional Accessories Rain Cover |3| Copyright © 2019, Petique, Inc., All Rights Reserved.
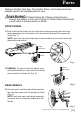
Parts Remove stroller from box. The stroller frame, front wheel and rear wheels need to be installed prior to use. WARNING: Please follow all of these instructions to ensure the safety of your pet. Failure to follow these instructions could result in serious injury or death. FRONT WHEEL 1) Push and hold the button on top of the front wheel post and insert the front wheel assembly into the bottom of the front wheel post until the spring clip clicks (Fig. 1).
Assembly Fig. 4a Fig. 4b 4) REMOVE: To remove each rear wheel, push the button at the center of the wheel inward and hold (Fig. 4a) and pull the wheel outward (Fig. 4b). • NEVER use the stroller if the wheels are not locked into place, if there’s any issue contact our customer service department immediately at 1-800-421-1902, between the hours of 8:30am and 5:00pm PST, for assistance. UNFOLD STROLLER WARNING: Care must be taken when unfolding the stroller to prevent finger entrapment.
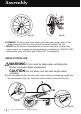
Assembly 6) Lift up on the stroller handle with both hands until the stroller frame is in the open position (Fig. 6a). Locate the frame lock on each side of the stroller. Push the frame lock outward and then down until the frame is locked (Fig. 6b). NOTE: The frame lock on both sides must be securely locked before use. 2. Down 1. Outward Fig. 6a Locked Fig. 6b CONTINUE ON NEXT PAGE Copyright © 2019, Petique, Inc., All Rights Reserved.
Assembly MULTI-POSITION HANDLE 7) To adjust the handle, press the button on both sides to move the handle up or down to a comfortable position for the user (Fig. 7). BRAKES WARNING: Always set brakes when the stroller is not being pushed so that the stroller will not roll away. NEVER leave stroller unattended on a hill or incline as the stroller may slide down the hill. Fig. 7 8) To engage brakes, apply light downward pressure to the brake lever bar located on the bottom back of the stroller.
Assembly SEAT Stroller Front View 9) To open the front of the seat, fully unzip both Zip Open zippers to the opposite ends. To close the front of the seat, fully zip both zippers to the center (Fig. 9a). NOTE: DO NOT stroll without all the zippers of the seat are closed. Zip Open Zip Close Zip Close Fig. 9a To open the rear of the seat, fully unzip the zipper to the opposite end. To close the rear of the seat, fully zip the zipper to the opposite end (Fig. 9b).
Assembly TO FOLD STROLLER WARNING: Care must be taken when folding and unfolding the stroller to prevent finger entrapment. CAUTION: Do not allow pet near stroller while folding. 11) Locate the frame lock on each side of the stroller. Push the frame lock outward and then up until the frame is unlocked on both sides(Fig. 11a). Push the stroller handle with both hands forward until the stroller frame is folded (Fig. 11b). 2. Up 1. Outward Fig. 11a Fig.
Assembly TIRE INFLATION 13) Check the pressure before using the stroller. DO NOT INFLATE above the maximum recommended inflation pressure that is on the side of the tire. Over inflation may cause the tire to blowout and could result in serious injury. NOTE: Only use hand pump. DO NOT USE air compressor to inflate the tire. RAIN COVER (OPTIONAL) 14) Release the four rear attachments of the rain cover and place the rain cover over the stroller (Fig. 14a). Attach the four rear attachments (Fig. 14b).
Assembly BIKE ADAPTER (OPTIONAL) WARNING: Always make sure all compartments opening are closed after pet is loaded. • When riding with the bike adapter, always secure your pet with the adjustable safety leash adjusted to the correct length. • Using the stroller's bike adapter will require extra stopping distance. • Use only on smooth roads. DO NOT ride over bumps, curbs, or potholes. 15) When using the bike adapter, the front wheel may either be kept on or removed. to Remove the front wheel see step 2.
Assembly Align the hole of the slot with one of the holes in the Tow Arm. Insert the Large Pin through the hole and lock the Pin (Fig. 17c). NOTE: pull onto the Pin and then pull onto the Tow Arm to make sure it is locked and secure. 18) Unscrew the bolt from the bike rear wheel (Fig. 18a). Insert the S Type Hook through the bike wheel post. Make sure the angle of the S Type Hook is facing away from the bike. Screw the bike rear wheel bolt back on (Fig. 18b). NOTE: make sure the bolt is locked and secure.
Assembly 19) Insert the end of the Tow Arm to the hole of the S Type Hook. Insert the Small Pin through the hole of the Tow Arm and lock the Pin (Fig. 19). NOTE: pull onto the Pin and then pull onto the Tow Arm to make sure it is locked and secure. Bike and Stroller Top View Fig. 19 | 13 | Copyright © 2019, Petique, Inc., All Rights Reserved.
ADJUSTABLE LEASHES AND PATENED PEE PAD FUNCTION To close the seat, fully open the canopy. Zip the zipper of the front mesh window to the opposite ends .To open the seat, fully unzip zippers of the front mesh window to the opposite ends. You can find three adjustable leashes inside the seat. Adjust each accordingly to your pet when in use. The removable seat has a pee pad insert feature.(Fig. 20). Removable Seat Pad Opening for pee pad insertion. Fig.
Advertencia ADVERTENCIA: Por favor, sigas todas estas instrucciones para asegurar la seguridad de su mascota. Conserve estas instrucciones para consultarlas en el futuro. ADVERTENCIA: No seguir estas advertencias y las instrucciones podría causarle heridas graves e incluso la muerte a su mascota. Evite lesiones graves provocadas por caídas o resbalones desde el cochecito. ADVERTENCIA: Nunca deje a su mascota sin supervisión. No deje a su mascota sin supervisión en el cochecito.
Advertencia • Antes de hacer ajustes al cochecito, asegúrese de que su mascota esté a salvo de las partes movibles. • NO vaya de paseo sin antes cerrar todos los compartimientos. Cuando lo utilice con el adaptador para bicicleta, siempre asegure a su mascota con la correa de seguridad ajustable de acuerdo al tamaño de su mascota. • Active los frenos cuando el cochecito no esté en movimiento • La tela puede lavarse a máquina con colores similares en ciclo suave y debe dejar que se seque al aire únicamente.
Partes Asegúrese de contar con todas las partes del modelo antes de armar el cochecito. Rueda delantera Cochecito y estructura Ruedas traseras Accesorios opcionales Protector para lluvia | 17 | Copyright © 2019, Petique, Inc., All Rights Reserved.
Partes Retire el cochecito de la caja. La estructura, la rueda delantera y las ruedas traseras deben ser instaladas antes de utilizar el producto. ADVERTENCIA: Por favor, sigas todas estas instrucciones para asegurar la seguridad de su mascota. No seguir estas advertencias y las instrucciones podría causarle heridas graves e incluso la muerte a su mascota.
Armado 4) RETIRAR: Para retirar cada una de las ruedas, presione el botón en el centro de la rueda hacia adentro y manténgalo presionado (Fig. 4a) y tire de la rueda hacia afuera (Fig. 4b). Fig. 4b Fig. 4a • NUNCA utilice el cochecito si las ruedas no están aseguradas en su lugar. En caso de que exista un inconveniente, contacte a nuestro servicio de atención al cliente al 1-800-421-1902, entre las 8:30am y las 5:00pm PST, para obtener ayuda.
Armado 6) Levante la palanca del cochecito con ambas manos hasta que la estructura del cochecito quede en la posición abierta (Fig. 6a). Localice el seguro de la estructura en cada lado del cochecito. Empuje el seguro de la estructura hacia afuera y luego hacia abajo hasta que la estructura quede bloqueada (Fig. 6b). 2. Abajo 1. Hacia afuera Fig. 6a Bloqueado Fig. 6b CONTINÚA EN LA SIGUIENTE PÁGINA Copyright © 2019, Petique, Inc., All Rights Reserved.
Armado AVISO: El seguro de la estructura en ambos lados debe estar correctamente bloqueado antes de utilizar el producto. MANIJA MULTI-POSICIÓN 7) Para ajustar la manija, presione el botón en ambos lados para mover la manija hacia arriba o hacia abajo hasta una posición cómoda para el usuario (Fig. 7). FRENOS Fig. 7 ADVERTENCIA: Siempre active los frenos cuando el cochecito no esté siendo empujado para evitar que se deslice.
Armado Vista frontal del cochecito ASIENTO 9) Para abrir la parte delantera del asiento, abra completamente ambos cierres hasta los extremos opuestos. Para cerrar la parte delantera del asiento, cierre completamente ambos cierres hasta el centro (Fig. 9a). AVISO: NO vaya de paseo sin cerrar todos los cierres del asiento. Cierre abierto Cierre abierto Cierre cerrado Cierre cerrado Fig. 9a Para abrir la parte trasera del asiento, abra completamente el cierre hasta el extremo opuesto.
Armado PLEGAR EL COCHECITO ADVERTENCIA: Tenga cuidado con los dedos al plegar el cochecito. CUIDADO: No permita que su mascota se acerque al momento de plegar el cochecito. 11) Localice el seguro de la estructura en cada lado del cochecito. Empuje el seguro de la estructura hacia afuera y luego hacia abajo hasta que la estructura quede bloqueada en ambos lados (Fig. 11a). Empuje la manija del cochecito con ambas manos hacia adelante hasta que la estructura se pliegue (Fig. 11b). 2. Arriba 1.
Armado AIRE DE LAS RUEDAS 13) Revise la presión antes de utilizar el cochecito. NO LAS INFLE por encima de la presión máxima recomendada que se encuentra en la parte lateral de la rueda. Inflarlas de manera excesiva puede causar que la rueda explote y generar serias lesiones. AVISO: Utilice únicamente bombas manuales. NO USE compresores de aire para inflar la rueda. PROTECTOR PARA LLUVIA (OPCIONAL) 14) Suelte las cuatro sujeciones traseras del protector para lluvia y colóquelo sobre el cochecito (Fig.
Armado ADAPTADOR PARA BICICLETAS (OPCIONAL) ADVERTENCIA: Siempre asegúrese de que todos los compartimientos estén cerrados luego de colocar a la mascota en el cochecito. • Cuando lo utilice con el adaptador para bicicleta, siempre asegure a su mascota con la correa de seguridad ajustable de acuerdo al tamaño de su mascota. • Utilizar el adaptador para bicicletas requerirá una mayor distancia para de frenado. • Utilícelo únicamente en caminos nivelados. NO circule sobre baches, banquetas o pozos.
Armado Alinee el orificio de la ranura con uno de los orificios del enganche. Inserte el perno grande a través del orificio y asegure el perno (Fig. 17c). AVISO: tire del perno y luego haga lo mismo con el enganche para cerciorarse de que estén firmemente asegurados. 18) Afloje el tornillo de la rueda trasera de la bicicleta (Fig. 18a). Inserte el gancho tipo S a través del poste de la rueda de la bicicleta. Asegúrese de que el ángulo del gancho tipo S apunte en dirección opuesta a la bicicleta.
Armado 19) Inserte el extremo del enganche en el orificio del gancho tipo S. Inserte el perno pequeño a través del orificio del enganche y asegure el perno (Fig. 19). AVISO: tire del perno y luego haga lo mismo con el enganche para cerciorarse de que estén firmemente asegurados. Bike and Stroller Top View Fig. 19 | 27 | Copyright © 2019, Petique, Inc., All Rights Reserved.
FUNCIONES AJUSTABLES Y “PEE PAD” PATENADAS Para cerrar el asiento, abra completamente la cubierta. Cierre e cierre de la ventanilla delantera a los extremos opuestos. Para abrir el asiento, descomprima abra el cierre de la ventana de malla delantera en los extremos opuestos.Puedes encontrar tres correas ajustables dentro del asiento. Ajuste cada una de acuerdo a su mascota cuando esté en uso. El asiento extraíble tiene una función de inserción de almohadilla de orina.(Fig.
Avertissement AVERTISSEMENT : Respectez toutes ces instructions pour assurer la sécurité de votre animal de compagnie. Conserver ces instructions pour s’y référer au besoin. AVERTISSEMENT : Le non-respect de ces instructions d’emploi peuvent entraîner des blessures graves ou la mort. Évitez les blessures graves en tombant ou en glissant. AVERTISSEMENT : Ne jamais laisser un animal de compagnie sans surveillance. Ne pas laisser un animal de compagnie sans surveillance dans la poussette.
Avertissement • NE JAMAIS permettre que votre poussette soit utilisée comme un jouet. • Toujours ranger la poussette dans un endroit propre et sec. • Avant d’effectuer des réglages sur la poussette, assurez-vous que l'animal ne se trouve pas dans les parties mobiles. • NE PAS se balader avec tous les compartiments fermés. Lorsque vous conduisez avec l'adaptateur de vélo, il faut toujours fixer votre animal de compagnie avec la laisse de sécurité réglable réglée à la longueur appropriée.
Pièces Vérifiez que vous avez toutes les pièces pour ce modèle avant de monter la poussette. Roue avant Poussette et cadre Roues arrière Accessoires optionnels Housse de pluie | 31| Copyright © 2019, Petique, Inc., All Rights Reserved.
Pièces Retirer la poussette de la boîte. Le cadre de la poussette, la roue avant et les roues arrière doivent être installés avant utilisation. AVERTISSEMENT : Respectez toutes ces instructions pour assurer la sécurité de votre animal de compagnie. Le nonrespect de ces instructions d’emploi peuvent entraîner des blessures graves ou la mort.
Montage REMARQUE : tirer sur chaque ensemble de la roue arrière pour s'assurer qu'elle est solidement fixée à la poussette.4) RETRAIT : Pour retirer chaque Fig. 4a Fig. 4b roue arrière, appuyer sur le bouton au centre de la roue vers l'intérieur et maintenir la touche (Fig. 4a) puis tirer la roue vers l'extérieur (Fig. 4b).
Montage 6) Soulever la poignée de la poussette avec les deux mains jusqu'à ce que le cadre de la poussette soit en position ouverte (Fig. 6a). Localise le blocage du cadre de chaque côté de la poussette. Pousser le système de sécurité vers l'extérieur, puis vers le bas jusqu'à ce que le cadre soit bloqué (Fig. 6b). REMARQUE : Le système de sécurité des deux côtés doit être solidement bloqué avant utilisation. 2. Vers le bas 1. Vers l'extérieur Fig. 6a Bloqué Fig.
Montage POIGNÉE À POSITION MULTIPLES 7) Pour régler la poignée, appuyer sur le bouton des deux côtés pour déplacer la poignée vers le haut ou vers le bas jusqu'à l’obtention d’une position confortable pour l'utilisateur (Fig. 7). FREINS AVERTISSEMENT : Toujours régler les freins lorsque la poussette n'est pas poussée pour que la poussette ne roule pas. NE JAMAIS laisser la poussette sans surveillance sur une colline ou inclinée au risque de la voir glisser sur la colline.
Montage Vue avant de la poussette SIÈGE 9) Pour ouvrir le siège, dézipper complètement les deux fermetures à glissière aux extrémités opposées. Pour fermer l’avant du siège, zipper complètement les deux fermetures à glissière vers le centre (Fig. 9a). REMARQUE : NE PAS se balader sans que toutes les fermetures à glissière du siège ne soient fermées.
Montage POUR PLIER LA POUSSETTE AVERTISSEMENT : Des précautions doivent être prises lors du pliage et du dépliage de la poussette pour éviter de coincer les doigts. MISES EN GARDE: Ne pas laisser les animaux de compagnie près de la poussette pendant le pliage. 11) Localiser le blocage du cadre de chaque côté de la poussette. Pousser le système de sécurité vers l'extérieur, puis vers le bas jusqu'à ce que le cadre soit bloqué (Fig. 11a). 2. En haut 1. Vers l'extérieur Fig. 11a Fig.
Montage 12) Pousser le bouton de déverrouillage sur les deux côtés de la poignée et faire pivoter la poignée en position ouverte (Fig. 12a). Bloquer le loquet situé sur le côté (Fig. 12b). GONFLEMENT DES PNEUS 13) Vérifier la pression avant d'utiliser la poussette. NE PAS GONFLER au-dessus de la pression de gonflage maximale recommandée qui se trouve sur le côté du pneu. Un gonflage excessif peut provoquer un éclatement du pneu et entraîner des blessures graves.
Montage 14) Relâcher les quatre attaches arrière de la housse de pluie et la placer sur la poussette (Fig. 14a). Fixer les quatre attaches arrières (Fig. 14b). Placer le crochet de la housse de pluie avant autour de l'essieu de la roue avant pour fixer la housse de pluie (Fig. 14c). ADAPTATEUR DE VÉLO (EN OPTION) AVERTISSEMENT : Toujours s’assurer que toutes les ouvertures des compartiments sont fermées après avoir placé l'animal compagnie à l’intérieur.
Montage 17) Insérer la section droite du bras de remorquage avec les 3 trous en bas de la poussette à travers les deux fentes (Fig. 17a). S’assurer que l'angle du bras de remorquage est tourné vers l'intérieur de la poussette (Fig. 17b). Aligner le trou de la fente avec l'un des trous du bras de remorquage. Insérer la grande broche à travers le trou et bloquer la broche (Fig. 17c). REMARQUE : tirer la broche, puis le bras de remorquage pour s’assurer qu'il est bloqué et sécurisé. Fig.
Montage 19) Insérer l’extrémité du bras de remorquage dans le trou du crochet de type S. Insérer la petite broche à travers le trou du bras de remorquage et bloquer la broche (Fig. 19). REMARQUE : tirer la broche, puis le bras de remorquage pour s’assurer qu'il est bloqué et sécurisé. Vue de dessus du vélo et de la poussette | 41| Copyright © 2019, Petique, Inc., All Rights Reserved.
Montage LAISSES RÉGLABLES ET FONCTION D’INSERTION DE TAPIS DE PROPRETÉ BREVETÉE Pour fermer le siège, ouvrez complètement le couvercle. Fermer la fenêtre avant aux extrémités opposées. Pour ouvrir le siège, décompressez le verrou de la fenêtre maillée avant aux extrémités opposées. Vous pouvez trouver trois sangles réglables à l'intérieur du siège. Ajustez-les en fonction de votre animal quand il est utilisé. Le siège amovible a une fonction d'insertion de tampon d'urine.(Fig.